This is the full developer documentation for Hono.
# Start of Hono documentation
# Hono
Hono - _**在日语中意为火焰🔥**_ - 是一个小型、简单且超快的基于 Web 标准构建的 Web 框架。
它适用于任何 JavaScript 运行时:Cloudflare Workers、Fastly Compute、Deno、Bun、Vercel、Netlify、AWS Lambda、Lambda@Edge 和 Node.js。
快速,但不止于快速。
```ts twoslash
import { Hono } from 'hono'
const app = new Hono()
app.get('/', (c) => c.text('Hono!'))
export default app
```
## 快速开始
只需运行此命令:
::: code-group
```sh [npm]
npm create hono@latest
```
```sh [yarn]
yarn create hono
```
```sh [pnpm]
pnpm create hono@latest
```
```sh [bun]
bun create hono@latest
```
```sh [deno]
deno init --npm hono@latest
```
:::
## 特性
- **超快** 🚀 - 路由器 `RegExpRouter` 非常快。不使用线性循环。快。
- **轻量级** 🪶 - `hono/tiny` 预设小于 14kB。Hono 零依赖,仅使用 Web 标准。
- **多运行时** 🌍 - 适用于 Cloudflare Workers、Fastly Compute、Deno、Bun、AWS Lambda 或 Node.js。相同的代码可在所有平台上运行。
- **功能齐全** 🔋 - Hono 拥有内置中间件、自定义中间件、第三方中间件和辅助函数。功能齐全。
- **愉快的开发体验** 😃 - 超级清晰的 API。一流的 TypeScript 支持。现在,我们拥有了“类型”。
## 用例
Hono 是一个类似于 Express 的简单 Web 应用框架,不含前端。
但它运行在 CDN 边缘,并且结合中间件允许你构建更大的应用程序。
以下是一些用例示例。
- 构建 Web API
- 后端服务器代理
- CDN 前端
- 边缘应用
- 库的基础服务器
- 全栈应用
## 谁在使用 Hono?
| 项目 | 平台 | 用途? |
| -------------------------------------------------------------------------------- | ------------------ | ----------------------------------------------------------------------------------------------------------- |
| [cdnjs](https://cdnjs.com) | Cloudflare Workers | 一个免费开源的 CDN 服务。_Hono 用于 API 服务器_。 |
| [Cloudflare D1](https://www.cloudflare.com/developer-platform/d1/) | Cloudflare Workers | 无服务器 SQL 数据库。_Hono 用于内部 API 服务器_。 |
| [Cloudflare Workers KV](https://www.cloudflare.com/developer-platform/workers-kv/) | Cloudflare Workers | 无服务器键值数据库。_Hono 用于内部 API 服务器_。 |
| [BaseAI](https://baseai.dev) | Local AI Server | 带有记忆的无服务器 AI 代理管道。一个用于 Web 的开源代理 AI 框架。_使用 Hono 的 API 服务器_。 |
| [Unkey](https://unkey.dev) | Cloudflare Workers | 一个开源的 API 认证和授权平台。_Hono 用于 API 服务器_。 |
| [OpenStatus](https://openstatus.dev) | Bun | 一个开源的网站和 API 监控平台。_Hono 用于 API 服务器_。 |
| [Deno Benchmarks](https://deno.com/benchmarks) | Deno | 一个基于 V8 构建的安全 TypeScript 运行时。_Hono 用于基准测试_。 |
| [Clerk](https://clerk.com) | Cloudflare Workers | 一个开源的用户管理平台。_Hono 用于 API 服务器_。 |
以及以下项目。
- [Drivly](https://driv.ly/) - Cloudflare Workers
- [repeat.dev](https://repeat.dev/) - Cloudflare Workers
想看更多?参见 [谁在生产环境中使用 Hono?](https://github.com/orgs/honojs/discussions/1510)。
## 1 分钟了解 Hono
使用 Hono 为 Cloudflare Workers 创建应用程序的演示。
## 超快
**Hono 是最快的**,相比其他 Cloudflare Workers 的路由器。
```
Hono x 402,820 ops/sec ±4.78% (80 runs sampled)
itty-router x 212,598 ops/sec ±3.11% (87 runs sampled)
sunder x 297,036 ops/sec ±4.76% (77 runs sampled)
worktop x 197,345 ops/sec ±2.40% (88 runs sampled)
Fastest is Hono
✨ Done in 28.06s.
```
参见 [更多基准测试](/docs/concepts/benchmarks)。
## 轻量级
**Hono 非常小**。使用 `hono/tiny` 预设,其最小化后的大小**小于 14KB**。有许多中间件和适配器,但它们仅在使用时才会被打包。作为参考,Express 的大小为 572KB。
```
$ npx wrangler dev --minify ./src/index.ts
⛅️ wrangler 2.20.0
--------------------
⬣ Listening at http://0.0.0.0:8787
- http://127.0.0.1:8787
- http://192.168.128.165:8787
Total Upload: 11.47 KiB / gzip: 4.34 KiB
```
## 多种路由器
**Hono 拥有多种路由器**。
**RegExpRouter** 是 JavaScript 世界中最快的路由器。它使用在调度前创建的单个大型正则表达式来匹配路由。配合 **SmartRouter**,它支持所有路由模式。
**LinearRouter** 注册路由非常快,因此适合每次初始化应用程序的环境。**PatternRouter** 简单地添加和匹配模式,使其小巧。
参见 [关于路由的更多信息](/docs/concepts/routers)。
## Web 标准
得益于使用 **Web 标准**,Hono 可在许多平台上运行。
- Cloudflare Workers
- Cloudflare Pages
- Fastly Compute
- Deno
- Bun
- Vercel
- AWS Lambda
- Lambda@Edge
- 其他
并且通过使用 [Node.js 适配器](https://github.com/honojs/node-server),Hono 可在 Node.js 上运行。
参见 [关于 Web 标准的更多信息](/docs/concepts/web-standard)。
## 中间件与辅助函数
**Hono 拥有许多中间件和辅助函数**。这使得“少写代码,多做事情”成为现实。
开箱即用,Hono 提供以下中间件和辅助函数:
- [基本认证](/docs/middleware/builtin/basic-auth)
- [Bearer 认证](/docs/middleware/builtin/bearer-auth)
- [Body 限制](/docs/middleware/builtin/body-limit)
- [缓存](/docs/middleware/builtin/cache)
- [压缩](/docs/middleware/builtin/compress)
- [上下文存储](/docs/middleware/builtin/context-storage)
- [Cookie](/docs/helpers/cookie)
- [CORS](/docs/middleware/builtin/cors)
- [ETag](/docs/middleware/builtin/etag)
- [html](/docs/helpers/html)
- [JSX](/docs/guides/jsx)
- [JWT 认证](/docs/middleware/builtin/jwt)
- [日志](/docs/middleware/builtin/logger)
- [语言](/docs/middleware/builtin/language)
- [美化 JSON](/docs/middleware/builtin/pretty-json)
- [安全 Headers](/docs/middleware/builtin/secure-headers)
- [SSG](/docs/helpers/ssg)
- [流式传输](/docs/helpers/streaming)
- [GraphQL 服务器](https://github.com/honojs/middleware/tree/main/packages/graphql-server)
- [Firebase 认证](https://github.com/honojs/middleware/tree/main/packages/firebase-auth)
- [Sentry](https://github.com/honojs/middleware/tree/main/packages/sentry)
- 其他!
例如,使用 Hono 添加 ETag 和请求日志记录只需几行代码:
```ts
import { Hono } from 'hono'
import { etag } from 'hono/etag'
import { logger } from 'hono/logger'
const app = new Hono()
app.use(etag(), logger())
```
参见 [关于中间件的更多信息](/docs/concepts/middleware)。
## 开发体验
Hono 提供愉快的"**开发体验**"。
得益于 `Context` 对象,可以轻松访问 Request/Response。
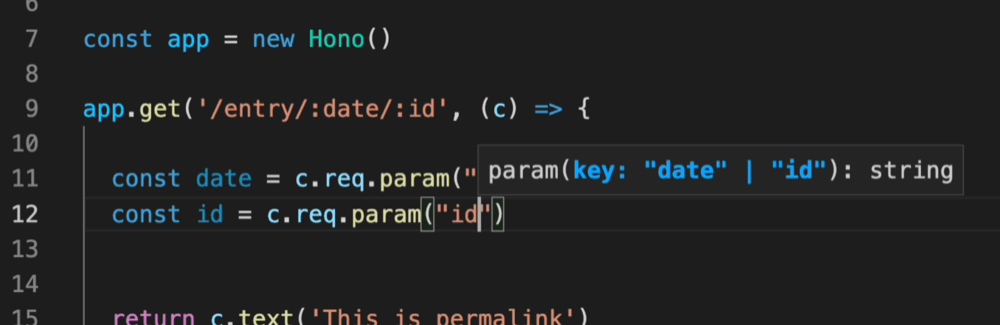
此外,Hono 是用 TypeScript 编写的。Hono 拥有"**类型**"。
例如,路径参数将是字面量类型。
此外,Validator 和 Hono Client `hc` 启用了 RPC 模式。在 RPC 模式下,
你可以使用你喜欢的验证器(如 Zod),并轻松地将服务器端 API 规范共享给客户端,构建类型安全的应用程序。
参见 [Hono 技术栈](/docs/concepts/stacks)。
# 第三方中间件
第三方中间件指的是未捆绑在 Hono 包内的中间件。
这些中间件大多数利用外部库。
### 认证
- [Auth.js(Next Auth)](https://github.com/honojs/middleware/tree/main/packages/auth-js)
- [Casbin](https://github.com/honojs/middleware/tree/main/packages/casbin)
- [Clerk 认证](https://github.com/honojs/middleware/tree/main/packages/clerk-auth)
- [Cloudflare Access](https://github.com/honojs/middleware/tree/main/packages/cloudflare-access)
- [OAuth 提供商](https://github.com/honojs/middleware/tree/main/packages/oauth-providers)
- [OIDC 认证](https://github.com/honojs/middleware/tree/main/packages/oidc-auth)
- [Firebase 认证](https://github.com/honojs/middleware/tree/main/packages/firebase-auth)
- [验证 RSA JWT (JWKS)](https://github.com/wataruoguchi/verify-rsa-jwt-cloudflare-worker)
- [Stytch 认证](https://github.com/honojs/middleware/tree/main/packages/stytch-auth)
### 验证器
- [Ajv 验证器](https://github.com/honojs/middleware/tree/main/packages/ajv-validator)
- [ArkType 验证器](https://github.com/honojs/middleware/tree/main/packages/arktype-validator)
- [Class 验证器](https://github.com/honojs/middleware/tree/main/packages/class-validator)
- [Conform 验证器](https://github.com/honojs/middleware/tree/main/packages/conform-validator)
- [Effect Schema 验证器](https://github.com/honojs/middleware/tree/main/packages/effect-validator)
- [Standard Schema 验证器](https://github.com/honojs/middleware/tree/main/packages/standard-validator)
- [TypeBox 验证器](https://github.com/honojs/middleware/tree/main/packages/typebox-validator)
- [Typia 验证器](https://github.com/honojs/middleware/tree/main/packages/typia-validator)
- [unknownutil 验证器](https://github.com/ryoppippi/hono-unknownutil-validator)
- [Valibot 验证器](https://github.com/honojs/middleware/tree/main/packages/valibot-validator)
- [Zod 验证器](https://github.com/honojs/middleware/tree/main/packages/zod-validator)
### OpenAPI
- [Zod OpenAPI](https://github.com/honojs/middleware/tree/main/packages/zod-openapi)
- [Scalar](https://github.com/scalar/scalar/tree/main/integrations/hono)
- [Swagger UI](https://github.com/honojs/middleware/tree/main/packages/swagger-ui)
- [Swagger Editor](https://github.com/honojs/middleware/tree/main/packages/swagger-editor)
- [Hono OpenAPI](https://github.com/rhinobase/hono-openapi)
- [hono-zod-openapi](https://github.com/paolostyle/hono-zod-openapi)
### 开发
- [ESLint 配置](https://github.com/honojs/middleware/tree/main/packages/eslint-config)
- [SSG 插件必备](https://github.com/honojs/middleware/tree/main/packages/ssg-plugins-essential)
### 监控 / 追踪
- [Apitally (API 监控与分析)](https://docs.apitally.io/frameworks/hono)
- [Highlight.io](https://www.highlight.io/docs/getting-started/backend-sdk/js/hono)
- [LogTape (日志记录)](https://logtape.org/manual/integrations#hono)
- [OpenTelemetry](https://github.com/honojs/middleware/tree/main/packages/otel)
- [Prometheus 指标](https://github.com/honojs/middleware/tree/main/packages/prometheus)
- [Sentry](https://github.com/honojs/middleware/tree/main/packages/sentry)
- [Pino 日志记录器](https://github.com/maou-shonen/hono-pino)
### 服务器 / 适配器
- [GraphQL 服务器](https://github.com/honojs/middleware/tree/main/packages/graphql-server)
- [Node WebSocket 助手](https://github.com/honojs/middleware/tree/main/packages/node-ws)
- [tRPC 服务器](https://github.com/honojs/middleware/tree/main/packages/trpc-server)
### 转译器
- [Bun 转译器](https://github.com/honojs/middleware/tree/main/packages/bun-transpiler)
- [esbuild 转译器](https://github.com/honojs/middleware/tree/main/packages/esbuild-transpiler)
### UI / 渲染器
- [Qwik City](https://github.com/honojs/middleware/tree/main/packages/qwik-city)
- [React 兼容性](https://github.com/honojs/middleware/tree/main/packages/react-compat)
- [React 渲染器](https://github.com/honojs/middleware/tree/main/packages/react-renderer)
### 队列 / 任务处理
- [GlideMQ (消息队列 REST API + SSE)](https://github.com/avifenesh/glidemq-hono)
### 国际化
- [Intlayer i18n](https://intlayer.org/doc/environment/hono)
### 工具
- [Bun 压缩](https://github.com/honojs/middleware/tree/main/packages/bun-compress)
- [Cap Checkpoint](https://capjs.js.org/guide/middleware/hono.html)
- [事件发射器](https://github.com/honojs/middleware/tree/main/packages/event-emitter)
- [地理位置](https://github.com/ktkongtong/hono-geo-middleware/tree/main/packages/middleware)
- [Hono 速率限制器](https://github.com/rhinobase/hono-rate-limiter)
- [Hono 问题详情 (RFC 9457)](https://github.com/paveg/hono-problem-details)
- [Hono 简单 DI](https://github.com/maou-shonen/hono-simple-DI)
- [幂等性 (Stripe 风格幂等键)](https://github.com/paveg/hono-idempotency)
- [jsonv-ts (验证器,OpenAPI, MCP)](https://github.com/dswbx/jsonv-ts)
- [MCP](https://github.com/honojs/middleware/tree/main/packages/mcp)
- [RONIN (数据库)](https://github.com/ronin-co/hono-client)
- [会话](https://github.com/honojs/middleware/tree/main/packages/session)
- [tsyringe](https://github.com/honojs/middleware/tree/main/packages/tsyringe)
- [基于 User Agent 的拦截器](https://github.com/honojs/middleware/tree/main/packages/ua-blocker)
# Basic Auth 中间件
此中间件可以将基本认证应用于指定路径。
使用 Cloudflare Workers 或其他平台实现基本认证比看起来更复杂,但有了这个中间件,这就轻而易举了。
有关基本认证方案如何在底层工作的更多信息,请参阅 [MDN 文档](https://developer.mozilla.org/en-US/docs/Web/HTTP/Authentication#basic_authentication_scheme)。
## 导入
```ts
import { Hono } from 'hono'
import { basicAuth } from 'hono/basic-auth'
```
## 用法
```ts
const app = new Hono()
app.use(
'/auth/*',
basicAuth({
username: 'hono',
password: 'acoolproject',
})
)
app.get('/auth/page', (c) => {
return c.text('You are authorized')
})
```
要限制为特定路由 + 方法:
```ts
const app = new Hono()
app.get('/auth/page', (c) => {
return c.text('Viewing page')
})
app.delete(
'/auth/page',
basicAuth({ username: 'hono', password: 'acoolproject' }),
(c) => {
return c.text('Page deleted')
}
)
```
如果你想自行验证用户,指定 `verifyUser` 选项;返回 `true` 表示接受。
```ts
const app = new Hono()
app.use(
basicAuth({
verifyUser: (username, password, c) => {
return (
username === 'dynamic-user' && password === 'hono-password'
)
},
})
)
```
## 选项
### username: `string`
正在进行认证的用户的用户名。
### password: `string`
用于针对提供的用户名进行认证的密码值。
### realm: `string`
领域的域名,作为返回的 WWW-Authenticate 挑战头的一部分。默认值为 `"Secure Area"`。
查看更多:https://developer.mozilla.org/en-US/docs/Web/HTTP/Headers/WWW-Authenticate#directives
### hashFunction: `Function`
一个用于处理哈希以安全比较密码的函数。
### verifyUser: `(username: string, password: string, c: Context) => boolean | Promise`
用于验证用户的函数。
### invalidUserMessage: `string | object | MessageFunction`
`MessageFunction` 是 `(c: Context) => string | object | Promise`。如果用户无效则返回自定义消息。
### onAuthSuccess: `(c: Context, username: string) => void | Promise`
成功认证后调用的回调函数。这允许你设置上下文变量或执行副作用,而无需重新解析 Authorization 头。
```ts
app.use(
'/auth/*',
basicAuth({
username: 'hono',
password: 'acoolproject',
onAuthSuccess: (c, username) => {
c.set('username', username)
},
})
)
app.get('/auth/page', (c) => {
const username = c.get('username')
return c.text(`Hello, ${username}!`)
})
```
## 更多选项
### ...users: `{ username: string, password: string }[]`
## 示例
### 定义多个用户
此中间件还允许你传递包含定义更多 `username` 和 `password` 对的对象的任意参数。
```ts
app.use(
'/auth/*',
basicAuth(
{
username: 'hono',
password: 'acoolproject',
// 在第一个对象中定义其他参数
realm: 'www.example.com',
},
{
username: 'hono-admin',
password: 'super-secure',
// 不能在此处重新定义其他参数
},
{
username: 'hono-user-1',
password: 'a-secret',
// 或此处
}
)
)
```
或者少硬编码一些:
```ts
import { users } from '../config/users'
app.use(
'/auth/*',
basicAuth(
{
realm: 'www.example.com',
...users[0],
},
...users.slice(1)
)
)
```
# Bearer 认证中间件
Bearer 认证中间件通过验证请求头中的 API 令牌来提供身份认证。
访问端点的 HTTP 客户端将添加 `Authorization` 头,并将 `Bearer {token}` 作为头值。
在终端中使用 `curl`,看起来是这样的:
```sh
curl -H 'Authorization: Bearer honoiscool' http://localhost:8787/auth/page
```
## 导入
```ts
import { Hono } from 'hono'
import { bearerAuth } from 'hono/bearer-auth'
```
## 用法
> [!NOTE]
> 您的 `token` 必须匹配正则表达式 `/[A-Za-z0-9._~+/-]+=*/`,否则将返回 400 错误。值得注意的是,此正则表达式同时兼容 URL 安全的 Base64 和标准 Base64 编码的 JWT。此中间件不要求 bearer 令牌必须是 JWT,只要它匹配上述正则表达式即可。
```ts
const app = new Hono()
const token = 'honoiscool'
app.use('/api/*', bearerAuth({ token }))
app.get('/api/page', (c) => {
return c.json({ message: 'You are authorized' })
})
```
要限制为特定路由 + 方法:
```ts
const app = new Hono()
const token = 'honoiscool'
app.get('/api/page', (c) => {
return c.json({ message: 'Read posts' })
})
app.post('/api/page', bearerAuth({ token }), (c) => {
return c.json({ message: 'Created post!' }, 201)
})
```
要实现多令牌(例如,任何有效令牌都可以读取,但创建/更新/删除仅限于特权令牌):
```ts
const app = new Hono()
const readToken = 'read'
const privilegedToken = 'read+write'
const privilegedMethods = ['POST', 'PUT', 'PATCH', 'DELETE']
app.on('GET', '/api/page/*', async (c, next) => {
// 有效令牌列表
const bearer = bearerAuth({ token: [readToken, privilegedToken] })
return bearer(c, next)
})
app.on(privilegedMethods, '/api/page/*', async (c, next) => {
// 单个有效特权令牌
const bearer = bearerAuth({ token: privilegedToken })
return bearer(c, next)
})
// 定义 GET、POST 等处理器
```
如果您想自行验证令牌的值,请指定 `verifyToken` 选项;返回 `true` 表示接受。
```ts
const app = new Hono()
app.use(
'/auth-verify-token/*',
bearerAuth({
verifyToken: async (token, c) => {
return token === 'dynamic-token'
},
})
)
```
## 选项
### token: `string` | `string[]`
用于验证传入 bearer 令牌的字符串。
### realm: `string`
域名的领域名称,作为返回的 WWW-Authenticate 挑战头的一部分。默认值为 `""`。
查看更多:https://developer.mozilla.org/en-US/docs/Web/HTTP/Headers/WWW-Authenticate#directives
### prefix: `string`
Authorization 头值的前缀(或称为 `schema`)。默认值为 `"Bearer"`。
### headerName: `string`
头名称。默认值为 `Authorization`。
### hashFunction: `Function`
用于处理哈希的函数,以便安全地比较身份验证令牌。
### verifyToken: `(token: string, c: Context) => boolean | Promise`
用于验证令牌的函数。
### noAuthenticationHeader: `object`
自定义请求没有身份验证头时的错误响应。
- `wwwAuthenticateHeader`: `string | object | MessageFunction` - 自定义 WWW-Authenticate 头值。
- `message`: `string | object | MessageFunction` - 响应体的自定义消息。
`MessageFunction` 是 `(c: Context) => string | object | Promise`。
### invalidAuthenticationHeader: `object`
自定义身份验证头格式无效时的错误响应。
- `wwwAuthenticateHeader`: `string | object | MessageFunction` - 自定义 WWW-Authenticate 头值。
- `message`: `string | object | MessageFunction` - 响应体的自定义消息。
### invalidToken: `object`
自定义令牌无效时的错误响应。
- `wwwAuthenticateHeader`: `string | object | MessageFunction` - 自定义 WWW-Authenticate 头值。
- `message`: `string | object | MessageFunction` - 响应体的自定义消息。
# Body Limit 中间件
Body Limit 中间件可以限制请求体的文件大小。
如果存在,此中间件首先使用请求中 `Content-Length` 头部的值。
如果未设置,它会在流中读取主体,如果大于指定的文件大小,则执行错误处理程序。
## 导入
```ts
import { Hono } from 'hono'
import { bodyLimit } from 'hono/body-limit'
```
## 用法
```ts
const app = new Hono()
app.post(
'/upload',
bodyLimit({
maxSize: 50 * 1024, // 50kb
onError: (c) => {
return c.text('overflow :(', 413)
},
}),
async (c) => {
const body = await c.req.parseBody()
if (body['file'] instanceof File) {
console.log(`Got file sized: ${body['file'].size}`)
}
return c.text('pass :)')
}
)
```
## 选项
### maxSize: `number`
想要限制的文件的最大文件大小。默认值是 `100 * 1024` - `100kb`。
### onError: `OnError`
如果超过指定的文件大小,将调用的错误处理程序。
## 在 Bun 中用于大请求的用法
如果显式使用 Body Limit 中间件来允许大于默认值的请求体,则可能需要相应地更改 `Bun.serve` 配置。[撰写本文时](https://github.com/oven-sh/bun/blob/f2cfa15e4ef9d730fc6842ad8b79fb7ab4c71cb9/packages/bun-types/bun.d.ts#L2191),`Bun.serve` 的默认请求体限制为 128MiB。如果将 Hono 的 Body Limit 中间件设置为比该值更大的值,请求仍然会失败,此外,中间件中指定的 `onError` 处理程序不会被调用。这是因为 `Bun.serve()` 会在将请求传递给 Hono 之前将状态代码设置为 `413` 并终止连接。
如果想在 Hono 和 Bun 中接受大于 128MiB 的请求,也需要为 Bun 设置限制:
```ts
export default {
port: process.env['PORT'] || 3000,
fetch: app.fetch,
maxRequestBodySize: 1024 * 1024 * 200, // 此处填写你的值
}
```
或者,根据你的设置:
```ts
Bun.serve({
fetch(req, server) {
return app.fetch(req, { ip: server.requestIP(req) })
},
maxRequestBodySize: 1024 * 1024 * 200, // 此处填写你的值
})
```
# 缓存中间件
缓存中间件使用 Web 标准的 [Cache API](https://developer.mozilla.org/en-US/docs/Web/API/Cache)。
缓存中间件目前支持使用自定义域名的 Cloudflare Workers 项目和使用 [Deno 1.26+](https://github.com/denoland/deno/releases/tag/v1.26.0) 的 Deno 项目。也可用于 Deno Deploy。
Cloudflare Workers 尊重 `Cache-Control` 头并返回缓存的响应。详细信息请参阅 [Cloudflare 文档上的缓存](https://developers.cloudflare.com/workers/runtime-apis/cache/)。Deno 不尊重头信息,因此如果您需要更新缓存,则需要实现自己的机制。
有关每个平台的说明,请参阅下面的 [用法](#usage)。
## 导入
```ts
import { Hono } from 'hono'
import { cache } from 'hono/cache'
```
## 用法
::: code-group
```ts [Cloudflare Workers]
app.get(
'*',
cache({
cacheName: 'my-app',
cacheControl: 'max-age=3600',
})
)
```
```ts [Deno]
// Deno 运行时必须使用 `wait: true`
app.get(
'*',
cache({
cacheName: 'my-app',
cacheControl: 'max-age=3600',
wait: true,
})
)
```
:::
## 选项
### cacheName: `string` | `(c: Context) => string` | `Promise`
缓存的名称。可用于存储具有不同标识符的多个缓存。
### wait: `boolean`
一个布尔值,指示 Hono 是否应在继续请求之前等待 `cache.put` 函数的 Promise 解析。_在 Deno 环境中必须为 true_。默认为 `false`。
### cacheControl: `string`
`Cache-Control` 头的指令字符串。有关更多信息,请参阅 [MDN 文档](https://developer.mozilla.org/en-US/docs/Web/HTTP/Headers/Cache-Control)。当未提供此选项时,不会向请求添加 `Cache-Control` 头。
### vary: `string` | `string[]`
设置响应中的 `Vary` 头。如果原始响应头已包含 `Vary` 头,则合并值,移除任何重复项。将其设置为 `*` 将导致错误。有关 Vary 头及其对缓存策略影响的更多详细信息,请参阅 [MDN 文档](https://developer.mozilla.org/en-US/docs/Web/HTTP/Headers/Vary)。
### keyGenerator: `(c: Context) => string | Promise`
为 `cacheName` 存储中的每个请求生成键。这可用于基于请求参数或上下文参数缓存数据。默认为 `c.req.url`。
### cacheableStatusCodes: `number[]`
应缓存的状态码数组。默认为 `[200]`。使用此选项缓存具有特定状态码的响应。
```ts
app.get(
'*',
cache({
cacheName: 'my-app',
cacheControl: 'max-age=3600',
cacheableStatusCodes: [200, 404, 412],
})
)
```
# 组合中间件
组合中间件将多个中间件函数组合成一个中间件。它提供三个函数:
- `some` - 仅运行给定中间件中的一个。
- `every` - 运行所有给定的中间件。
- `except` - 仅当条件不满足时运行所有给定的中间件。
## 导入
```ts
import { Hono } from 'hono'
import { some, every, except } from 'hono/combine'
```
## 用法
以下是使用组合中间件实现复杂访问控制规则的示例。
```ts
import { Hono } from 'hono'
import { bearerAuth } from 'hono/bearer-auth'
import { getConnInfo } from 'hono/cloudflare-workers'
import { every, some } from 'hono/combine'
import { ipRestriction } from 'hono/ip-restriction'
import { rateLimit } from '@/my-rate-limit'
const app = new Hono()
app.use(
'*',
some(
every(
ipRestriction(getConnInfo, { allowList: ['192.168.0.2'] }),
bearerAuth({ token })
),
// 如果两个条件都满足,rateLimit 将不会执行。
rateLimit()
)
)
app.get('/', (c) => c.text('Hello Hono!'))
```
### some
运行第一个返回 true 的中间件。中间件按顺序应用,如果任何中间件成功退出,后续中间件将不会运行。
```ts
import { some } from 'hono/combine'
import { bearerAuth } from 'hono/bearer-auth'
import { myRateLimit } from '@/rate-limit'
// 如果客户端拥有有效令牌,跳过速率限制。
// 否则,应用速率限制。
app.use(
'/api/*',
some(bearerAuth({ token }), myRateLimit({ limit: 100 }))
)
```
### every
运行所有中间件,如果其中任何一个失败则停止。中间件按顺序应用,如果任何中间件抛出错误,后续中间件将不会运行。
```ts
import { some, every } from 'hono/combine'
import { bearerAuth } from 'hono/bearer-auth'
import { myCheckLocalNetwork } from '@/check-local-network'
import { myRateLimit } from '@/rate-limit'
// 如果客户端在本地网络中,跳过认证和速率限制。
// 否则,应用认证和速率限制。
app.use(
'/api/*',
some(
myCheckLocalNetwork(),
every(bearerAuth({ token }), myRateLimit({ limit: 100 }))
)
)
```
### except
除非满足条件,否则运行所有中间件。你可以传递字符串或函数作为条件。如果需要匹配多个目标,请将它们作为数组传递。
```ts
import { except } from 'hono/combine'
import { bearerAuth } from 'hono/bearer-auth'
// 如果客户端正在访问公共 API,跳过认证。
// 否则,需要有效令牌。
app.use('/api/*', except('/api/public/*', bearerAuth({ token })))
```
# 压缩中间件
此中间件根据 `Accept-Encoding` 请求头压缩响应体。
::: info
**注意**:在 Cloudflare Workers 和 Deno Deploy 上,响应体会被自动压缩,因此无需使用此中间件。
:::
## 导入
```ts
import { Hono } from 'hono'
import { compress } from 'hono/compress'
```
## 用法
```ts
const app = new Hono()
app.use(compress())
```
## 选项
### encoding: `'gzip'` | `'deflate'`
允许用于响应压缩的压缩方案。可以是 `gzip` 或 `deflate`。如果未定义,则两者都允许,并将根据 `Accept-Encoding` 头使用。如果未提供此选项且客户端在 `Accept-Encoding` 头中同时提供了两者,则优先使用 `gzip`。
### threshold: `number`
要压缩的最小字节大小。默认为 1024 字节。
# Context Storage 中间件
Context Storage 中间件将 Hono `Context` 存储在 `AsyncLocalStorage` 中,使其全局可访问。
::: info
**注意** 此中间件使用 `AsyncLocalStorage`。运行时应该支持它。
**Cloudflare Workers**:要启用 `AsyncLocalStorage`,请将 [`nodejs_compat` 或 `nodejs_als` 标志](https://developers.cloudflare.com/workers/configuration/compatibility-dates/#nodejs-compatibility-flag) 添加到您的 `wrangler.toml` 文件中。
:::
## 导入
```ts
import { Hono } from 'hono'
import {
contextStorage,
getContext,
tryGetContext,
} from 'hono/context-storage'
```
## 用法
如果将 `contextStorage()` 作为中间件应用,`getContext()` 将返回当前的 Context 对象。
```ts
type Env = {
Variables: {
message: string
}
}
const app = new Hono()
app.use(contextStorage())
app.use(async (c, next) => {
c.set('message', 'Hello!')
await next()
})
// 您可以在处理程序外部访问变量。
const getMessage = () => {
return getContext().var.message
}
app.get('/', (c) => {
return c.text(getMessage())
})
```
在 Cloudflare Workers 上,您可以在处理程序外部访问绑定。
```ts
type Env = {
Bindings: {
KV: KVNamespace
}
}
const app = new Hono()
app.use(contextStorage())
const setKV = (value: string) => {
return getContext().env.KV.put('key', value)
}
```
## tryGetContext
`tryGetContext()` 的工作方式类似于 `getContext()`,但当上下文不可用时返回 `undefined` 而不是抛出错误:
```ts
const context = tryGetContext()
if (context) {
// 上下文可用
console.log(context.var.message)
}
```
# CORS 中间件
Cloudflare Workers 作为 Web API 有很多用例,并且需要从外部前端应用程序调用它们。
为此我们必须实现 CORS,让我们也用中间件来实现它。
## 导入
```ts
import { Hono } from 'hono'
import { cors } from 'hono/cors'
```
## 用法
```ts
const app = new Hono()
// CORS 应该在路由之前调用
app.use('/api/*', cors())
app.use(
'/api2/*',
cors({
origin: 'http://example.com',
allowHeaders: ['X-Custom-Header', 'Upgrade-Insecure-Requests'],
allowMethods: ['POST', 'GET', 'OPTIONS'],
exposeHeaders: ['Content-Length', 'X-Kuma-Revision'],
maxAge: 600,
credentials: true,
})
)
app.all('/api/abc', (c) => {
return c.json({ success: true })
})
app.all('/api2/abc', (c) => {
return c.json({ success: true })
})
```
多个源:
```ts
app.use(
'/api3/*',
cors({
origin: ['https://example.com', 'https://example.org'],
})
)
// 或者你可以使用“函数”
app.use(
'/api4/*',
cors({
// `c` 是一个 `Context` 对象
origin: (origin, c) => {
return origin.endsWith('.example.com')
? origin
: 'http://example.com'
},
})
)
```
基于源的动态允许方法:
```ts
app.use(
'/api5/*',
cors({
origin: (origin) =>
origin === 'https://example.com' ? origin : '*',
// `c` 是一个 `Context` 对象
allowMethods: (origin, c) =>
origin === 'https://example.com'
? ['GET', 'HEAD', 'POST', 'PATCH', 'DELETE']
: ['GET', 'HEAD'],
})
)
```
## 选项
### origin: `string` | `string[]` | `(origin:string, c:Context) => string`
"_Access-Control-Allow-Origin_" CORS 头部的值。你也可以传递回调函数,例如 `origin: (origin) => (origin.endsWith('.example.com') ? origin : 'http://example.com')`。默认值是 `*`。
### allowMethods: `string[]` | `(origin:string, c:Context) => string[]`
"_Access-Control-Allow-Methods_" CORS 头部的值。你也可以传递回调函数来根据源动态确定允许的方法。默认值是 `['GET', 'HEAD', 'PUT', 'POST', 'DELETE', 'PATCH']`。
### allowHeaders: `string[]`
"_Access-Control-Allow-Headers_" CORS 头部的值。默认值是 `[]`。
### maxAge: `number`
"_Access-Control-Max-Age_" CORS 头部的值。
### credentials: `boolean`
"_Access-Control-Allow-Credentials_" CORS 头部的值。
### exposeHeaders: `string[]`
"_Access-Control-Expose-Headers_" CORS 头部的值。默认值是 `[]`。
## 依赖环境的 CORS 配置
如果你想根据执行环境(如开发或生产)调整 CORS 配置,从环境变量注入值很方便,因为它消除了应用程序感知自身执行环境的需要。请参阅下面的示例以作说明。
```ts
app.use('*', async (c, next) => {
const corsMiddlewareHandler = cors({
origin: c.env.CORS_ORIGIN,
})
return corsMiddlewareHandler(c, next)
})
```
## 与 Vite 一起使用
当与 Vite 一起使用 Hono 时,你应该在 `vite.config.ts` 中将 `server.cors` 设置为 `false` 以禁用 Vite 的内置 CORS 功能。这可以防止与 Hono 的 CORS 中间件发生冲突。
```ts
// vite.config.ts
import { cloudflare } from '@cloudflare/vite-plugin'
import { defineConfig } from 'vite'
export default defineConfig({
server: {
cors: false, // 禁用 Vite 的内置 CORS 设置
},
plugins: [cloudflare()],
})
```
# CSRF 保护
此中间件通过检查 `Origin` 标头和 `Sec-Fetch-Site` 标头来防止 CSRF 攻击。如果任一验证通过,则允许请求。
该中间件仅验证以下请求:
- 使用不安全的 HTTP 方法(非 GET、HEAD 或 OPTIONS)
- 具有 HTML 表单可以发送的内容类型(`application/x-www-form-urlencoded`、`multipart/form-data` 或 `text/plain`)
不发送 `Origin` 标头的旧浏览器,或使用反向代理移除这些标头的环境,可能无法正常工作。在此类环境中,请使用其他 CSRF 令牌方法。
## 导入
```ts
import { Hono } from 'hono'
import { csrf } from 'hono/csrf'
```
## 用法
```ts
const app = new Hono()
// 默认:同时验证 origin 和 sec-fetch-site
app.use(csrf())
// 允许特定的来源
app.use(csrf({ origin: 'https://myapp.example.com' }))
// 允许多个来源
app.use(
csrf({
origin: [
'https://myapp.example.com',
'https://development.myapp.example.com',
],
})
)
// 允许特定的 sec-fetch-site 值
app.use(csrf({ secFetchSite: 'same-origin' }))
app.use(csrf({ secFetchSite: ['same-origin', 'none'] }))
// 动态 origin 验证
// 强烈建议验证协议以确保匹配到 `$`。
// 你绝不应该*进行前向匹配。
app.use(
'*',
csrf({
origin: (origin) =>
/https:\/\/(\w+\.)?myapp\.example\.com$/.test(origin),
})
)
// 动态 sec-fetch-site 验证
app.use(
csrf({
secFetchSite: (secFetchSite, c) => {
// 始终允许同源
if (secFetchSite === 'same-origin') return true
// 允许 webhook 端点的跨站请求
if (
secFetchSite === 'cross-site' &&
c.req.path.startsWith('/webhook/')
) {
return true
}
return false
},
})
)
```
## 选项
### origin: `string` | `string[]` | `Function`
指定 CSRF 保护允许的来源。
- **`string`**:单个允许的来源(例如 `'https://example.com'`)
- **`string[]`**:允许的来源数组
- **`Function`**:自定义处理函数 `(origin: string, context: Context) => boolean`,用于灵活的来源验证和绕过逻辑
**默认**:仅与请求 URL 同源
函数处理程序接收请求的 `Origin` 标头值和请求上下文,允许基于请求属性(如路径、标头或其他上下文数据)进行动态验证。
### secFetchSite: `string` | `string[]` | `Function`
指定 CSRF 保护允许的 Sec-Fetch-Site 标头值,使用 [Fetch Metadata](https://web.dev/articles/fetch-metadata)。
- **`string`**:单个允许的值(例如 `'same-origin'`)
- **`string[]`**:允许的值数组(例如 `['same-origin', 'none']`)
- **`Function`**:自定义处理函数 `(secFetchSite: string, context: Context) => boolean`,用于灵活验证
**默认**:仅允许 `'same-origin'`
标准 Sec-Fetch-Site 值:
- `same-origin`:来自同源的请求
- `same-site`:来自同一站点的请求(不同子域)
- `cross-site`:来自不同站点的请求
- `none`:非来自网页的请求(例如浏览器地址栏、书签)
函数处理程序接收请求的 `Sec-Fetch-Site` 标头值和请求上下文,支持基于请求属性进行动态验证。
# ETag 中间件
使用此中间件,您可以轻松添加 ETag 头。
## 导入
```ts
import { Hono } from 'hono'
import { etag } from 'hono/etag'
```
## 用法
```ts
const app = new Hono()
app.use('/etag/*', etag())
app.get('/etag/abc', (c) => {
return c.text('Hono is cool')
})
```
## 保留的响应头
304 响应必须包含等同于 200 OK 响应中应发送的响应头。默认的响应头包括 Cache-Control、Content-Location、Date、ETag、Expires 和 Vary。
如果您想添加发送的响应头,可以使用 `retainedHeaders` 选项和包含默认响应头的 `RETAINED_304_HEADERS` 字符串数组变量:
```ts
import { etag, RETAINED_304_HEADERS } from 'hono/etag'
// ...
app.use(
'/etag/*',
etag({
retainedHeaders: ['x-message', ...RETAINED_304_HEADERS],
})
)
```
## 选项
### weak: `boolean`
定义是否使用 [弱验证](https://developer.mozilla.org/en-US/docs/Web/HTTP/Conditional_requests#weak_validation)。如果设置为 `true`,则会在值的前缀添加 `w/`。默认为 `false`。
### retainedHeaders: `string[]`
您希望在 304 响应中保留的响应头。
### generateDigest: `(body: Uint8Array) => ArrayBuffer | Promise`
一个自定义的摘要生成函数。默认情况下,它使用 `SHA-1`。此函数以 `Uint8Array` 形式的响应体作为调用参数,并应返回一个 `ArrayBuffer` 形式的哈希或其 Promise。
# IP 限制中间件
IP 限制中间件是一种根据用户的 IP 地址限制资源访问的中间件。
## 导入
```ts
import { Hono } from 'hono'
import { ipRestriction } from 'hono/ip-restriction'
```
## 用法
对于运行在 Bun 上的应用程序,如果只想允许本地访问,可以如下编写。在 `denyList` 中指定要拒绝的规则,在 `allowList` 中指定要允许的规则。
```ts
import { Hono } from 'hono'
import { getConnInfo } from 'hono/bun'
import { ipRestriction } from 'hono/ip-restriction'
const app = new Hono()
app.use(
'*',
ipRestriction(getConnInfo, {
denyList: [],
allowList: ['127.0.0.1', '::1'],
})
)
app.get('/', (c) => c.text('Hello Hono!'))
```
将适合您环境的 [ConnInfo 辅助函数](/docs/helpers/conninfo) 中的 `getConninfo` 作为 `ipRestriction` 的第一个参数传递。例如,对于 Deno,看起来像这样:
```ts
import { getConnInfo } from 'hono/deno'
import { ipRestriction } from 'hono/ip-restriction'
//...
app.use(
'*',
ipRestriction(getConnInfo, {
// ...
})
)
```
## 规则
请遵循以下说明编写规则。
### IPv4
- `192.168.2.0` - 静态 IP 地址
- `192.168.2.0/24` - CIDR 表示法
- `*` - 所有地址
### IPv6
- `::1` - 静态 IP 地址
- `::1/10` - CIDR 表示法
- `*` - 所有地址
## 错误处理
要自定义错误,请在第三个参数中返回一个 `Response`。
```ts
app.use(
'*',
ipRestriction(
getConnInfo,
{
denyList: ['192.168.2.0/24'],
},
async (remote, c) => {
return c.text(`Blocking access from ${remote.addr}`, 403)
}
)
)
```
# JSX 渲染器中间件
JSX 渲染器中间件允许你在使用 `c.render()` 函数渲染 JSX 时设置布局,而无需使用 `c.setRenderer()`。此外,它使得通过 `useRequestContext()` 在组件中访问 Context 实例成为可能。
## 导入
```ts
import { Hono } from 'hono'
import { jsxRenderer, useRequestContext } from 'hono/jsx-renderer'
```
## 用法
```jsx
const app = new Hono()
app.get(
'/page/*',
jsxRenderer(({ children }) => {
return (
{children}
)
})
)
app.get('/page/about', (c) => {
return c.render(About me!
)
})
```
## 选项
### docType: `boolean` | `string`
如果你不想在 HTML 开头添加 DOCTYPE,请将 `docType` 选项设置为 `false`。
```tsx
app.use(
'*',
jsxRenderer(
({ children }) => {
return (
{children}
)
},
{ docType: false }
)
)
```
你也可以指定 DOCTYPE。
```tsx
app.use(
'*',
jsxRenderer(
({ children }) => {
return (
{children}
)
},
{
docType:
'',
}
)
)
```
### stream: `boolean` | `Record`
如果将其设置为 `true` 或提供 Record 值,它将作为流式响应进行渲染。
```tsx
const AsyncComponent = async () => {
await new Promise((r) => setTimeout(r, 1000)) // 休眠 1 秒
return Hi!
}
app.get(
'*',
jsxRenderer(
({ children }) => {
return (
SSR Streaming
{children}
)
},
{ stream: true }
)
)
app.get('/', (c) => {
return c.render(
loading...}>
)
})
```
如果设置为 `true`,将添加以下头信息:
```ts
{
'Transfer-Encoding': 'chunked',
'Content-Type': 'text/html; charset=UTF-8',
'Content-Encoding': 'Identity'
}
```
你可以通过指定 Record 值来自定义头信息的值。
### 基于函数的选项
你可以传递一个接收 `Context` 对象的函数,而不是静态选项对象。这允许你根据请求上下文(例如环境变量或请求参数)动态设置选项。
```tsx
app.use(
'*',
jsxRenderer(
({ children }) => {
return (
{children}
)
},
(c) => ({
stream: c.req.header('X-Enable-Streaming') === 'true',
})
)
)
```
作为一个具体示例,当使用 `` 生成静态站点 (SSG) 时,你可以使用此方法禁用流式传输,通过 [`isSSGContext`](/docs/helpers/ssg#isssgcontext) 辅助函数:
```tsx
app.use(
'*',
jsxRenderer(
({ children }) => {
return (
)
},
(c) => ({
stream: !isSSGContext(c),
})
)
)
```
## 嵌套布局
`Layout` 组件支持布局嵌套。
```tsx
app.use(
jsxRenderer(({ children }) => {
return (
{children}
)
})
)
const blog = new Hono()
blog.use(
jsxRenderer(({ children, Layout }) => {
return (
{children}
)
})
)
app.route('/blog', blog)
```
## `useRequestContext()`
`useRequestContext()` 返回 Context 实例。
```tsx
import { useRequestContext, jsxRenderer } from 'hono/jsx-renderer'
const app = new Hono()
app.use(jsxRenderer())
const RequestUrlBadge: FC = () => {
const c = useRequestContext()
return {c.req.url}
}
app.get('/page/info', (c) => {
return c.render(
You are accessing:
)
})
```
::: warning
你不能在 Deno 的 `precompile` JSX 选项下使用 `useRequestContext()`。请使用 `react-jsx`:
```json
"compilerOptions": {
"jsx": "precompile", // [!code --]
"jsx": "react-jsx", // [!code ++]
"jsxImportSource": "hono/jsx"
}
}
```
:::
## 扩展 `ContextRenderer`
通过如下定义 `ContextRenderer`,你可以向渲染器传递额外的内容。例如,当你想根据页面更改 head 标签的内容时,这很方便。
```tsx
declare module 'hono' {
interface ContextRenderer {
(
content: string | Promise,
props: { title: string }
): Response
}
}
const app = new Hono()
app.get(
'/page/*',
jsxRenderer(({ children, title }) => {
return (
{title}
{children}
)
})
)
app.get('/page/favorites', (c) => {
return c.render(
- Eating sushi
- Watching baseball games
,
{
title: 'My favorites',
}
)
})
```
# JWK 认证中间件
JWK 认证中间件通过使用 JWK (JSON Web Key) 验证令牌来认证请求。它检查 `Authorization` 头部以及其他配置的来源(如指定时的 cookies)。它使用提供的 `keys` 验证令牌,如果指定了 `jwks_uri` 则从中检索密钥,并且如果设置了 `cookie` 选项,则支持从 cookies 中提取令牌。
## 此中间件验证的内容
对于每个令牌,`jwk()`:
- 解析并验证 JWT 头部格式。
- 需要 `kid` 头部,并通过 `kid` 查找匹配密钥。
- 拒绝对称算法(`HS256`、`HS384`、`HS512`)。
- 要求头部 `alg` 包含在配置的 `alg` 允许列表中。
- 如果匹配的 JWK 具有 `alg` 字段,则要求它与 JWT 头部 `alg` 匹配。
- 使用匹配的密钥验证令牌签名。
- 默认情况下,验证基于时间的声明:`nbf`、`exp` 和 `iat`。
可选的声明验证可以通过 `verification` 选项配置:
- `iss`:提供时验证颁发者。
- `aud`:提供时验证受众。
如果您需要上述之外的额外令牌检查(例如,自定义应用程序级授权规则),请在 `jwk()` 之后的自有中间件中添加它们。
:::info
客户端发送的 Authorization 头部必须具有指定的方案。
示例:`Bearer my.token.value` 或 `Basic my.token.value`
:::
## 导入
```ts
import { Hono } from 'hono'
import { jwk } from 'hono/jwk'
import { verifyWithJwks } from 'hono/jwt'
```
## 用法
```ts
const app = new Hono()
app.use(
'/auth/*',
jwk({
jwks_uri: `https://${backendServer}/.well-known/jwks.json`,
alg: ['RS256'],
})
)
app.get('/auth/page', (c) => {
return c.text('You are authorized')
})
```
获取 payload:
```ts
const app = new Hono()
app.use(
'/auth/*',
jwk({
jwks_uri: `https://${backendServer}/.well-known/jwks.json`,
alg: ['RS256'],
})
)
app.get('/auth/page', (c) => {
const payload = c.get('jwtPayload')
return c.json(payload) // 例如:{ "sub": "1234567890", "name": "John Doe", "iat": 1516239022 }
})
```
匿名访问:
```ts
const app = new Hono()
app.use(
'/auth/*',
jwk({
jwks_uri: (c) =>
`https://${c.env.authServer}/.well-known/jwks.json`,
alg: ['RS256'],
allow_anon: true,
})
)
app.get('/auth/page', (c) => {
const payload = c.get('jwtPayload')
return c.json(payload ?? { message: 'hello anon' })
})
```
## 在中间件之外使用 `verifyWithJwks`
`verifyWithJwks` 实用函数可用于在 Hono 中间件上下文之外验证 JWT 令牌,例如在 SvelteKit SSR 页面或其他服务器端环境中:
```ts
const id_payload = await verifyWithJwks(
id_token,
{
jwks_uri: 'https://your-auth-server/.well-known/jwks.json',
allowedAlgorithms: ['RS256'],
},
{
cf: { cacheEverything: true, cacheTtl: 3600 },
}
)
```
## 配置 JWKS 获取请求选项
要配置如何从 `jwks_uri` 检索 JWKS,请将 fetch 请求选项作为 `jwk()` 的第二个参数传递。
此参数为 `RequestInit`,仅用于 JWKS 获取请求。
```ts
const app = new Hono()
app.use(
'/auth/*',
jwk(
{
jwks_uri: `https://${backendServer}/.well-known/jwks.json`,
alg: ['RS256'],
},
{
headers: {
Authorization: 'Bearer TOKEN',
},
}
)
)
```
## 选项
### alg: `AsymmetricAlgorithm[]`
用于令牌验证的允许非对称算法数组。
可用类型为 `RS256` | `RS384` | `RS512` | `PS256` | `PS384` | `PS512` | `ES256` | `ES384` | `ES512` | `EdDSA`。
### keys: `HonoJsonWebKey[] | (c: Context) => Promise`
您的公钥值,或返回它们的函数。该函数接收 Context 对象。
### jwks_uri: `string` | `(c: Context) => Promise`
如果设置了此值,则尝试从此 URI 获取 JWK,期望响应为包含 `keys` 的 JSON,这些 keys 将添加到提供的 `keys` 选项中。您也可以传递回调函数以使用 Context 动态确定 JWKS URI。
### allow_anon: `boolean`
如果将此值设置为 `true`,则没有有效令牌的请求将被允许通过中间件。使用 `c.get('jwtPayload')` 检查请求是否已认证。默认为 `false`。
### cookie: `string`
如果设置了此值,则使用该值作为键从 cookie 头部检索值,然后将其作为令牌进行验证。
### headerName: `string`
用于查找 JWT 令牌的头部名称。默认为 `Authorization`。
### verification: `VerifyOptions`
配置除签名验证之外的声明验证行为:
- `iss`:预期的颁发者。
- `aud`:预期的受众。
- `exp`, `nbf`, `iat`:默认启用,如有需要可禁用。
# JWT 认证中间件
JWT 认证中间件通过验证 JWT 令牌提供身份认证。
如果未设置 `cookie` 选项,中间件将检查 `Authorization` 头。你可以使用 `headerName` 选项自定义头名称。
:::info
客户端发送的 Authorization 头必须具有指定的方案。
例如:`Bearer my.token.value` 或 `Basic my.token.value`
:::
## 导入
```ts
import { Hono } from 'hono'
import { jwt } from 'hono/jwt'
import type { JwtVariables } from 'hono/jwt'
```
## 用法
```ts
// 指定变量类型以推断 `c.get('jwtPayload')`:
type Variables = JwtVariables
const app = new Hono<{ Variables: Variables }>()
app.use(
'/auth/*',
jwt({
secret: 'it-is-very-secret',
alg: 'HS256',
})
)
app.get('/auth/page', (c) => {
return c.text('You are authorized')
})
```
获取负载:
```ts
const app = new Hono()
app.use(
'/auth/*',
jwt({
secret: 'it-is-very-secret',
alg: 'HS256',
issuer: 'my-trusted-issuer',
})
)
app.get('/auth/page', (c) => {
const payload = c.get('jwtPayload')
return c.json(payload) // 例如:{ "sub": "1234567890", "name": "John Doe", "iat": 1516239022, "iss": "my-trusted-issuer" }
})
```
::: tip
`jwt()` 只是一个中间件函数。如果你想使用环境变量(例如:`c.env.JWT_SECRET`),你可以如下使用:
```js
app.use('/auth/*', (c, next) => {
const jwtMiddleware = jwt({
secret: c.env.JWT_SECRET,
alg: 'HS256',
})
return jwtMiddleware(c, next)
})
```
:::
## 选项
### secret: `string`
你的密钥的值。
### alg: `string`
用于验证的算法类型。
可用类型包括 `HS256` | `HS384` | `HS512` | `RS256` | `RS384` | `RS512` | `PS256` | `PS384` | `PS512` | `ES256` | `ES384` | `ES512` | `EdDSA`。
### cookie: `string`
如果设置了此值,则使用该值作为键从 cookie 头中检索值,然后将其作为令牌进行验证。
### headerName: `string`
查找 JWT 令牌的头名称。默认为 `Authorization`。
```ts
app.use(
'/auth/*',
jwt({
secret: 'it-is-very-secret',
alg: 'HS256',
headerName: 'x-custom-auth-header',
})
)
```
### verifyOptions: `VerifyOptions`
控制令牌验证的选项。
#### verifyOptions.iss: `string | RexExp`
用于令牌验证的预期颁发者。如果未设置此项,则 **不会** 检查 `iss` 声明。
#### verifyOptions.nbf: `boolean`
如果存在 `nbf`(not before)声明且此项设置为 `true`,则将对其进行验证。默认为 `true`。
#### verifyOptions.iat: `boolean`
如果存在 `iat`(issued at)声明且此项设置为 `true`,则将对其进行验证。默认为 `true`。
#### verifyOptions.exp: `boolean`
如果存在 `exp`(expiration time)声明且此项设置为 `true`,则将对其进行验证。默认为 `true`。
# 语言中间件
Language Detector 中间件自动从各种来源确定用户的首选语言(区域设置),并通过 `c.get('language')` 提供。检测策略包括查询参数、Cookie、Header 和 URL 路径段。非常适合国际化 (i18n) 和特定区域设置的内容。
## 导入
```ts
import { Hono } from 'hono'
import { languageDetector } from 'hono/language'
```
## 基本用法
从查询字符串、Cookie 和 Header 检测语言(默认顺序),回退到英语:
```ts
const app = new Hono()
app.use(
languageDetector({
supportedLanguages: ['en', 'ar', 'ja'], // 必须包含回退语言
fallbackLanguage: 'en', // 必填
})
)
app.get('/', (c) => {
const lang = c.get('language')
return c.text(`Hello! Your language is ${lang}`)
})
```
### 客户端示例
```sh
# 通过路径
curl http://localhost:8787/ar/home
# 通过查询参数
curl http://localhost:8787/?lang=ar
# 通过 Cookie
curl -H 'Cookie: language=ja' http://localhost:8787/
# 通过 Header
curl -H 'Accept-Language: ar,en;q=0.9' http://localhost:8787/
```
## 默认配置
```ts
export const DEFAULT_OPTIONS: DetectorOptions = {
order: ['querystring', 'cookie', 'header'],
lookupQueryString: 'lang',
lookupCookie: 'language',
lookupFromHeaderKey: 'accept-language',
lookupFromPathIndex: 0,
caches: ['cookie'],
ignoreCase: true,
fallbackLanguage: 'en',
supportedLanguages: ['en'],
cookieOptions: {
sameSite: 'Strict',
secure: true,
maxAge: 365 * 24 * 60 * 60,
httpOnly: true,
},
debug: false,
}
```
## 关键行为
### 检测工作流程
1. **顺序**:默认按此顺序检查来源:
- 查询参数 (?lang=ar)
- Cookie (language=ar)
- Accept-Language 请求头
2. **缓存**:将检测到的语言存储在 Cookie 中(默认 1 年)
3. **回退**:如果没有有效的检测结果,则使用 `fallbackLanguage`(必须在 `supportedLanguages` 中)
## 高级配置
### 自定义检测顺序
优先检测 URL 路径(例如 /en/about):
```ts
app.use(
languageDetector({
order: ['path', 'cookie', 'querystring', 'header'],
lookupFromPathIndex: 0, // /en/profile → 索引 0 = 'en'
supportedLanguages: ['en', 'ar'],
fallbackLanguage: 'en',
})
)
```
### 渐进式区域设置匹配
当检测到的区域设置代码(如 `ja-JP`)不在 `supportedLanguages` 中时,中间件会 progressively 截断子标签以找到匹配项。例如,`zh-Hant-CN` 将尝试 `zh-Hant`,然后尝试 `zh`。始终优先完全匹配。
```ts
app.use(
languageDetector({
supportedLanguages: ['en', 'ja', 'zh-Hant'],
fallbackLanguage: 'en',
})
)
// Accept-Language: ja-JP → 匹配 'ja'
// Accept-Language: zh-Hant-CN → 匹配 'zh-Hant'
```
### 语言代码转换
标准化复杂代码(例如 en-US → en):
```ts
app.use(
languageDetector({
convertDetectedLanguage: (lang) => lang.split('-')[0],
supportedLanguages: ['en', 'ja'],
fallbackLanguage: 'en',
})
)
```
### Cookie 配置
```ts
app.use(
languageDetector({
lookupCookie: 'app_lang',
caches: ['cookie'],
cookieOptions: {
path: '/', // Cookie 路径
sameSite: 'Lax', // Cookie 同站策略
secure: true, // 仅通过 HTTPS 发送
maxAge: 86400 * 365, // 1 年过期
httpOnly: true, // 无法通过 JavaScript 访问
domain: '.example.com', // 可选:特定域名
},
})
)
```
要禁用 Cookie 缓存:
```ts
languageDetector({
caches: false,
})
```
### 调试
记录检测步骤:
```ts
languageDetector({
debug: true, // 显示:"从查询字符串检测到:ar"
})
```
## 选项参考
### 基本选项
| 选项 | 类型 | 默认值 | 必填 | 描述 |
| :------------------- | :--------------- | :------------------------------------ | :--- | :--------------- |
| `supportedLanguages` | `string[]` | `['en']` | 是 | 允许的语言代码 |
| `fallbackLanguage` | `string` | `'en'` | 是 | 默认语言 |
| `order` | `DetectorType[]` | `['querystring', 'cookie', 'header']` | 否 | 检测顺序 |
| `debug` | `boolean` | `false` | 否 | 启用日志记录 |
### 检测选项
| 选项 | 类型 | 默认值 | 描述 |
| :-------------------- | :------- | :------------------ | :------------- |
| `lookupQueryString` | `string` | `'lang'` | 查询参数名称 |
| `lookupCookie` | `string` | `'language'` | Cookie 名称 |
| `lookupFromHeaderKey` | `string` | `'accept-language'` | Header 名称 |
| `lookupFromPathIndex` | `number` | `0` | 路径段索引 |
### Cookie 选项
| 选项 | 类型 | 默认值 | 描述 |
| :------------------------- | :---------------------------- | :----------- | :------------- |
| `caches` | `CacheType[] \| false` | `['cookie']` | 缓存设置 |
| `cookieOptions.path` | `string` | `'/'` | Cookie 路径 |
| `cookieOptions.sameSite` | `'Strict' \| 'Lax' \| 'None'` | `'Strict'` | 同站策略 |
| `cookieOptions.secure` | `boolean` | `true` | 仅 HTTPS |
| `cookieOptions.maxAge` | `number` | `31536000` | 过期时间 (秒) |
| `cookieOptions.httpOnly` | `boolean` | `true` | JS 可访问性 |
| `cookieOptions.domain` | `string` | `undefined` | Cookie 域名 |
### 高级选项
| 选项 | 类型 | 默认值 | 描述 |
| :------------------------ | :------------------------- | :---------- | :----------------- |
| `ignoreCase` | `boolean` | `true` | 不区分大小写匹配 |
| `convertDetectedLanguage` | `(lang: string) => string` | `undefined` | 语言代码转换器 |
## 验证与错误处理
- `fallbackLanguage` 必须在 `supportedLanguages` 中(设置期间抛出错误)
- `lookupFromPathIndex` 必须 ≥ 0
- 无效配置会在中间件初始化期间抛出错误
- 检测失败会静默使用 `fallbackLanguage`
## 常见示例
### 基于路径的路由
```ts
app.get('/:lang/home', (c) => {
const lang = c.get('language') // 'en', 'ar' 等
return c.json({ message: getLocalizedContent(lang) })
})
```
### 多种支持语言
```ts
languageDetector({
supportedLanguages: ['en', 'en-GB', 'ar', 'ar-EG'],
convertDetectedLanguage: (lang) => lang.replace('_', '-'), // 标准化
})
```
# 日志中间件
它是一个简单的日志记录器。
## 导入
```ts
import { Hono } from 'hono'
import { logger } from 'hono/logger'
```
## 用法
```ts
const app = new Hono()
app.use(logger())
app.get('/', (c) => c.text('Hello Hono!'))
```
## 日志详情
日志中间件会记录每个请求的以下详情:
- **传入请求**:记录 HTTP 方法、请求路径和传入请求。
- **传出响应**:记录 HTTP 方法、请求路径、响应状态码和请求/响应时间。
- **状态码着色**:响应状态码采用颜色编码,以提高可见性并快速识别状态类别。不同的状态码类别由不同的颜色表示。
- **耗时**:请求/响应周期所花费的时间以人类可读的格式记录,单位为毫秒 (ms) 或秒 (s)。
通过使用日志中间件,您可以轻松监控 Hono 应用程序中的请求和响应流,并快速识别任何问题或性能瓶颈。
您还可以通过提供自己的 `PrintFunc` 函数来进一步扩展中间件,以实现定制的日志行为。
::: tip
要禁用 _状态码着色_,您可以设置 `NO_COLOR` 环境变量。这是在日志库中禁用 ANSI 颜色转义码的常用方法,详见 。请注意,Cloudflare Workers 没有 `process.env` 对象,因此将默认为纯文本日志输出。
:::
## PrintFunc
日志中间件接受一个可选的 `PrintFunc` 函数作为参数。此函数允许您自定义日志记录器并添加额外的日志。
## 选项
### fn: `PrintFunc(str: string, ...rest: string[])`
- `str`:由日志记录器传递。
- `...rest`:要打印到控制台的其他字符串属性。
### 示例
为日志中间件设置自定义 `PrintFunc` 函数:
```ts
export const customLogger = (message: string, ...rest: string[]) => {
console.log(message, ...rest)
}
app.use(logger(customLogger))
```
在路由中设置自定义日志记录器:
```ts
app.post('/blog', (c) => {
// 路由逻辑
customLogger('Blog saved:', `Path: ${blog.url},`, `ID: ${blog.id}`)
// 输出
// <-- POST /blog
// 博客已保存:Path: /blog/example, ID: 1
// --> POST /blog 201 93ms
// 返回 Context
})
```
# 方法覆盖中间件
此中间件根据表单、请求头或查询参数的值,执行指定方法(不同于请求的实际方法)的处理程序,并返回其响应。
## 导入
```ts
import { Hono } from 'hono'
import { methodOverride } from 'hono/method-override'
```
## 用法
```ts
const app = new Hono()
// 如果未指定选项,则使用表单中 `_method` 的值,
// 例如 DELETE,作为方法。
app.use('/posts', methodOverride({ app }))
app.delete('/posts', (c) => {
// ....
})
```
## 示例
由于 HTML 表单无法发送 DELETE 方法,您可以在名为 `_method` 的属性中放入值 `DELETE` 并发送。然后 `app.delete()` 的处理程序将被执行。
HTML 表单:
```html
```
应用程序:
```ts
import { methodOverride } from 'hono/method-override'
const app = new Hono()
app.use('/posts', methodOverride({ app }))
app.delete('/posts', () => {
// ...
})
```
您可以更改默认值或使用请求头值和查询参数值:
```ts
app.use('/posts', methodOverride({ app, form: '_custom_name' }))
app.use(
'/posts',
methodOverride({ app, header: 'X-METHOD-OVERRIDE' })
)
app.use('/posts', methodOverride({ app, query: '_method' }))
```
## 选项
### app: `Hono`
您的应用程序中使用的 `Hono` 实例。
### form: `string`
包含方法名的值的表单键。
默认值为 `_method`。
### header: `boolean`
包含方法名的值的请求头名称。
### query: `boolean`
包含方法名的值的查询参数键。
# Pretty JSON 中间件
Pretty JSON 中间件为 JSON 响应体启用"_JSON 美化打印_"。
在 URL 查询参数中添加 `?pretty`,JSON 字符串将被美化。
```js
// GET /
{"project":{"name":"Hono","repository":"https://github.com/honojs/hono"}}
```
将会变成:
```js
// GET /?pretty
{
"project": {
"name": "Hono",
"repository": "https://github.com/honojs/hono"
}
}
```
## 导入
```ts
import { Hono } from 'hono'
import { prettyJSON } from 'hono/pretty-json'
```
## 用法
```ts
const app = new Hono()
app.use(prettyJSON()) // 带选项:prettyJSON({ space: 4 })
app.get('/', (c) => {
return c.json({ message: 'Hono!' })
})
```
## 选项
### space: `number`
缩进的空格数。默认为 `2`。
### query: `string`
用于应用的查询字符串名称。默认为 `pretty`。
### force: `boolean`
当设置为 `true` 时,无论查询参数如何,JSON 响应始终会被美化。默认为 `false`。
# Request ID 中间件
Request ID 中间件为每个请求生成一个唯一的 ID,你可以在处理程序中使用它。
::: info
**Node.js**: 此中间件使用 `crypto.randomUUID()` 生成 ID。全局 `crypto` 是在 Node.js 版本 20 或更高版本中引入的。因此,在早于该版本的版本中可能会发生错误。在这种情况下,请指定 `generator`。但是,如果你正在使用 [Node.js 适配器](https://github.com/honojs/node-server),它会自动全局设置 `crypto`,因此这不是必须的。
:::
## 导入
```ts
import { Hono } from 'hono'
import { requestId } from 'hono/request-id'
```
## 用法
你可以在应用了 Request ID 中间件的处理程序和中间件中通过 `requestId` 变量访问 Request ID。
```ts
const app = new Hono()
app.use('*', requestId())
app.get('/', (c) => {
return c.text(`Your request id is ${c.get('requestId')}`)
})
```
如果你想显式指定类型,导入 `RequestIdVariables` 并将其传递给 `new Hono()` 的泛型。
```ts
import type { RequestIdVariables } from 'hono/request-id'
const app = new Hono<{
Variables: RequestIdVariables
}>()
```
### 设置 Request ID
如果你在请求头中设置了一个自定义的 request ID(默认:`X-Request-Id`),中间件将使用该值而不是生成一个新的:
```ts
const app = new Hono()
app.use('*', requestId())
app.get('/', (c) => {
return c.text(`${c.get('requestId')}`)
})
const res = await app.request('/', {
headers: {
'X-Request-Id': 'your-custom-id',
},
})
console.log(await res.text()) // 你的自定义 id
```
如果你想禁用此功能,将 [`headerName` 选项](#headername-string) 设置为空字符串。
## 选项
### limitLength: `number`
Request ID 的最大长度。默认值是 `255`。
### headerName: `string`
用于 Request ID 的请求头名称。默认值是 `X-Request-Id`。
### generator: `(c: Context) => string`
Request ID 生成函数。默认情况下,它使用 `crypto.randomUUID()`。
## 平台特定的 Request IDs
某些平台(例如 AWS Lambda)已经为每个请求生成自己的 Request IDs。
没有任何额外配置的情况下,此中间件不知道这些特定的 Request IDs 并生成一个新的 Request ID。
这在查看应用程序日志时可能会导致混淆。
为了统一这些 ID,使用 `generator` 函数捕获平台特定的 Request ID 并在此中间件中使用它。
### 平台特定链接
- AWS Lambda
- [AWS 文档:Context 对象](https://docs.aws.amazon.com/lambda/latest/dg/nodejs-context.html)
- [Hono:访问 AWS Lambda 对象](/docs/getting-started/aws-lambda#access-aws-lambda-object)
- Cloudflare
- [Cloudflare Ray ID
](https://developers.cloudflare.com/fundamentals/reference/cloudflare-ray-id/)
- Deno
- [Deno 博客上的 Request ID](https://deno.com/blog/zero-config-debugging-deno-opentelemetry#:~:text=s%20automatically%20have-,unique%20request%20IDs,-associated%20with%20them)
- Fastly
- [Fastly 文档:req.xid](https://www.fastly.com/documentation/reference/vcl/variables/client-request/req-xid/)
# Secure Headers 中间件
Secure Headers 中间件简化了安全头部的设置。部分灵感来源于 Helmet 的功能,它允许您控制特定安全头部的激活和停用。
## 导入
```ts
import { Hono } from 'hono'
import { secureHeaders } from 'hono/secure-headers'
```
## 用法
默认情况下,您可以使用最佳设置。
```ts
const app = new Hono()
app.use(secureHeaders())
```
您可以通过将它们设置为 false 来抑制不必要的头部。
```ts
const app = new Hono()
app.use(
'*',
secureHeaders({
xFrameOptions: false,
xXssProtection: false,
})
)
```
您可以使用字符串覆盖默认的头部值。
```ts
const app = new Hono()
app.use(
'*',
secureHeaders({
strictTransportSecurity:
'max-age=63072000; includeSubDomains; preload',
xFrameOptions: 'DENY',
xXssProtection: '1',
})
)
```
## 支持的选项
每个选项对应以下头部键值对。
| 选项 | 头部 | 值 | 默认 |
| ------------------------------- | ---------------------------------------------------------------------------------------------------------------------------------------------- | -------------------------------------------------------------------------- | ---------- |
| - | X-Powered-By | (删除头部) | 启用 |
| contentSecurityPolicy | [内容安全策略](https://developer.mozilla.org/en-US/docs/Web/HTTP/CSP) | 用法:[设置内容安全策略](#设置内容安全策略) | 未设置 |
| contentSecurityPolicyReportOnly | [内容安全策略仅报告](https://developer.mozilla.org/en-US/docs/Web/HTTP/Headers/Content-Security-Policy-Report-Only) | 用法:[设置内容安全策略](#设置内容安全策略) | 未设置 |
| trustedTypes | [可信类型](https://developer.mozilla.org/en-US/docs/Web/HTTP/Headers/Content-Security-Policy/trusted-types) | 用法:[设置内容安全策略](#设置内容安全策略) | 未设置 |
| requireTrustedTypesFor | [要求可信类型用于](https://developer.mozilla.org/en-US/docs/Web/HTTP/Headers/Content-Security-Policy/require-trusted-types-for) | 用法:[设置内容安全策略](#设置内容安全策略) | 未设置 |
| crossOriginEmbedderPolicy | [跨源嵌入者策略](https://developer.mozilla.org/en-US/docs/Web/HTTP/Headers/Cross-Origin-Embedder-Policy) | require-corp | **禁用** |
| crossOriginResourcePolicy | [跨源资源策略](https://developer.mozilla.org/en-US/docs/Web/HTTP/Headers/Cross-Origin-Resource-Policy) | same-origin | 启用 |
| crossOriginOpenerPolicy | [跨源打开者策略](https://developer.mozilla.org/en-US/docs/Web/HTTP/Headers/Cross-Origin-Opener-Policy) | same-origin | 启用 |
| originAgentCluster | [源代理集群](https://developer.mozilla.org/en-US/docs/Web/HTTP/Headers/Origin-Agent-Cluster) | ?1 | 启用 |
| referrerPolicy | [引荐来源策略](https://developer.mozilla.org/en-US/docs/Web/HTTP/Headers/Referrer-Policy) | no-referrer | 启用 |
| reportingEndpoints | [报告端点](https://www.w3.org/TR/reporting-1/#header) | 用法:[设置内容安全策略](#设置内容安全策略) | 未设置 |
| reportTo | [报告至](https://developer.mozilla.org/en-US/docs/Web/HTTP/Headers/Content-Security-Policy/report-to) | 用法:[设置内容安全策略](#设置内容安全策略) | 未设置 |
| strictTransportSecurity | [严格传输安全](https://developer.mozilla.org/en-US/docs/Web/HTTP/Headers/Strict-Transport-Security) | max-age=15552000; includeSubDomains | 启用 |
| xContentTypeOptions | [X-Content-Type-Options](https://developer.mozilla.org/en-US/docs/Web/HTTP/Headers/X-Content-Type-Options) | nosniff | 启用 |
| xDnsPrefetchControl | [X-DNS-Prefetch-Control](https://developer.mozilla.org/en-US/docs/Web/HTTP/Headers/X-DNS-Prefetch-Control) | off | 启用 |
| xDownloadOptions | [X-Download-Options](https://learn.microsoft.com/en-us/archive/blogs/ie/ie8-security-part-v-comprehensive-protection#mime-handling-force-save) | noopen | 启用 |
| xFrameOptions | [X-Frame-Options](https://developer.mozilla.org/en-US/docs/Web/HTTP/Headers/X-Frame-Options) | SAMEORIGIN | 启用 |
| xPermittedCrossDomainPolicies | [X-Permitted-Cross-Domain-Policies](https://developer.mozilla.org/en-US/docs/Web/HTTP/Headers/X-Permitted-Cross-Domain-Policies) | none | 启用 |
| xXssProtection | [X-XSS-Protection](https://developer.mozilla.org/en-US/docs/Web/HTTP/Headers/X-XSS-Protection) | 0 | 启用 |
| permissionPolicy | [权限策略](https://developer.mozilla.org/en-US/docs/Web/HTTP/Headers/Permissions-Policy) | 用法:[设置权限策略](#设置权限策略) | 未设置 |
## 中间件冲突
在处理操作相同头部的中间件时,请注意指定顺序。
在这种情况下,Secure-headers 生效,`x-powered-by` 被移除:
```ts
const app = new Hono()
app.use(secureHeaders())
app.use(poweredBy())
```
在这种情况下,Powered-By 生效,`x-powered-by` 被添加:
```ts
const app = new Hono()
app.use(poweredBy())
app.use(secureHeaders())
```
## 设置内容安全策略
```ts
const app = new Hono()
app.use(
'/test',
secureHeaders({
reportingEndpoints: [
{
name: 'endpoint-1',
url: 'https://example.com/reports',
},
],
// -- 或者另一种方式
// reportTo: [
// {
// group: 'endpoint-1',
// max_age: 10886400,
// endpoints: [{ url: 'https://example.com/reports' }],
// },
// ],
contentSecurityPolicy: {
defaultSrc: ["'self'"],
baseUri: ["'self'"],
childSrc: ["'self'"],
connectSrc: ["'self'"],
fontSrc: ["'self'", 'https:', 'data:'],
formAction: ["'self'"],
frameAncestors: ["'self'"],
frameSrc: ["'self'"],
imgSrc: ["'self'", 'data:'],
manifestSrc: ["'self'"],
mediaSrc: ["'self'"],
objectSrc: ["'none'"],
reportTo: 'endpoint-1',
reportUri: '/csp-report',
sandbox: ['allow-same-origin', 'allow-scripts'],
scriptSrc: ["'self'"],
scriptSrcAttr: ["'none'"],
scriptSrcElem: ["'self'"],
styleSrc: ["'self'", 'https:', "'unsafe-inline'"],
styleSrcAttr: ['none'],
styleSrcElem: ["'self'", 'https:', "'unsafe-inline'"],
upgradeInsecureRequests: [],
workerSrc: ["'self'"],
},
})
)
```
### `nonce` 属性
您可以通过将 `hono/secure-headers` 导出的 `NONCE` 添加到 `scriptSrc` 或 `styleSrc`,从而为 `script` 或 `style` 元素添加 [`nonce` 属性](https://developer.mozilla.org/en-US/docs/Web/HTML/Global_attributes/nonce):
```tsx
import { secureHeaders, NONCE } from 'hono/secure-headers'
import type { SecureHeadersVariables } from 'hono/secure-headers'
// 指定变量类型以推断 `c.get('secureHeadersNonce')`:
type Variables = SecureHeadersVariables
const app = new Hono<{ Variables: Variables }>()
// 将预定义的 nonce 值设置到 `scriptSrc`:
app.get(
'*',
secureHeaders({
contentSecurityPolicy: {
scriptSrc: [NONCE, 'https://allowed1.example.com'],
},
})
)
// 从 `c.get('secureHeadersNonce')` 获取值:
app.get('/', (c) => {
return c.html(
{/** 内容 */}
)
})
```
如果您想自己生成 nonce 值,也可以按以下方式指定一个函数:
```tsx
const app = new Hono<{
Variables: { myNonce: string }
}>()
const myNonceGenerator: ContentSecurityPolicyOptionHandler = (c) => {
// 此函数在每次请求时被调用。
const nonce = Math.random().toString(36).slice(2)
c.set('myNonce', nonce)
return `'nonce-${nonce}'`
}
app.get(
'*',
secureHeaders({
contentSecurityPolicy: {
scriptSrc: [myNonceGenerator, 'https://allowed1.example.com'],
},
})
)
app.get('/', (c) => {
return c.html(
{/** 内容 */}
)
})
```
## 设置 Permission-Policy
Permission-Policy 标头允许您控制浏览器中可以使用哪些功能和 API。以下是如何设置它的示例:
```ts
const app = new Hono()
app.use(
'*',
secureHeaders({
permissionsPolicy: {
fullscreen: ['self'], // 全屏=(self)
bluetooth: ['none'], // 蓝牙=(none)
payment: ['self', 'https://example.com'], // 支付=(self "https://example.com")
syncXhr: [], // 同步 XMLHttpRequest=()
camera: false, // 摄像头=none
microphone: true, // 麦克风=*
geolocation: ['*'], // 地理位置=*
usb: ['self', 'https://a.example.com', 'https://b.example.com'], // USB=(self "https://a.example.com" "https://b.example.com")
accelerometer: ['https://*.example.com'], // 加速度计=("https://*.example.com")
gyroscope: ['src'], // 陀螺仪=(src)
magnetometer: [
'https://a.example.com',
'https://b.example.com',
], // 磁力计=("https://a.example.com" "https://b.example.com")
},
})
)
```
# 超时中间件
超时中间件使您能够轻松管理应用程序中的请求超时。它允许您设置请求的最大持续时间,并可选择在超过指定超时时定义自定义错误响应。
## 导入
```ts
import { Hono } from 'hono'
import { timeout } from 'hono/timeout'
```
## 用法
以下是如何使用默认设置和自定义设置来使用超时中间件的方法:
默认设置:
```ts
const app = new Hono()
// 应用 5 秒超时
app.use('/api', timeout(5000))
// 处理路由
app.get('/api/data', async (c) => {
// 您的路由处理逻辑
return c.json({ data: 'Your data here' })
})
```
自定义设置:
```ts
import { HTTPException } from 'hono/http-exception'
// 自定义异常工厂函数
const customTimeoutException = (context) =>
new HTTPException(408, {
message: `Request timeout after waiting ${context.req.headers.get(
'Duration'
)} seconds. Please try again later.`,
})
// 用于静态异常消息
// const customTimeoutException = new HTTPException(408, {
// message: '操作超时。请稍后重试。'
// });
// 应用 1 分钟超时及自定义异常
app.use('/api/long-process', timeout(60000, customTimeoutException))
app.get('/api/long-process', async (c) => {
// 模拟长时间进程
await new Promise((resolve) => setTimeout(resolve, 61000))
return c.json({ data: 'This usually takes longer' })
})
```
## 注意事项
- 超时持续时间可以以毫秒为单位指定。如果超过指定的持续时间,中间件将自动拒绝承诺并可能抛出错误。
- 超时中间件不能与 stream 一起使用。因此,请结合使用 `stream.close` 和 `setTimeout`。
```ts
app.get('/sse', async (c) => {
let id = 0
let running = true
let timer: number | undefined
return streamSSE(c, async (stream) => {
timer = setTimeout(() => {
console.log('Stream timeout reached, closing stream')
stream.close()
}, 3000) as unknown as number
stream.onAbort(async () => {
console.log('Client closed connection')
running = false
clearTimeout(timer)
})
while (running) {
const message = `It is ${new Date().toISOString()}`
await stream.writeSSE({
data: message,
event: 'time-update',
id: String(id++),
})
await stream.sleep(1000)
}
})
})
```
## 中间件冲突
请注意中间件的顺序,尤其是在使用错误处理或其他与计时相关的中间件时,因为它可能会影响此超时中间件的行为。
# Server-Timing 中间件
[Server-Timing](https://developer.mozilla.org/en-US/docs/Web/HTTP/Headers/Server-Timing) 中间件在响应头中提供性能指标。
::: info
注意:在 Cloudflare Workers 上,计时器指标可能不准确,
因为 [计时器仅显示上次 I/O 的时间](https://developers.cloudflare.com/workers/learning/security-model/#step-1-disallow-timers-and-multi-threading)。
:::
## 导入
```ts [npm]
import { Hono } from 'hono'
import {
timing,
setMetric,
startTime,
endTime,
wrapTime,
} from 'hono/timing'
import type { TimingVariables } from 'hono/timing'
```
## 用法
```js
// 指定变量类型以推断 `c.get('metric')`:
type Variables = TimingVariables
const app = new Hono<{ Variables: Variables }>()
// 将中间件添加到你的路由
app.use(timing());
app.get('/', async (c) => {
// 添加自定义指标
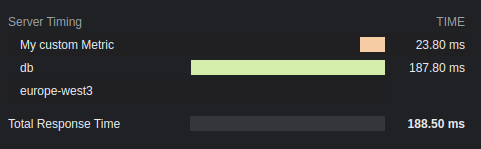
setMetric(c, 'region', 'europe-west3')
// 添加带计时的自定义指标,必须是毫秒
setMetric(c, 'custom', 23.8, 'My custom Metric')
// 启动一个新计时器
startTime(c, 'db');
const data = await db.findMany(...);
// 结束计时器
endTime(c, 'db');
// ...或者你也可以使用此函数包装一个 Promise:
const data = await wrapTime(c, 'db', db.findMany(...));
return c.json({ response: data });
});
```
### 条件启用
```ts
const app = new Hono()
app.use(
'*',
timing({
// c: 请求的上下文
enabled: (c) => c.req.method === 'POST',
})
)
```
## 结果
## 选项
### total: `boolean`
显示总响应时间。默认为 `true`。
### enabled: `boolean` | `(c: Context) => boolean`
是否应将计时信息添加到头中。默认为 `true`。
### totalDescription: `boolean`
总响应时间的描述。默认为 `Total Response Time`。
### autoEnd: `boolean`
如果 `startTime()` 应在请求结束时自动结束。
如果禁用,未手动结束的计时器将不会显示。
### crossOrigin: `boolean` | `string` | `(c: Context) => boolean | string`
此计时头可被读取的源。
- 如果为 false,仅来自当前源。
- 如果为 true,来自所有源。
- 如果为字符串,来自此域名。多个域名必须用逗号分隔。
默认为 `false`。查看更多 [文档](https://developer.mozilla.org/en-US/docs/Web/HTTP/Headers/Timing-Allow-Origin)。
# 尾部斜杠中间件
此中间件处理 GET 请求 URL 中的尾部斜杠。
`appendTrailingSlash` 会在未找到内容时将 URL 重定向到添加了尾部斜杠的地址。此外,`trimTrailingSlash` 将移除尾部斜杠。
## 导入
```ts
import { Hono } from 'hono'
import {
appendTrailingSlash,
trimTrailingSlash,
} from 'hono/trailing-slash'
```
## 用法
将 `/about/me` 的 GET 请求重定向到 `/about/me/` 的示例。
```ts
import { Hono } from 'hono'
import { appendTrailingSlash } from 'hono/trailing-slash'
const app = new Hono({ strict: true })
app.use(appendTrailingSlash())
app.get('/about/me/', (c) => c.text('With Trailing Slash'))
```
将 `/about/me/` 的 GET 请求重定向到 `/about/me` 的示例。
```ts
import { Hono } from 'hono'
import { trimTrailingSlash } from 'hono/trailing-slash'
const app = new Hono({ strict: true })
app.use(trimTrailingSlash())
app.get('/about/me', (c) => c.text('Without Trailing Slash'))
```
## 选项
### alwaysRedirect: `boolean`
默认情况下,尾部斜杠中间件仅在响应状态为 `404` 时进行重定向。当 `alwaysRedirect` 设置为 `true` 时,中间件会在执行处理程序之前进行重定向。这对于默认行为不起作用的通配符路由(`*`)很有用。
```ts
const app = new Hono()
app.use(trimTrailingSlash({ alwaysRedirect: true }))
app.get('/my-path/*', (c) => c.text('Wildcard route'))
```
此选项适用于 `trimTrailingSlash` 和 `appendTrailingSlash`。
## 注意
当请求方法为 `GET` 且响应状态为 `404` 时,它将生效。
# Accepts 辅助工具
Accepts 辅助工具帮助处理请求中的 Accept 头。
## 导入
```ts
import { Hono } from 'hono'
import { accepts } from 'hono/accepts'
```
## `accepts()`
`accepts()` 函数查看 Accept 头,例如 Accept-Encoding 和 Accept-Language,并返回适当的值。
```ts
import { accepts } from 'hono/accepts'
app.get('/', (c) => {
const accept = accepts(c, {
header: 'Accept-Language',
supports: ['en', 'ja', 'zh'],
default: 'en',
})
return c.json({ lang: accept })
})
```
### `AcceptHeader` 类型
`AcceptHeader` 类型的定义如下。
```ts
export type AcceptHeader =
| 'Accept'
| 'Accept-Charset'
| 'Accept-Encoding'
| 'Accept-Language'
| 'Accept-Patch'
| 'Accept-Post'
| 'Accept-Ranges'
```
## 选项
### header: `AcceptHeader`
目标 accept 头。
### supports: `string[]`
您的应用程序支持的头值。
### default: `string`
默认值。
### match: `(accepts: Accept[], config: acceptsConfig) => string`
自定义匹配函数。
# Adapter 助手
Adapter 助手提供了一种通过统一接口与各种平台交互的无缝方式。
## 导入
```ts
import { Hono } from 'hono'
import { env, getRuntimeKey } from 'hono/adapter'
```
## `env()`
`env()` 函数有助于在不同的运行时中检索环境变量,不仅仅局限于 Cloudflare Workers 的 Bindings。通过 `env(c)` 检索到的值对于每个运行时可能不同。
```ts
import { env } from 'hono/adapter'
app.get('/env', (c) => {
// 在 Node.js 或 Bun 上,NAME 是 process.env.NAME
// 在 Cloudflare 上,NAME 是写在 `wrangler.toml` 中的值
const { NAME } = env<{ NAME: string }>(c)
return c.text(NAME)
})
```
支持的运行时、无服务器平台和云服务:
- Cloudflare Workers
- `wrangler.toml`
- `wrangler.jsonc`
- Deno
- [`Deno.env`](https://docs.deno.com/runtime/manual/basics/env_variables)
- `.env` 文件
- Bun
- [`Bun.env`](https://bun.com/guides/runtime/set-env)
- `process.env`
- Node.js
- `process.env`
- Vercel
- [Vercel 上的环境变量](https://vercel.com/docs/projects/environment-variables)
- AWS Lambda
- [AWS Lambda 上的环境变量](https://docs.aws.amazon.com/lambda/latest/dg/samples-blank.html#samples-blank-architecture)
- Lambda@Edge\
Lambda 上的环境变量不被 Lambda@Edge [支持](https://docs.aws.amazon.com/AmazonCloudFront/latest/DeveloperGuide/add-origin-custom-headers.html),你需要使用 [Lambda@Edge 事件](https://docs.aws.amazon.com/AmazonCloudFront/latest/DeveloperGuide/lambda-event-structure.html) 作为替代。
- Fastly Compute\
在 Fastly Compute 上,你可以使用 ConfigStore 来管理用户定义的数据。
- Netlify\
在 Netlify 上,你可以使用 [Netlify Contexts](https://docs.netlify.com/site-deploys/overview/#deploy-contexts) 来管理用户定义的数据。
### 指定运行时
你可以通过将运行时键作为第二个参数传递来指定要获取环境变量的运行时。
```ts
app.get('/env', (c) => {
const { NAME } = env<{ NAME: string }>(c, 'workerd')
return c.text(NAME)
})
```
## `getRuntimeKey()`
`getRuntimeKey()` 函数返回当前运行时的标识符。
```ts
app.get('/', (c) => {
if (getRuntimeKey() === 'workerd') {
return c.text('You are on Cloudflare')
} else if (getRuntimeKey() === 'bun') {
return c.text('You are on Bun')
}
...
})
```
### 可用的运行时键
以下是可用的运行时键,不可用的运行时键所对应的运行时可能会被支持并标记为 `other`,其中一些灵感来自 [WinterCG 的 Runtime Keys](https://runtime-keys.proposal.wintercg.org/):
- `workerd` - Cloudflare Workers
- `deno`
- `bun`
- `node`
- `edge-light` - Vercel Edge Functions
- `fastly` - Fastly Compute
- `other` - 其他未知的运行时键
# ConnInfo 助手
ConnInfo 助手帮助您获取连接信息。例如,您可以轻松获取客户端的远程地址。
## 导入
::: code-group
```ts [Cloudflare Workers]
import { Hono } from 'hono'
import { getConnInfo } from 'hono/cloudflare-workers'
```
```ts [Deno]
import { Hono } from 'hono'
import { getConnInfo } from 'hono/deno'
```
```ts [Bun]
import { Hono } from 'hono'
import { getConnInfo } from 'hono/bun'
```
```ts [Vercel]
import { Hono } from 'hono'
import { getConnInfo } from 'hono/vercel'
```
```ts [AWS Lambda]
import { Hono } from 'hono'
import { getConnInfo } from 'hono/aws-lambda'
```
```ts [Cloudflare Pages]
import { Hono } from 'hono'
import { getConnInfo } from 'hono/cloudflare-pages'
```
```ts [Netlify]
import { Hono } from 'hono'
import { getConnInfo } from 'hono/netlify'
```
```ts [Lambda@Edge]
import { Hono } from 'hono'
import { getConnInfo } from 'hono/lambda-edge'
```
```ts [Node.js]
import { Hono } from 'hono'
import { getConnInfo } from '@hono/node-server/conninfo'
```
:::
## 用法
```ts
const app = new Hono()
app.get('/', (c) => {
const info = getConnInfo(c) // info 是 `ConnInfo`
return c.text(`Your remote address is ${info.remote.address}`)
})
```
## 类型定义
您可以通过 `getConnInfo()` 获取的值的类型定义如下:
```ts
type AddressType = 'IPv6' | 'IPv4' | undefined
type NetAddrInfo = {
/**
* 传输协议类型
*/
transport?: 'tcp' | 'udp'
/**
* 传输端口号
*/
port?: number
address?: string
addressType?: AddressType
} & (
| {
/**
* 主机名,例如 IP 地址
*/
address: string
/**
* 主机名类型
*/
addressType: AddressType
}
| {}
)
/**
* HTTP 连接信息
*/
interface ConnInfo {
/**
* 远程信息
*/
remote: NetAddrInfo
}
```
# Cookie 助手
Cookie 助手提供了一个简单的接口来管理 Cookie,使开发者能够无缝地设置、解析和删除 Cookie。
## 导入
```ts
import { Hono } from 'hono'
import {
deleteCookie,
getCookie,
getSignedCookie,
setCookie,
setSignedCookie,
generateCookie,
generateSignedCookie,
} from 'hono/cookie'
```
## 用法
### 普通 Cookie
```ts
app.get('/cookie', (c) => {
setCookie(c, 'cookie_name', 'cookie_value')
const yummyCookie = getCookie(c, 'cookie_name')
deleteCookie(c, 'cookie_name')
const allCookies = getCookie(c)
// ...
})
```
### 签名 Cookie
**注意**:设置和检索签名 Cookie 会返回一个 Promise,这是因为使用了 WebCrypto API 来创建 HMAC SHA-256 签名,该 API 是异步的。
```ts
app.get('/signed-cookie', (c) => {
const secret = 'secret' // 确保它是一个足够长的字符串以保证安全
await setSignedCookie(c, 'cookie_name0', 'cookie_value', secret)
const fortuneCookie = await getSignedCookie(
c,
secret,
'cookie_name0'
)
deleteCookie(c, 'cookie_name0')
// 如果签名被篡改或无效,`getSignedCookie` 将为指定的 cookie 返回 `false`
const allSignedCookies = await getSignedCookie(c, secret)
// ...
})
```
### Cookie 生成
`generateCookie` 和 `generateSignedCookie` 函数允许你直接创建 Cookie 字符串,而无需将它们设置到响应头中。
#### `generateCookie`
```ts
// 基本 cookie 生成
const cookie = generateCookie('delicious_cookie', 'macha')
// 返回:'delicious_cookie=macha; Path=/'
// 带选项的 cookie
const cookie = generateCookie('delicious_cookie', 'macha', {
path: '/',
secure: true,
httpOnly: true,
domain: 'example.com',
})
```
#### `generateSignedCookie`
```ts
// 基本签名 cookie 生成
const signedCookie = await generateSignedCookie(
'delicious_cookie',
'macha',
'secret chocolate chips'
)
// 带选项的签名 cookie
const signedCookie = await generateSignedCookie(
'delicious_cookie',
'macha',
'secret chocolate chips',
{
path: '/',
secure: true,
httpOnly: true,
}
)
```
**注意**:与 `setCookie` 和 `setSignedCookie` 不同,这些函数仅生成 Cookie 字符串。如果需要,你需要手动将它们设置到头中。
## 选项
### `setCookie` & `setSignedCookie`
- domain: `string`
- expires: `Date`
- httpOnly: `boolean`
- maxAge: `number`
- path: `string`
- secure: `boolean`
- sameSite: `'Strict'` | `'Lax'` | `'None'`
- priority: `'Low' | 'Medium' | 'High'`
- prefix: `secure` | `'host'`
- partitioned: `boolean`
示例:
```ts
// 普通 cookie
setCookie(c, 'great_cookie', 'banana', {
path: '/',
secure: true,
domain: 'example.com',
httpOnly: true,
maxAge: 1000,
expires: new Date(Date.UTC(2000, 11, 24, 10, 30, 59, 900)),
sameSite: 'Strict',
})
// 签名 cookie
await setSignedCookie(
c,
'fortune_cookie',
'lots-of-money',
'secret ingredient',
{
path: '/',
secure: true,
domain: 'example.com',
httpOnly: true,
maxAge: 1000,
expires: new Date(Date.UTC(2000, 11, 24, 10, 30, 59, 900)),
sameSite: 'Strict',
}
)
```
### `deleteCookie`
- path: `string`
- secure: `boolean`
- domain: `string`
示例:
```ts
deleteCookie(c, 'banana', {
path: '/',
secure: true,
domain: 'example.com',
})
```
`deleteCookie` 返回被删除的值:
```ts
const deletedCookie = deleteCookie(c, 'delicious_cookie')
```
## `__Secure-` 和 `__Host-` 前缀
Cookie 助手支持 Cookie 名称的 `__Secure-` 和 `__Host-` 前缀。
如果你想验证 Cookie 名称是否有前缀,请指定 prefix 选项。
```ts
const securePrefixCookie = getCookie(c, 'yummy_cookie', 'secure')
const hostPrefixCookie = getCookie(c, 'yummy_cookie', 'host')
const securePrefixSignedCookie = await getSignedCookie(
c,
secret,
'fortune_cookie',
'secure'
)
const hostPrefixSignedCookie = await getSignedCookie(
c,
secret,
'fortune_cookie',
'host'
)
```
另外,如果你希望在设置 Cookie 时指定前缀,请为 prefix 选项指定一个值。
```ts
setCookie(c, 'delicious_cookie', 'macha', {
prefix: 'secure', // 或 `host`
})
await setSignedCookie(
c,
'delicious_cookie',
'macha',
'secret choco chips',
{
prefix: 'secure', // 或 `host`
}
)
```
## 遵循最佳实践
新的 Cookie RFC(即 cookie-bis)和 CHIPS 包含了一些开发者应遵循的 Cookie 设置最佳实践。
- [RFC6265bis-13](https://datatracker.ietf.org/doc/html/draft-ietf-httpbis-rfc6265bis-13)
- `Max-Age`/`Expires` 限制
- `__Host-`/`__Secure-` 前缀限制
- [CHIPS-01](https://www.ietf.org/archive/id/draft-cutler-httpbis-partitioned-cookies-01.html)
- `Partitioned` 限制
Hono 遵循这些最佳实践。
在以下条件下,Cookie 助手在解析 Cookie 时将抛出 `Error`:
- Cookie 名称以 `__Secure-` 开头,但未设置 `secure` 选项。
- Cookie 名称以 `__Host-` 开头,但未设置 `secure` 选项。
- Cookie 名称以 `__Host-` 开头,但 `path` 不是 `/`。
- Cookie 名称以 `__Host-` 开头,但设置了 `domain`。
- `maxAge` 选项值大于 400 天。
- `expires` 选项值晚于当前时间 400 天。
# css 辅助函数
CSS 辅助函数 - `hono/css` - 是 Hono 内置的 CSS in JS(X)。
你可以在 JSX 中使用名为 `css` 的 JavaScript 模板字面量编写 CSS。`css` 的返回值将作为类名,设置为 class 属性的值。随后 `` 组件将包含 CSS 内容。
## 导入
```ts
import { Hono } from 'hono'
import { css, cx, keyframes, Style } from 'hono/css'
```
## `css`
你可以在 `css` 模板字面量中编写 CSS。在这种情况下,它使用 `headerClass` 作为 `class` 属性的值。不要忘记添加 ``,因为它包含 CSS 内容。
```ts{10,13}
app.get('/', (c) => {
const headerClass = css`
background-color: orange;
color: white;
padding: 1rem;
`
return c.html(
)
})
```
你可以使用 [嵌套选择器](https://developer.mozilla.org/en-US/docs/Web/CSS/Nesting_selector) `&` 来样式化伪类,如 `:hover`:
```ts
const buttonClass = css`
background-color: #fff;
&:hover {
background-color: red;
}
`
```
### 扩展
你可以通过嵌入类名来扩展 CSS 定义。
```tsx
const baseClass = css`
color: white;
background-color: blue;
`
const header1Class = css`
${baseClass}
font-size: 3rem;
`
const header2Class = css`
${baseClass}
font-size: 2rem;
`
```
此外,`${baseClass} {}` 的语法支持类嵌套。
```tsx
const headerClass = css`
color: white;
background-color: blue;
`
const containerClass = css`
${headerClass} {
h1 {
font-size: 3rem;
}
}
`
return c.render(
)
```
### 全局样式
一个名为 `:-hono-global` 的伪选择器允许你定义全局样式。
```tsx
const globalClass = css`
:-hono-global {
html {
font-family: Arial, Helvetica, sans-serif;
}
}
`
return c.render(
Hello!
Today is a good day.
)
```
或者你可以在 `` 组件中使用 `css` 字面量编写 CSS。
```tsx
export const renderer = jsxRenderer(({ children, title }) => {
return (
{title}
{children}
)
})
```
## `keyframes`
你可以使用 `keyframes` 来编写 `@keyframes` 的内容。在这种情况下,`fadeInAnimation` 将是动画的名称。
```tsx
const fadeInAnimation = keyframes`
from {
opacity: 0;
}
to {
opacity: 1;
}
`
const headerClass = css`
animation-name: ${fadeInAnimation};
animation-duration: 2s;
`
const Header = () =>
```
## `cx`
`cx` 组合两个类名。
```tsx
const buttonClass = css`
border-radius: 10px;
`
const primaryClass = css`
background: orange;
`
const Button = () => (
Click!
)
```
它也可以组合简单的字符串。
```tsx
const Header = () => Hi
```
## 与 [Secure Headers](/docs/middleware/builtin/secure-headers) 中间件结合使用
如果你想结合 [Secure Headers](/docs/middleware/builtin/secure-headers) 中间件使用 CSS 辅助函数,你可以将 [`nonce` 属性](https://developer.mozilla.org/en-US/docs/Web/HTML/Global_attributes/nonce) 添加到 ``,以避免 CSS 辅助函数引起的 Content-Security-Policy 问题。
```tsx{8,23}
import { secureHeaders, NONCE } from 'hono/secure-headers'
app.get(
'*',
secureHeaders({
contentSecurityPolicy: {
// 将预定义的 nonce 值设置为 `styleSrc`:
styleSrc: [NONCE],
},
})
)
app.get('/', (c) => {
const headerClass = css`
background-color: orange;
color: white;
padding: 1rem;
`
return c.html(
{/* 在 CSS 辅助函数的 `style` 和 `script` 元素上设置 `nonce` 属性 */}
)
})
```
## 提示
如果你使用 VS Code,可以使用 [vscode-styled-components](https://marketplace.visualstudio.com/items?itemName=styled-components.vscode-styled-components) 来为 CSS 标签字面量提供语法高亮和智能感知。
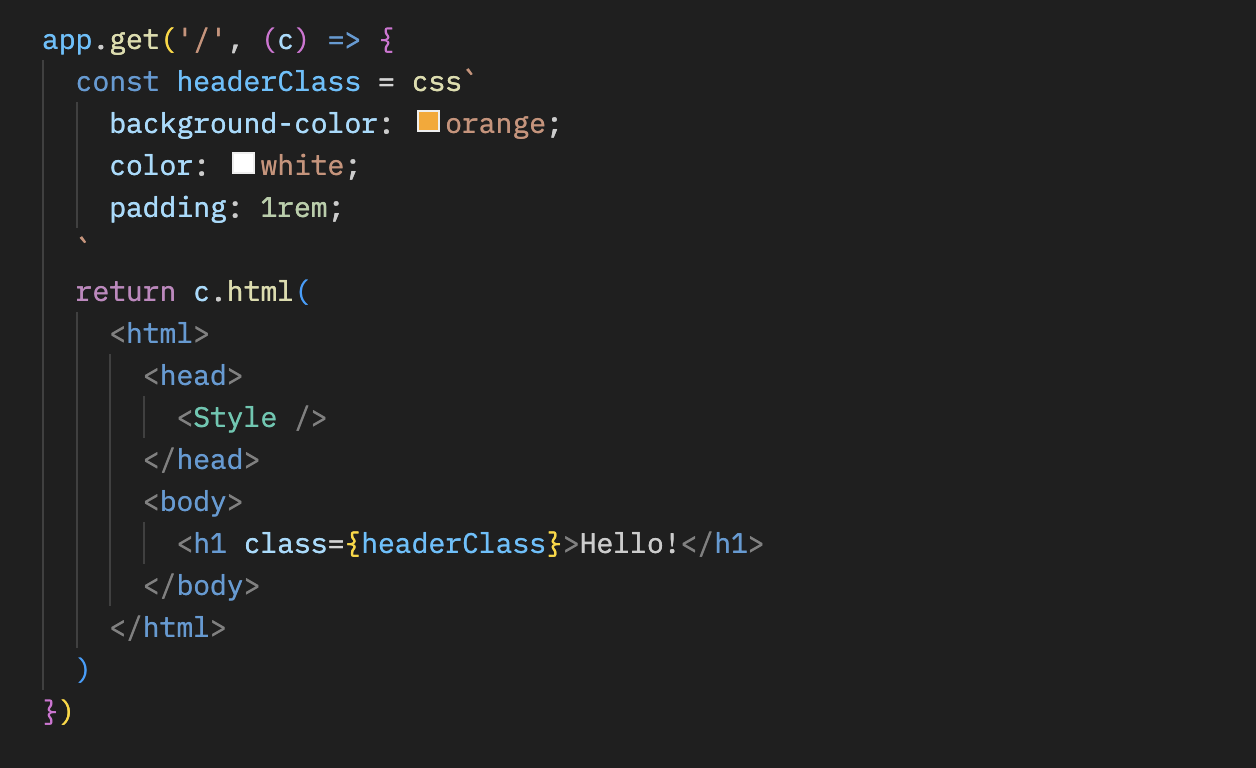
# 开发助手
开发助手提供了在开发过程中可以使用的有用方法。
```ts
import { Hono } from 'hono'
import { getRouterName, showRoutes } from 'hono/dev'
```
## `getRouterName()`
你可以使用 `getRouterName()` 获取当前使用的路由器名称。
```ts
const app = new Hono()
// ...
console.log(getRouterName(app))
```
## `showRoutes()`
`showRoutes()` 函数会在控制台中显示已注册的路由。
考虑如下所示的应用程序:
```ts
const app = new Hono().basePath('/v1')
app.get('/posts', (c) => {
// ...
})
app.get('/posts/:id', (c) => {
// ...
})
app.post('/posts', (c) => {
// ...
})
showRoutes(app, {
verbose: true,
})
```
当此应用程序开始运行时,路由将如下所示显示在控制台中:
```txt
GET /v1/posts
GET /v1/posts/:id
POST /v1/posts
```
## 选项
### verbose: `boolean`
当设置为 `true` 时,它会显示详细信息。
### colorize: `boolean`
当设置为 `false` 时,输出将不会着色。
# Factory 助手
Factory 助手提供了用于创建 Hono 组件(例如中间件)的实用函数。有时设置正确的 TypeScript 类型很困难,但这个助手让这一切变得更容易。
## 导入
```ts
import { Hono } from 'hono'
import { createFactory, createMiddleware } from 'hono/factory'
```
## `createFactory()`
`createFactory()` 将创建 Factory 类的一个实例。
```ts
import { createFactory } from 'hono/factory'
const factory = createFactory()
```
你可以将 Env 类型作为泛型传递:
```ts
type Env = {
Variables: {
foo: string
}
}
const factory = createFactory()
```
### 选项
### defaultAppOptions: `HonoOptions`
传递给由 `createApp()` 创建的 Hono 应用程序的默认选项。
```ts
const factory = createFactory({
defaultAppOptions: { strict: false },
})
const app = factory.createApp() // `strict: false` is applied
```
## `createMiddleware()`
`createMiddleware()` 是 `factory.createMiddleware()` 的快捷方式。
此函数将创建你的自定义中间件。
```ts
const messageMiddleware = createMiddleware(async (c, next) => {
await next()
c.res.headers.set('X-Message', 'Good morning!')
})
```
提示:如果你想获取像 `message` 这样的参数,你可以像下面这样将其创建为一个函数。
```ts
const messageMiddleware = (message: string) => {
return createMiddleware(async (c, next) => {
await next()
c.res.headers.set('X-Message', message)
})
}
app.use(messageMiddleware('Good evening!'))
```
## `factory.createHandlers()`
`createHandlers()` 有助于在与 `app.get('/')` 不同的地方定义处理程序。
```ts
import { createFactory } from 'hono/factory'
import { logger } from 'hono/logger'
// ...
const factory = createFactory()
const middleware = factory.createMiddleware(async (c, next) => {
c.set('foo', 'bar')
await next()
})
const handlers = factory.createHandlers(logger(), middleware, (c) => {
return c.json(c.var.foo)
})
app.get('/api', ...handlers)
```
## `factory.createApp()`
`createApp()` 有助于创建具有正确类型的 Hono 实例。如果你将此方法与 `createFactory()` 一起使用,可以避免在 `Env` 类型定义中的冗余。
如果你的应用程序是这样的,你必须在两个地方设置 `Env`:
```ts
import { createMiddleware } from 'hono/factory'
type Env = {
Variables: {
myVar: string
}
}
// 1. 将 `Env` 设置给 `new Hono()`
const app = new Hono()
// 2. 将 `Env` 设置给 `createMiddleware()`
const mw = createMiddleware(async (c, next) => {
await next()
})
app.use(mw)
```
通过使用 `createFactory()` 和 `createApp()`,你只需在一个地方设置 `Env`。
```ts
import { createFactory } from 'hono/factory'
// ...
// 将 `Env` 设置给 `createFactory()`
const factory = createFactory()
const app = factory.createApp()
// factory 也有 `createMiddleware()`
const mw = factory.createMiddleware(async (c, next) => {
await next()
})
```
`createFactory()` 可以接收 `initApp` 选项来初始化由 `createApp()` 创建的 `app`。以下是使用该选项的示例。
```ts
// factory-with-db.ts
type Env = {
Bindings: {
MY_DB: D1Database
}
Variables: {
db: DrizzleD1Database
}
}
export default createFactory({
initApp: (app) => {
app.use(async (c, next) => {
const db = drizzle(c.env.MY_DB)
c.set('db', db)
await next()
})
},
})
```
```ts
// crud.ts
import factoryWithDB from './factory-with-db'
const app = factoryWithDB.createApp()
app.post('/posts', (c) => {
c.var.db.insert()
// ...
})
```
# html 助手
html 助手允许你使用名为 `html` 的标签在 JavaScript 模板字面量中编写 HTML。使用 `raw()` 时,内容将原样渲染。你必须自行转义这些字符串。
## 导入
```ts
import { Hono } from 'hono'
import { html, raw } from 'hono/html'
```
## `html`
```ts
const app = new Hono()
app.get('/:username', (c) => {
const { username } = c.req.param()
return c.html(
html`
Hello! ${username}!
`
)
})
```
### 将片段插入 JSX
将内联脚本插入 JSX:
```tsx
app.get('/', (c) => {
return c.html(
Test Site
{html`
`}
Hello!
)
})
```
### 作为函数组件使用
由于 `html` 返回一个 HtmlEscapedString,它可以作为功能齐全的组件使用,而无需使用 JSX。
#### 使用 `html` 而不是 `memo` 来加速过程
```typescript
const Footer = () => html`
`
```
### 接收属性并嵌入值
```typescript
interface SiteData {
title: string
description: string
image: string
children?: any
}
const Layout = (props: SiteData) => html`
${props.title}
${props.children}
`
const Content = (props: { siteData: SiteData; name: string }) => (
Hello {props.name}
)
app.get('/', (c) => {
const props = {
name: 'World',
siteData: {
title: 'Hello <> World',
description: 'This is a description',
image: 'https://example.com/image.png',
},
}
return c.html()
})
```
## `raw()`
```ts
app.get('/', (c) => {
const name = 'John "Johnny" Smith'
return c.html(html`I'm ${raw(name)}.
`)
})
```
## 提示
得益于这些库,Visual Studio Code 和 vim 也能将模板字面量解释为 HTML,从而应用语法高亮和格式化。
-
-
# JWT 认证助手
此助手提供用于编码、解码、签名和验证 JSON Web Tokens (JWT) 的函数。JWT 通常用于 Web 应用程序中的认证和授权目的。此助手提供强大的 JWT 功能,支持各种加密算法。
## 导入
要使用此助手,你可以按以下方式导入它:
```ts
import { decode, sign, verify } from 'hono/jwt'
```
::: info
[JWT 中间件](/docs/middleware/builtin/jwt) 也从 `hono/jwt` 导入 `jwt` 函数。
:::
## `sign()`
此函数通过编码 payload 并使用指定的算法和密钥对其进行签名来生成 JWT 令牌。
```ts
sign(
payload: unknown,
secret: string,
alg?: 'HS256';
): Promise;
```
### 示例
```ts
import { sign } from 'hono/jwt'
const payload = {
sub: 'user123',
role: 'admin',
exp: Math.floor(Date.now() / 1000) + 60 * 5, // 令牌在 5 分钟后过期
}
const secret = 'mySecretKey'
const token = await sign(payload, secret)
```
### 选项
#### payload: `unknown`
要签名的 JWT payload。你可以包含其他 claims,如 [Payload 验证](#payload-validation) 中所示。
#### secret: `string`
用于 JWT 验证或签名的密钥。
#### alg: [AlgorithmTypes](#supported-algorithmtypes)
用于 JWT 签名或验证的算法。默认是 HS256。
## `verify()`
此函数检查 JWT 令牌是否真实且仍然有效。它确保令牌未被篡改,并且仅当你添加了 [Payload 验证](#payload-validation) 时才检查有效性。
```ts
verify(
token: string,
secret: string,
alg: 'HS256';
issuer?: string | RegExp;
): Promise;
```
### 示例
```ts
import { verify } from 'hono/jwt'
const tokenToVerify = 'token'
const secretKey = 'mySecretKey'
const decodedPayload = await verify(tokenToVerify, secretKey, 'HS256')
console.log(decodedPayload)
```
### 选项
#### token: `string`
要验证的 JWT 令牌。
#### secret: `string`
用于 JWT 验证或签名的密钥。
#### alg: [AlgorithmTypes](#supported-algorithmtypes)
用于 JWT 签名或验证的算法。
#### issuer: `string | RegExp`
用于 JWT 验证的预期发行者。
## `decode()`
此函数解码 JWT 令牌而不执行签名验证。它从令牌中提取并返回 header 和 payload。
```ts
decode(token: string): { header: any; payload: any };
```
### 示例
```ts
import { decode } from 'hono/jwt'
// 解码 JWT 令牌
const tokenToDecode =
'eyJhbGciOiAiSFMyNTYiLCAidHlwIjogIkpXVCJ9.eyJzdWIiOiAidXNlcjEyMyIsICJyb2xlIjogImFkbWluIn0.JxUwx6Ua1B0D1B0FtCrj72ok5cm1Pkmr_hL82sd7ELA'
const { header, payload } = decode(tokenToDecode)
console.log('Decoded Header:', header)
console.log('Decoded Payload:', payload)
```
### 选项
#### token: `string`
要解码的 JWT 令牌。
> `decode` 函数允许你检查 JWT 令牌的 header 和 payload 而_**不**_执行验证。这对于调试或从 JWT 令牌中提取信息可能很有用。
## Payload 验证
验证 JWT 令牌时,会执行以下 payload 验证:
- `exp`: 检查令牌以确保其未过期。
- `nbf`: 检查令牌以确保其在指定时间之前未被使用。
- `iat`: 检查令牌以确保其不是在将来签发的。
- `iss`: 检查令牌以确保其由受信任的发行者签发。
如果你打算在验证期间执行这些检查,请确保你的 JWT payload 包含这些字段(作为对象)。
## 自定义错误类型
该模块还定义了自定义错误类型以处理 JWT 相关错误。
- `JwtAlgorithmNotImplemented`: 表示请求的 JWT 算法未实现。
- `JwtTokenInvalid`: 表示 JWT 令牌无效。
- `JwtTokenNotBefore`: 表示令牌在其有效日期之前被使用。
- `JwtTokenExpired`: 表示令牌已过期。
- `JwtTokenIssuedAt`: 表示令牌中的 "iat" claim 不正确。
- `JwtTokenIssuer`: 表示令牌中的 "iss" claim 不正确。
- `JwtTokenSignatureMismatched`: 表示令牌中的签名不匹配。
## 支持的算法类型
该模块支持以下 JWT 加密算法:
- `HS256`: 使用 SHA-256 的 HMAC
- `HS384`: 使用 SHA-384 的 HMAC
- `HS512`: 使用 SHA-512 的 HMAC
- `RS256`: 使用 SHA-256 的 RSASSA-PKCS1-v1_5
- `RS384`: 使用 SHA-384 的 RSASSA-PKCS1-v1_5
- `RS512`: 使用 SHA-512 的 RSASSA-PKCS1-v1_5
- `PS256`: 使用 SHA-256 以及带 SHA-256 的 MGF1 的 RSASSA-PSS
- `PS384`: 使用 SHA-386 以及带 SHA-386 的 MGF1 的 RSASSA-PSS
- `PS512`: 使用 SHA-512 以及带 SHA-512 的 MGF1 的 RSASSA-PSS
- `ES256`: 使用 P-256 和 SHA-256 的 ECDSA
- `ES384`: 使用 P-384 和 SHA-384 的 ECDSA
- `ES512`: 使用 P-521 和 SHA-512 的 ECDSA
- `EdDSA`: 使用 Ed25519 的 EdDSA
# 代理助手
当将 Hono 应用程序用作(反向)代理时,代理助手提供有用的函数。
## 导入
```ts
import { Hono } from 'hono'
import { proxy } from 'hono/proxy'
```
## `proxy()`
`proxy()` 是用于代理的 `fetch()` API 包装器。参数和返回值与 `fetch()` 相同(代理特定选项除外)。
`Accept-Encoding` 标头被替换为当前运行时可以处理的编码。不必要的响应标头被移除,并返回一个可以从处理程序发送的 `Response` 对象。
### 示例
简单用法:
```ts
app.get('/proxy/:path', (c) => {
return proxy(`http://${originServer}/${c.req.param('path')}`)
})
```
复杂用法:
```ts
app.get('/proxy/:path', async (c) => {
const res = await proxy(
`http://${originServer}/${c.req.param('path')}`,
{
headers: {
...c.req.header(), // 可选,仅在需要转发所有请求数据(包括凭证)时指定。
'X-Forwarded-For': '127.0.0.1',
'X-Forwarded-Host': c.req.header('host'),
Authorization: undefined, // 不传播 c.req.header('Authorization') 中包含的请求标头
},
}
)
res.headers.delete('Set-Cookie')
return res
})
```
或者你可以将 `c.req` 作为参数传递。
```ts
app.all('/proxy/:path', (c) => {
return proxy(`http://${originServer}/${c.req.param('path')}`, {
...c.req, // 可选,仅在需要转发所有请求数据(包括凭证)时指定。
headers: {
...c.req.header(),
'X-Forwarded-For': '127.0.0.1',
'X-Forwarded-Host': c.req.header('host'),
Authorization: undefined, // 不传播 c.req.header('Authorization') 中包含的请求标头
},
})
})
```
你可以使用 `customFetch` 选项覆盖默认的全局 `fetch` 函数:
```ts
app.get('/proxy', (c) => {
return proxy('https://example.com/', {
customFetch,
})
})
```
### Connection 标头处理
默认情况下,`proxy()` 会忽略 `Connection` 标头以防止 Hop-by-Hop 标头注入攻击。你可以使用 `strictConnectionProcessing` 选项启用严格的 RFC 9110 合规性:
```ts
// 默认行为(推荐用于不可信的客户端)
app.get('/proxy/:path', (c) => {
return proxy(`http://${originServer}/${c.req.param('path')}`, c.req)
})
// 严格的 RFC 9110 合规性(仅在受信任的环境中使用)
app.get('/internal-proxy/:path', (c) => {
return proxy(`http://${internalServer}/${c.req.param('path')}`, {
...c.req,
strictConnectionProcessing: true,
})
})
```
### `ProxyFetch`
`proxy()` 的类型定义为 `ProxyFetch`,如下所示
```ts
interface ProxyRequestInit extends Omit {
raw?: Request
customFetch?: (request: Request) => Promise
strictConnectionProcessing?: boolean
headers?:
| HeadersInit
| [string, string][]
| Record
| Record
}
interface ProxyFetch {
(
input: string | URL | Request,
init?: ProxyRequestInit
): Promise
}
```
# 路由助手
Route Helper 为调试和中间件开发提供了增强的路由信息。它允许你访问关于匹配路由和当前正在处理的路由的详细信息。
## 导入
```ts
import { Hono } from 'hono'
import {
matchedRoutes,
routePath,
baseRoutePath,
basePath,
} from 'hono/route'
```
## 用法
### 基本路由信息
```ts
const app = new Hono()
app.get('/posts/:id', (c) => {
const currentPath = routePath(c) // '/posts/:id'
const routes = matchedRoutes(c) // 匹配到的路由数组
return c.json({
path: currentPath,
totalRoutes: routes.length,
})
})
```
### 与子应用一起工作
```ts
const app = new Hono()
const apiApp = new Hono()
apiApp.get('/posts/:id', (c) => {
return c.json({
routePath: routePath(c), // '/posts/:id'
baseRoutePath: baseRoutePath(c), // '/api'
basePath: basePath(c), // '/api'(带有实际参数)
})
})
app.route('/api', apiApp)
```
## `matchedRoutes()`
返回一个数组,包含所有匹配当前请求的路由,包括中间件。
```ts
app.all('/api/*', (c, next) => {
console.log('API middleware')
return next()
})
app.get('/api/users/:id', (c) => {
const routes = matchedRoutes(c)
// 返回:[
// { method: 'ALL', path: '/api/*', handler: [Function] },
// { method: 'GET', path: '/api/users/:id', handler: [Function] }
// ]
return c.json({ routes: routes.length })
})
```
## `routePath()`
返回为当前处理程序注册的路由路径模式。
```ts
app.get('/posts/:id', (c) => {
console.log(routePath(c)) // '/posts/:id'
return c.text('Post details')
})
```
### 与索引参数一起使用
你可以选择传递一个索引参数来获取特定位置的路由路径,类似于 `Array.prototype.at()`。
```ts
app.all('/api/*', (c, next) => {
return next()
})
app.get('/api/users/:id', (c) => {
console.log(routePath(c, 0)) // '/api/*'(第一个匹配的路由)
console.log(routePath(c, -1)) // '/api/users/:id'(最后一个匹配的路由)
return c.text('User details')
})
```
## `baseRoutePath()`
返回路由中指定的当前路由的基础路径模式。
```ts
const subApp = new Hono()
subApp.get('/posts/:id', (c) => {
return c.text(baseRoutePath(c)) // '/:sub'
})
app.route('/:sub', subApp)
```
### 与索引参数一起使用
你可以选择传递一个索引参数来获取特定位置的基础路由路径,类似于 `Array.prototype.at()`。
```ts
app.all('/api/*', (c, next) => {
return next()
})
const subApp = new Hono()
subApp.get('/users/:id', (c) => {
console.log(baseRoutePath(c, 0)) // '/'(第一个匹配的路由)
console.log(baseRoutePath(c, -1)) // '/api'(最后一个匹配的路由)
return c.text('User details')
})
app.route('/api', subApp)
```
## `basePath()`
返回带有来自实际请求的嵌入参数的基础路径。
```ts
const subApp = new Hono()
subApp.get('/posts/:id', (c) => {
return c.text(basePath(c)) // '/api'(对于请求 '/api/posts/123')
})
app.route('/:sub', subApp)
```
# SSG 助手
SSG 助手从你的 Hono 应用程序生成静态站点。它将检索注册路由的内容并将它们保存为静态文件。
## 用法
### 手动
如果你有一个如下简单的 Hono 应用程序:
```tsx
// index.tsx
const app = new Hono()
app.get('/', (c) => c.html('Hello, World!'))
app.use('/about', async (c, next) => {
c.setRenderer((content) => {
return c.html(
{content}
)
})
await next()
})
app.get('/about', (c) => {
return c.render(
<>
Hono SSG PageHello!
)
})
export default app
```
对于 Node.js,创建如下构建脚本:
```ts
// build.ts
import app from './index'
import { toSSG } from 'hono/ssg'
import fs from 'fs/promises'
toSSG(app, fs)
```
通过执行脚本,文件将按如下方式输出:
```bash
ls ./static
about.html index.html
```
### Vite 插件
使用 `@hono/vite-ssg` Vite 插件,你可以轻松处理该过程。
更多详情,请参阅此处:
https://github.com/honojs/vite-plugins/tree/main/packages/ssg
## toSSG
`toSSG` 是生成静态站点的主函数,接受应用程序和文件系统模块作为参数。它基于以下内容:
### 输入
toSSG 的参数在 ToSSGInterface 中指定。
```ts
export interface ToSSGInterface {
(
app: Hono,
fsModule: FileSystemModule,
options?: ToSSGOptions
): Promise
}
```
- `app` 指定带有注册路由的 `new Hono()`。
- `fs` 指定以下对象,假设为 `node:fs/promise`。
```ts
export interface FileSystemModule {
writeFile(path: string, data: string | Uint8Array): Promise
mkdir(
path: string,
options: { recursive: boolean }
): Promise
}
```
### 使用 Deno 和 Bun 的适配器
如果你想在 Deno 或 Bun 上使用 SSG,则为每个文件系统提供了 `toSSG` 函数。
对于 Deno:
```ts
import { toSSG } from 'hono/deno'
toSSG(app) // 第二个参数是类型为 `ToSSGOptions` 的选项。
```
对于 Bun:
```ts
import { toSSG } from 'hono/bun'
toSSG(app) // 第二个参数是类型为 `ToSSGOptions` 的选项。
```
### 选项
选项在 ToSSGOptions 接口中指定。
```ts
export interface ToSSGOptions {
dir?: string
concurrency?: number
extensionMap?: Record
plugins?: SSGPlugin[]
}
```
- `dir` 是静态文件的输出目的地。默认值为 `./static`。
- `concurrency` 是同时生成的文件并发数。默认值为 `2`。
- `extensionMap` 是一个映射,包含作为键的 `Content-Type` 和作为值的扩展名字符串。这用于确定输出文件的文件扩展名。
- `plugins` 是扩展静态站点生成过程功能的 SSG 插件数组。
### 输出
`toSSG` 以下述 Result 类型返回结果。
```ts
export interface ToSSGResult {
success: boolean
files: string[]
error?: Error
}
```
## 生成文件
### 路由和文件名
以下规则适用于注册的路由信息和生成的文件名。默认 `./static` 的行为如下:
- `/` -> `./static/index.html`
- `/path` -> `./static/path.html`
- `/path/` -> `./static/path/index.html`
### 文件扩展名
文件扩展名取决于每个路由返回的 `Content-Type`。例如,来自 `c.html` 的响应保存为 `.html`。
如果你想自定义文件扩展名,设置 `extensionMap` 选项。
```ts
import { toSSG, defaultExtensionMap } from 'hono/ssg'
// 将 `application/x-html` 内容保存为 `.html`
toSSG(app, fs, {
extensionMap: {
'application/x-html': 'html',
...defaultExtensionMap,
},
})
```
注意,以斜杠结尾的路径无论扩展名如何都保存为 index.ext。
```ts
// 保存到 ./static/html/index.html
app.get('/html/', (c) => c.html('html'))
// 保存到 ./static/text/index.txt
app.get('/text/', (c) => c.text('text'))
```
## 中间件
介绍支持 SSG 的内置中间件。
### ssgParams
你可以使用像 Next.js 的 `generateStaticParams` 这样的 API。
示例:
```ts
app.get(
'/shops/:id',
ssgParams(async () => {
const shops = await getShops()
return shops.map((shop) => ({ id: shop.id }))
}),
async (c) => {
const shop = await getShop(c.req.param('id'))
if (!shop) {
return c.notFound()
}
return c.render(
{shop.name}
)
}
)
```
### isSSGContext
`isSSGContext` 是一个辅助函数,如果当前应用程序在由 `toSSG` 触发的 SSG 上下文中运行,则返回 `true`。
```ts
app.get('/page', (c) => {
if (isSSGContext(c)) {
return c.text('This is generated by SSG')
}
return c.text('This is served dynamically')
})
```
### disableSSG
设置了 `disableSSG` 中间件的路由被 `toSSG` 排除在静态文件生成之外。
```ts
app.get('/api', disableSSG(), (c) => c.text('an-api'))
```
### onlySSG
设置了 `onlySSG` 中间件的路由将在 `toSSG` 执行后被 `c.notFound()` 覆盖。
```ts
app.get('/static-page', onlySSG(), (c) => c.html(Welcome to my site
))
```
## 插件
插件允许你扩展静态站点生成过程的功能。它们使用 hooks 在不同阶段自定义生成过程。
### 默认插件
默认情况下,`toSSG` 使用 `defaultPlugin`,它跳过非 200 状态响应(如重定向、错误或 404)。这防止为不成功的响应生成文件。
```ts
import { toSSG, defaultPlugin } from 'hono/ssg'
// 未指定插件时自动应用 defaultPlugin
toSSG(app, fs)
// 等同于:
toSSG(app, fs, { plugins: [defaultPlugin] })
```
如果你指定了自定义插件,`defaultPlugin` **不会**自动包含。为了在添加自定义插件时保持默认行为,请显式包含它:
```ts
toSSG(app, fs, {
plugins: [defaultPlugin, myCustomPlugin],
})
```
### 重定向插件
`redirectPlugin` 为返回 HTTP 重定向响应(301, 302, 303, 307, 308)的路由生成 HTML 重定向页面。生成的 HTML 包含 `` 标签和规范链接。
```ts
import { toSSG, redirectPlugin, defaultPlugin } from 'hono/ssg'
toSSG(app, fs, {
plugins: [redirectPlugin(), defaultPlugin()],
})
```
例如,如果你的应用程序有:
```ts
app.get('/old', (c) => c.redirect('/new'))
```
`redirectPlugin` 将在 `/old.html` 生成一个带有 meta 刷新重定向到 `/new` 的 HTML 文件。
> [!NOTE]
> 当与 `defaultPlugin` 一起使用时,请将 `redirectPlugin` 放在 `defaultPlugin` **之前**。由于 `defaultPlugin` 跳过非 200 响应,将其放在前面会阻止 `redirectPlugin` 处理重定向响应。
### Hook 类型
插件可以使用以下 hooks 来自定义 `toSSG` 过程:
```ts
export type BeforeRequestHook = (req: Request) => Request | false
export type AfterResponseHook = (res: Response) => Response | false
export type AfterGenerateHook = (
result: ToSSGResult
) => void | Promise
```
- **BeforeRequestHook**: 在处理每个请求之前调用。返回 `false` 以跳过路由。
- **AfterResponseHook**: 在接收每个响应之后调用。返回 `false` 以跳过文件生成。
- **AfterGenerateHook**: 在整个生成过程完成后调用。
### 插件接口
```ts
export interface SSGPlugin {
beforeRequestHook?: BeforeRequestHook | BeforeRequestHook[]
afterResponseHook?: AfterResponseHook | AfterResponseHook[]
afterGenerateHook?: AfterGenerateHook | AfterGenerateHook[]
}
```
### 基础插件示例
仅过滤 GET 请求:
```ts
const getOnlyPlugin: SSGPlugin = {
beforeRequestHook: (req) => {
if (req.method === 'GET') {
return req
}
return false
},
}
```
按状态码过滤:
```ts
const statusFilterPlugin: SSGPlugin = {
afterResponseHook: (res) => {
if (res.status === 200 || res.status === 500) {
return res
}
return false
},
}
```
记录生成的文件:
```ts
const logFilesPlugin: SSGPlugin = {
afterGenerateHook: (result) => {
if (result.files) {
result.files.forEach((file) => console.log(file))
}
},
}
```
### 高级插件示例
这是一个创建生成 `sitemap.xml` 文件的 sitemap 插件的示例:
```ts
// plugins.ts
import fs from 'node:fs/promises'
import path from 'node:path'
import type { SSGPlugin } from 'hono/ssg'
import { DEFAULT_OUTPUT_DIR } from 'hono/ssg'
export const sitemapPlugin = (baseURL: string): SSGPlugin => {
return {
afterGenerateHook: (result, fsModule, options) => {
const outputDir = options?.dir ?? DEFAULT_OUTPUT_DIR
const filePath = path.join(outputDir, 'sitemap.xml')
const urls = result.files.map((file) =>
new URL(file, baseURL).toString()
)
const siteMapText = `
${urls.map((url) => `${url}`).join('\n')}
`
fsModule.writeFile(filePath, siteMapText)
},
}
}
```
应用插件:
```ts
import app from './index'
import { toSSG } from 'hono/ssg'
import { sitemapPlugin } from './plugins'
// 应用插件:
toSSG(app, fs, {
plugins: [
getOnlyPlugin,
statusFilterPlugin,
logFilesPlugin,
sitemapPlugin('https://example.com'),
],
})
```
# 流式助手
流式助手提供了用于流式响应的方法。
## 导入
```ts
import { Hono } from 'hono'
import { stream, streamText, streamSSE } from 'hono/streaming'
```
## `stream()`
它返回一个简单的流式响应,作为 `Response` 对象。
```ts
app.get('/stream', (c) => {
return stream(c, async (stream) => {
// 编写当请求中止时要执行的过程。
stream.onAbort(() => {
console.log('Aborted!')
})
// 写入一个 Uint8Array。
await stream.write(new Uint8Array([0x48, 0x65, 0x6c, 0x6c, 0x6f]))
// 管道传输一个可读流。
await stream.pipe(anotherReadableStream)
})
})
```
## `streamText()`
它返回一个带有 `Content-Type:text/plain`、`Transfer-Encoding:chunked` 和 `X-Content-Type-Options:nosniff` 头部的流式响应。
```ts
app.get('/streamText', (c) => {
return streamText(c, async (stream) => {
// 写入带换行符 ('\n') 的文本。
await stream.writeln('Hello')
// 等待 1 秒。
await stream.sleep(1000)
// 写入不带换行符的文本。
await stream.write(`Hono!`)
})
})
```
::: warning
如果您正在为 Cloudflare Workers 开发应用程序,流式传输在 Wrangler 上可能无法正常工作。如果是这样,请为 `Content-Encoding` 头部添加 `Identity`。
```ts
app.get('/streamText', (c) => {
c.header('Content-Encoding', 'Identity')
return streamText(c, async (stream) => {
// ...
})
})
```
:::
## `streamSSE()`
它允许您无缝流式传输服务器发送事件 (SSE)。
```ts
const app = new Hono()
let id = 0
app.get('/sse', async (c) => {
return streamSSE(c, async (stream) => {
while (true) {
const message = `It is ${new Date().toISOString()}`
await stream.writeSSE({
data: message,
event: 'time-update',
id: String(id++),
})
await stream.sleep(1000)
}
})
})
```
## 错误处理
流式助手的第三个参数是错误处理程序。
此参数是可选的,如果您不指定它,错误将作为控制台错误输出。
```ts
app.get('/stream', (c) => {
return stream(
c,
async (stream) => {
// 编写当请求中止时要执行的过程。
stream.onAbort(() => {
console.log('Aborted!')
})
// 写入一个 Uint8Array。
await stream.write(
new Uint8Array([0x48, 0x65, 0x6c, 0x6c, 0x6f])
)
// 管道传输一个可读流。
await stream.pipe(anotherReadableStream)
},
(err, stream) => {
stream.writeln('An error occurred!')
console.error(err)
}
)
})
```
回调执行完毕后,流将自动关闭。
::: warning
如果流式助手的回调函数抛出错误,Hono 的 `onError` 事件将不会被触发。
`onError` 是一个在响应发送之前处理错误并覆盖响应的钩子。但是,当回调函数执行时,流已经启动,因此无法被覆盖。
:::
# 测试助手
测试助手提供了函数,使测试 Hono 应用程序变得更加容易。
## 导入
```ts
import { Hono } from 'hono'
import { testClient } from 'hono/testing'
```
## `testClient()`
`testClient()` 函数将 Hono 实例作为其第一个参数,并返回一个根据 Hono 应用程序路由类型化的对象,类似于 [Hono 客户端](/docs/guides/rpc#client)。这允许你在测试中以类型安全的方式调用定义的路由,并享有编辑器自动补全功能。
**关于类型推断的重要说明:**
为了让 `testClient` 正确推断你的路由类型并提供自动补全,**你必须直接在 `Hono` 实例上使用链式方法定义路由**。
类型推断依赖于类型通过链式的 `.get()`、`.post()` 等调用进行流动。如果在创建 Hono 实例后单独定义路由(如 "Hello World" 示例中显示的常见模式:`const app = new Hono(); app.get(...)`),`testClient` 将没有特定路由所需的类型信息,你也无法获得类型安全的客户端功能。
**示例:**
此示例之所以有效,是因为 `.get()` 方法直接链式调用在 `new Hono()` 上:
```ts
// index.ts
const app = new Hono().get('/search', (c) => {
const query = c.req.query('q')
return c.json({ query: query, results: ['result1', 'result2'] })
})
export default app
```
```ts
// index.test.ts
import { Hono } from 'hono'
import { testClient } from 'hono/testing'
import { describe, it, expect } from 'vitest' // 或者你首选的测试运行器
import app from './app'
describe('Search Endpoint', () => {
// 从 app 实例创建测试客户端
const client = testClient(app)
it('should return search results', async () => {
// 使用类型化客户端调用端点
// 注意查询参数的类型安全性(如果在路由中定义)
// 以及通过 .$get() 直接访问
const res = await client.search.$get({
query: { q: 'hono' },
})
// 断言
expect(res.status).toBe(200)
expect(await res.json()).toEqual({
query: 'hono',
results: ['result1', 'result2'],
})
})
})
```
要在测试中包含头信息,请将它们作为调用中的第二个参数传递。第二个参数还可以接受一个 `init` 属性作为 `RequestInit` 对象,允许你设置头信息、方法、请求体等。有关 `init` 属性的更多信息,请参见 [此处](/docs/guides/rpc#init-option)。
```ts
// index.test.ts
import { Hono } from 'hono'
import { testClient } from 'hono/testing'
import { describe, it, expect } from 'vitest' // 或者你首选的测试运行器
import app from './app'
describe('Search Endpoint', () => {
// 从 app 实例创建测试客户端
const client = testClient(app)
it('should return search results', async () => {
// 在头信息中包含 token 并设置内容类型
const token = 'this-is-a-very-clean-token'
const res = await client.search.$get(
{
query: { q: 'hono' },
},
{
headers: {
Authorization: `Bearer ${token}`,
'Content-Type': `application/json`,
},
}
)
// 断言
expect(res.status).toBe(200)
expect(await res.json()).toEqual({
query: 'hono',
results: ['result1', 'result2'],
})
})
})
```
# WebSocket Helper
WebSocket Helper 是 Hono 应用中用于服务器端 WebSocket 的辅助工具。
目前支持 Cloudflare Workers / Pages、Deno 和 Bun 适配器。
## 导入
::: code-group
```ts [Cloudflare Workers]
import { Hono } from 'hono'
import { upgradeWebSocket } from 'hono/cloudflare-workers'
```
```ts [Deno]
import { Hono } from 'hono'
import { upgradeWebSocket } from 'hono/deno'
```
```ts [Bun]
import { Hono } from 'hono'
import { upgradeWebSocket, websocket } from 'hono/bun'
// ...
export default {
fetch: app.fetch,
websocket,
}
```
:::
如果您使用 Node.js,可以使用 [@hono/node-ws](https://github.com/honojs/middleware/tree/main/packages/node-ws)。
## `upgradeWebSocket()`
`upgradeWebSocket()` 返回一个用于处理 WebSocket 的处理程序。
```ts
const app = new Hono()
app.get(
'/ws',
upgradeWebSocket((c) => {
return {
onMessage(event, ws) {
console.log(`Message from client: ${event.data}`)
ws.send('Hello from server!')
},
onClose: () => {
console.log('Connection closed')
},
}
})
)
```
可用事件:
- `onOpen` - 目前,Cloudflare Workers 不支持它。
- `onMessage`
- `onClose`
- `onError`
::: warning
如果您在使用 WebSocket Helper 的路由上使用修改请求头(例如应用 CORS)的中间件,您可能会遇到无法修改不可变请求头的错误。这是因为 `upgradeWebSocket()` 内部也会更改请求头。
因此,如果您同时使用 WebSocket Helper 和中间件,请小心。
:::
## RPC 模式
使用 WebSocket Helper 定义的处理程序支持 RPC 模式。
```ts
// server.ts
const wsApp = app.get(
'/ws',
upgradeWebSocket((c) => {
//...
})
)
export type WebSocketApp = typeof wsApp
// client.ts
const client = hc('http://localhost:8787')
const socket = client.ws.$ws() // 客户端的 WebSocket 对象
```
## 示例
请参阅使用 WebSocket Helper 的示例。
### 服务器端和客户端
```ts
// server.ts
import { Hono } from 'hono'
import { upgradeWebSocket } from 'hono/cloudflare-workers'
const app = new Hono().get(
'/ws',
upgradeWebSocket(() => {
return {
onMessage: (event) => {
console.log(event.data)
},
}
})
)
export default app
```
```ts
// client.ts
import { hc } from 'hono/client'
import type app from './server'
const client = hc('http://localhost:8787')
const ws = client.ws.$ws(0)
ws.addEventListener('open', () => {
setInterval(() => {
ws.send(new Date().toString())
}, 1000)
})
```
### 使用 JSX 的 Bun
```tsx
import { Hono } from 'hono'
import { upgradeWebSocket, websocket } from 'hono/bun'
import { html } from 'hono/html'
const app = new Hono()
app.get('/', (c) => {
return c.html(
{html`
`}
)
})
const ws = app.get(
'/ws',
upgradeWebSocket((c) => {
let intervalId
return {
onOpen(_event, ws) {
intervalId = setInterval(() => {
ws.send(new Date().toString())
}, 200)
},
onClose() {
clearInterval(intervalId)
},
}
})
)
export default {
fetch: app.fetch,
websocket,
}
```
# 最佳实践
Hono 非常灵活。你可以按照自己喜欢的方式编写应用。
然而,有一些最佳实践最好遵循。
## 尽可能不要创建“控制器”
如果可能,你不应该创建“类似 Ruby on Rails 的控制器”。
```ts
// 🙁
// 一个类似 RoR 的控制器
const booksList = (c: Context) => {
return c.json('list books')
}
app.get('/books', booksList)
```
问题与类型有关。例如,如果不编写复杂的泛型,无法在控制器中推断路径参数。
```ts
// 🙁
// 一个类似 RoR 的控制器
const bookPermalink = (c: Context) => {
const id = c.req.param('id') // 无法推断路径参数
return c.json(`get ${id}`)
}
```
因此,你不需要创建类似 RoR 的控制器,应该直接在路径定义后编写处理程序。
```ts
// 😃
app.get('/books/:id', (c) => {
const id = c.req.param('id') // 可以推断路径参数
return c.json(`get ${id}`)
})
```
## `hono/factory` 中的 `factory.createHandlers()`
如果你仍然想创建类似 RoR 的控制器,请使用 [`hono/factory`](/docs/helpers/factory) 中的 `factory.createHandlers()`。如果你使用这个,类型推断将正常工作。
```ts
import { createFactory } from 'hono/factory'
import { logger } from 'hono/logger'
// ...
// 😃
const factory = createFactory()
const middleware = factory.createMiddleware(async (c, next) => {
c.set('foo', 'bar')
await next()
})
const handlers = factory.createHandlers(logger(), middleware, (c) => {
return c.json(c.var.foo)
})
app.get('/api', ...handlers)
```
## 构建大型应用
使用 `app.route()` 来构建大型应用,而无需创建“类似 Ruby on Rails 的控制器”。
如果你的应用有 `/authors` 和 `/books` 端点,并且你希望将文件从 `index.ts` 分离出来,创建 `authors.ts` 和 `books.ts`。
```ts
// authors.ts
import { Hono } from 'hono'
const app = new Hono()
app.get('/', (c) => c.json('list authors'))
app.post('/', (c) => c.json('create an author', 201))
app.get('/:id', (c) => c.json(`get ${c.req.param('id')}`))
export default app
```
```ts
// books.ts
import { Hono } from 'hono'
const app = new Hono()
app.get('/', (c) => c.json('list books'))
app.post('/', (c) => c.json('create a book', 201))
app.get('/:id', (c) => c.json(`get ${c.req.param('id')}`))
export default app
```
然后,导入它们并使用 `app.route()` 挂载到路径 `/authors` 和 `/books` 上。
```ts
// index.ts
import { Hono } from 'hono'
import authors from './authors'
import books from './books'
const app = new Hono()
// 😃
app.route('/authors', authors)
app.route('/books', books)
export default app
```
### 如果你想使用 RPC 功能
上面的代码适用于正常用例。
但是,如果你想使用 `RPC` 功能,你可以通过如下链式调用获得正确的类型。
```ts
// authors.ts
import { Hono } from 'hono'
const app = new Hono()
.get('/', (c) => c.json('list authors'))
.post('/', (c) => c.json('create an author', 201))
.get('/:id', (c) => c.json(`get ${c.req.param('id')}`))
export default app
export type AppType = typeof app
```
如果你将 `app` 的类型传递给 `hc`,它将获得正确的类型。
```ts
import type { AppType } from './authors'
import { hc } from 'hono/client'
// 😃
const client = hc('http://localhost') // 类型正确
```
有关更详细的信息,请参阅 [RPC 页面](/docs/guides/rpc#using-rpc-with-larger-applications)。
# Create-hono
`create-hono` 支持的命令行选项 - 这是当你运行 `npm create hono@latest`、`npx create-hono@latest` 或 `pnpm create hono@latest` 时运行的项目初始化工具。
> [!NOTE]
> **为什么需要这个页面?** 安装/快速启动示例通常展示一个最小化的 `npm create hono@latest my-app` 命令。`create-hono` 支持几个有用的标志,你可以传递这些标志来自动化和自定义项目创建(选择模板、跳过提示、选择包管理器、使用本地缓存等)。
## 传递参数:
当你使用 `npm create`(或 `npx`)时,旨在传递给初始化脚本的参数必须放在 `--` **之后**。`--` 之后的任何内容都会转发给初始化程序。
::: code-group
```sh [npm]
# 将参数转发给 create-hono(npm 需要 `--`)
npm create hono@latest my-app -- --template cloudflare-workers
```
```sh [yarn]
# "--template cloudflare-workers" 选择 Cloudflare Workers 模板
yarn create hono my-app --template cloudflare-workers
```
```sh [pnpm]
# "--template cloudflare-workers" 选择 Cloudflare Workers 模板
pnpm create hono@latest my-app --template cloudflare-workers
```
```sh [bun]
# "--template cloudflare-workers" 选择 Cloudflare Workers 模板
bun create hono@latest my-app --template cloudflare-workers
```
```sh [deno]
# "--template cloudflare-workers" 选择 Cloudflare Workers 模板
deno init --npm hono@latest my-app --template cloudflare-workers
```
:::
## 常用参数
| 参数 | 描述 | 示例 |
| :---------------------- | :----------------------------------------------------------------------------------------------------------------------------------------------- | :------------------------------ |
| `--template ` | 选择一个起始模板并跳过交互式模板提示。模板可能包含名称,如 `bun`、`cloudflare-workers`、`vercel` 等。 | `--template cloudflare-workers` |
| `--install` | 模板创建后自动安装依赖。 | `--install` |
| `--pm ` | 指定安装依赖时运行哪个包管理器。常用值:`npm`、`pnpm`、`yarn`。 | `--pm pnpm` |
| `--offline` | 使用本地缓存/模板而不是获取最新的远程模板。适用于离线环境或确定性本地运行。 | `--offline` |
> [!NOTE]
> 确切的模板集和可用选项由 `create-hono` 项目维护。此文档页面总结了最常用的标志 — 请参阅下方链接的仓库以获取完整、权威的参考。
## 示例流程
### 最小化,交互式
```bash
npm create hono@latest my-app
```
这将提示你选择模板和选项。
### 非交互式,选择模板和包管理器
```bash
npm create hono@latest my-app -- --template vercel --pm npm --install
```
这将使用 `vercel` 模板创建 `my-app`,使用 `npm` 安装依赖,并跳过交互式提示。
### 使用离线缓存(无网络)
```bash
pnpm create hono@latest my-app --template deno --offline
```
## 故障排除与提示
- 如果某个选项似乎未被识别,请确保在使用 `npm create` / `npx` 时使用 `--` 转发它。
- 要查看最新的模板和标志列表,请参阅 `create-hono` 仓库或在本地运行初始化程序并遵循其帮助输出。
## 链接与参考
- `create-hono` 仓库:[create-hono](https://github.com/honojs/create-hono)
# 示例
参见 [示例部分](/examples/).
# 常见问题
本指南收集了关于 Hono 的常见问题 (FAQ) 及其解决方法。
## Hono 有官方的 Renovate 配置吗?
Hono 团队目前不维护 [Renovate](https://github.com/renovatebot/renovate) 配置。
因此,请按如下方式使用第三方 renovate-config。
在你的 `renovate.json` 中:
```json
// renovate.json
{
"$schema": "https://docs.renovatebot.com/renovate-schema.json",
"extends": [
"github>shinGangan/renovate-config-hono" // [!code ++]
]
}
```
请参阅 [renovate-config-hono](https://github.com/shinGangan/renovate-config-hono) 仓库以获取更多详情。
# 辅助工具
辅助工具可用于协助您开发应用程序。与中间件不同,它们不作为处理程序,而是提供有用的函数。
例如,以下是使用 [Cookie 辅助工具](/docs/helpers/cookie) 的方法:
```ts
import { getCookie, setCookie } from 'hono/cookie'
const app = new Hono()
app.get('/cookie', (c) => {
const yummyCookie = getCookie(c, 'yummy_cookie')
// ...
setCookie(c, 'delicious_cookie', 'macha')
//
})
```
## 可用的辅助工具
- [Accepts](/docs/helpers/accepts)
- [适配器](/docs/helpers/adapter)
- [Cookie](/docs/helpers/cookie)
- [css](/docs/helpers/css)
- [开发](/docs/helpers/dev)
- [工厂](/docs/helpers/factory)
- [html](/docs/helpers/html)
- [JWT](/docs/helpers/jwt)
- [SSG](/docs/helpers/ssg)
- [流式传输](/docs/helpers/streaming)
- [测试](/docs/helpers/testing)
- [WebSocket](/docs/helpers/websocket)
# 客户端组件
`hono/jsx` 不仅支持服务端,也支持客户端。这意味着可以创建在浏览器中运行的交互式 UI。我们称之为客户端组件或 `hono/jsx/dom`。
它速度快且体积非常小。`hono/jsx/dom` 中的计数器程序经过 Brotli 压缩后仅为 2.8KB,而 React 则为 47.8KB。
本节介绍客户端组件特有的功能。
## 计数器示例
这是一个简单计数器的示例,代码与 React 中的工作方式相同。
```tsx
import { useState } from 'hono/jsx'
import { render } from 'hono/jsx/dom'
function Counter() {
const [count, setCount] = useState(0)
return (
Count: {count}
)
}
function App() {
return (
)
}
const root = document.getElementById('root')
render(, root)
```
## `render()`
你可以使用 `render()` 将 JSX 组件插入到指定的 HTML 元素中。
```tsx
render(, container)
```
你可以在此处查看完整的示例代码:[计数器示例](https://github.com/honojs/examples/tree/main/hono-vite-jsx)。
## 与 React 兼容的 Hooks
hono/jsx/dom 拥有与 React 兼容或部分兼容的 Hooks。你可以通过查看 [React 文档](https://react.dev/reference/react/hooks) 来了解这些 API。
- `useState()`
- `useEffect()`
- `useRef()`
- `useCallback()`
- `use()`
- `startTransition()`
- `useTransition()`
- `useDeferredValue()`
- `useMemo()`
- `useLayoutEffect()`
- `useReducer()`
- `useDebugValue()`
- `createElement()`
- `memo()`
- `isValidElement()`
- `useId()`
- `createRef()`
- `forwardRef()`
- `useImperativeHandle()`
- `useSyncExternalStore()`
- `useInsertionEffect()`
- `useFormStatus()`
- `useActionState()`
- `useOptimistic()`
## `startViewTransition()` 系列
`startViewTransition()` 系列包含原始的 hooks 和函数,用于轻松处理 [View Transitions API](https://developer.mozilla.org/en-US/docs/Web/API/View_Transitions_API)。以下是如何使用它们的示例。
### 1. 最简单的示例
借助 `startViewTransition()`,你可以简便地编写使用 `document.startViewTransition` 的过渡效果。
```tsx
import { useState, startViewTransition } from 'hono/jsx'
import { css, Style } from 'hono/css'
export default function App() {
const [showLargeImage, setShowLargeImage] = useState(false)
return (
<>
{!showLargeImage ? (

) : (
)}
{!showLargeImage ? (
) : (
)}
{!showLargeImage ? (
) : (
)}
Hello Hono!
{props.messages.map((message) => {
return - {message}!!
})}
)
}
app.get('/', (c) => {
const messages = ['Good Morning', 'Good Evening', 'Good Night']
return c.html()
})
export default app
```
## 元数据提升
你可以直接在组件内部编写文档元数据标签,例如 ``、`<link>` 和 `<meta>`。这些标签将自动提升到文档的 `<head>` 部分。当 `<head>` 元素渲染位置远离确定适当元数据的组件时,这尤其有用。
```tsx
import { Hono } from 'hono'
const app = new Hono()
app.use('*', async (c, next) => {
c.setRenderer((content) => {
return c.html(
<html>
<head></head>
<body>{content}</body>
</html>
)
})
await next()
})
app.get('/about', (c) => {
return c.render(
<>
<title>About Page
about page content
)
})
export default app
```
:::info
当发生提升时,现有元素不会被移除。后面出现的元素会被添加到末尾。例如,如果你的 `` 中有 `Default` 并且组件渲染了 `Page Title`,两个标题都会出现在 head 中。
:::
## Fragment
使用 Fragment 将多个元素分组而不添加额外的节点:
```tsx
import { Fragment } from 'hono/jsx'
const List = () => (
first child
second child
third child
)
```
或者如果设置得当,你可以用 `<>` 来编写。
```tsx
const List = () => (
<>
first child
second child
third child
)
```
## `PropsWithChildren`
你可以使用 `PropsWithChildren` 在函数组件中正确推断子元素。
```tsx
import { PropsWithChildren } from 'hono/jsx'
type Post = {
id: number
title: string
}
function Component({ title, children }: PropsWithChildren) {
return (
{title}
{children}
)
}
```
## 插入原始 HTML
要直接插入 HTML,使用 `dangerouslySetInnerHTML`:
```tsx
app.get('/foo', (c) => {
const inner = { __html: 'JSX · SSR' }
const Div =
})
```
## 记忆化
通过使用 `memo` 记忆计算后的字符串来优化你的组件:
```tsx
import { memo } from 'hono/jsx'
const Header = memo(() => )
const Footer = memo(() => )
const Layout = (
)
```
## Context
通过使用 `useContext`,你可以在组件树的任何层级全局共享数据,而无需通过 props 传递值。
```tsx
import type { FC } from 'hono/jsx'
import { createContext, useContext } from 'hono/jsx'
const themes = {
light: {
color: '#000000',
background: '#eeeeee',
},
dark: {
color: '#ffffff',
background: '#222222',
},
}
const ThemeContext = createContext(themes.light)
const Button: FC = () => {
const theme = useContext(ThemeContext)
return
}
const Toolbar: FC = () => {
return (
)
}
// ...
app.get('/', (c) => {
return c.html(
)
})
```
## 异步组件
`hono/jsx` 支持异步组件,因此你可以在组件中使用 `async`/`await`。
如果你使用 `c.html()` 渲染它,它将自动等待。
```tsx
const AsyncComponent = async () => {
await new Promise((r) => setTimeout(r, 1000)) // 睡眠 1 秒
return Done!
}
app.get('/', (c) => {
return c.html(
)
})
```
## Suspense
类似 React 的 `Suspense` 功能可用。
如果你用 `Suspense` 包装异步组件,fallback 中的内容将首先渲染,一旦 Promise 解决,等待的内容将显示。
你可以配合 `renderToReadableStream()` 使用它。
```tsx
import { renderToReadableStream, Suspense } from 'hono/jsx/streaming'
//...
app.get('/', (c) => {
const stream = renderToReadableStream(
loading...}>
)
return c.body(stream, {
headers: {
'Content-Type': 'text/html; charset=UTF-8',
'Transfer-Encoding': 'chunked',
},
})
})
```
## ErrorBoundary
你可以使用 `ErrorBoundary` 捕获子组件中的错误。
在下面的示例中,如果发生错误,它将显示 `fallback` 中指定的内容。
```tsx
function SyncComponent() {
throw new Error('Error')
return Hello
}
app.get('/sync', async (c) => {
return c.html(
Out of Service}>
)
})
```
`ErrorBoundary` 也可以与异步组件和 `Suspense` 一起使用。
```tsx
async function AsyncComponent() {
await new Promise((resolve) => setTimeout(resolve, 2000))
throw new Error('Error')
return Hello
}
app.get('/with-suspense', async (c) => {
return c.html(
Out of Service}>
Loading...}>
)
})
```
## StreamingContext
你可以使用 `StreamingContext` 为 `Suspense` 和 `ErrorBoundary` 等流式组件提供配置。这对于为这些组件生成的脚本标签添加 nonce 值以用于内容安全策略 (CSP) 很有用。
```tsx
import { Suspense, StreamingContext } from 'hono/jsx/streaming'
// ...
app.get('/', (c) => {
const stream = renderToReadableStream(
Loading...}>
)
return c.body(stream, {
headers: {
'Content-Type': 'text/html; charset=UTF-8',
'Transfer-Encoding': 'chunked',
'Content-Security-Policy':
"script-src 'nonce-random-nonce-value'",
},
})
})
```
`scriptNonce` 值将自动添加到由 `Suspense` 和 `ErrorBoundary` 组件生成的任何 `
) : (
)}
Hello
)
})
```
为了正确构建脚本,你可以使用如下所示的示例配置文件 `vite.config.ts`。
```ts
import pages from '@hono/vite-cloudflare-pages'
import devServer from '@hono/vite-dev-server'
import { defineConfig } from 'vite'
export default defineConfig(({ mode }) => {
if (mode === 'client') {
return {
build: {
rollupOptions: {
input: './src/client.ts',
output: {
entryFileNames: 'static/client.js',
},
},
},
}
} else {
return {
plugins: [
pages(),
devServer({
entry: 'src/index.tsx',
}),
],
}
}
})
```
你可以运行以下命令来构建服务器和客户端脚本。
```sh
vite build --mode client && vite build
```
## Cloudflare Pages 中间件
Cloudflare Pages 使用其自己的 [中间件](https://developers.cloudflare.com/pages/functions/middleware/) 系统,这与 Hono 的中间件不同。你可以通过在名为 `_middleware.ts` 的文件中导出 `onRequest` 来启用它,如下所示:
```ts
// functions/_middleware.ts
export async function onRequest(pagesContext) {
console.log(`You are accessing ${pagesContext.request.url}`)
return await pagesContext.next()
}
```
使用 `handleMiddleware`,你可以将 Hono 的中间件用作 Cloudflare Pages 中间件。
```ts
// functions/_middleware.ts
import { handleMiddleware } from 'hono/cloudflare-pages'
export const onRequest = handleMiddleware(async (c, next) => {
console.log(`You are accessing ${c.req.url}`)
await next()
})
```
你也可以使用 Hono 的内置和第三方中间件。例如,要添加基本认证,你可以使用 [Hono 的基本认证中间件](/docs/middleware/builtin/basic-auth)。
```ts
// functions/_middleware.ts
import { handleMiddleware } from 'hono/cloudflare-pages'
import { basicAuth } from 'hono/basic-auth'
export const onRequest = handleMiddleware(
basicAuth({
username: 'hono',
password: 'acoolproject',
})
)
```
如果你想应用多个中间件,你可以这样写:
```ts
import { handleMiddleware } from 'hono/cloudflare-pages'
// ...
export const onRequest = [
handleMiddleware(middleware1),
handleMiddleware(middleware2),
handleMiddleware(middleware3),
]
```
### 访问 `EventContext`
你可以通过 `handleMiddleware` 中的 `c.env` 访问 [`EventContext`](https://developers.cloudflare.com/pages/functions/api-reference/#eventcontext) 对象。
```ts
// functions/_middleware.ts
import { handleMiddleware } from 'hono/cloudflare-pages'
export const onRequest = [
handleMiddleware(async (c, next) => {
c.env.eventContext.data.user = 'Joe'
await next()
}),
]
```
然后,你可以在处理程序中通过 `c.env.eventContext` 访问数据值:
```ts
// functions/api/[[route]].ts
import type { EventContext } from 'hono/cloudflare-pages'
import { handle } from 'hono/cloudflare-pages'
// ...
type Env = {
Bindings: {
eventContext: EventContext
}
}
const app = new Hono().basePath('/api')
app.get('/hello', (c) => {
return c.json({
message: `Hello, ${c.env.eventContext.data.user}!`, // 'Joe'
})
})
export const onRequest = handle(app)
```
# Cloudflare Workers
[Cloudflare Workers](https://workers.cloudflare.com) 是 Cloudflare CDN 上的 JavaScript 边缘运行时。
您可以使用 [Wrangler](https://developers.cloudflare.com/workers/wrangler/) 在本地开发应用程序并通过几条命令发布它。
Wrangler 包含转译器,所以我们可以用 TypeScript 编写代码。
让我们用 Hono 制作您的第一个 Cloudflare Workers 应用程序。
## 1. 设置
Cloudflare Workers 的启动器可用。
使用 "create-hono" 命令开始您的项目。
为本示例选择 `cloudflare-workers` 模板。
::: code-group
```sh [npm]
npm create hono@latest my-app
```
```sh [yarn]
yarn create hono my-app
```
```sh [pnpm]
pnpm create hono my-app
```
```sh [bun]
bun create hono@latest my-app
```
```sh [deno]
deno init --npm hono my-app
```
:::
进入 `my-app` 并安装依赖。
::: code-group
```sh [npm]
cd my-app
npm i
```
```sh [yarn]
cd my-app
yarn
```
```sh [pnpm]
cd my-app
pnpm i
```
```sh [bun]
cd my-app
bun i
```
:::
## 2. 你好世界
如下编辑 `src/index.ts`。
```ts
import { Hono } from 'hono'
const app = new Hono()
app.get('/', (c) => c.text('Hello Cloudflare Workers!'))
export default app
```
## 3. 运行
在本地运行开发服务器。然后,在您的网页浏览器中访问 `http://localhost:8787`。
::: code-group
```sh [npm]
npm run dev
```
```sh [yarn]
yarn dev
```
```sh [pnpm]
pnpm dev
```
```sh [bun]
bun run dev
```
:::
### 更改端口号
如果您需要更改端口号,可以按照这里的说明更新 `wrangler.toml` / `wrangler.json` / `wrangler.jsonc` 文件:
[Wrangler 配置](https://developers.cloudflare.com/workers/wrangler/configuration/#local-development-settings)
或者,您可以按照这里的说明设置 CLI 选项:
[Wrangler CLI](https://developers.cloudflare.com/workers/wrangler/commands/#dev)
## 4. 部署
如果您拥有 Cloudflare 账户,您可以部署到 Cloudflare。在 `package.json` 中,`$npm_execpath` 需要更改为您选择的包管理器。
::: code-group
```sh [npm]
npm run deploy
```
```sh [yarn]
yarn deploy
```
```sh [pnpm]
pnpm run deploy
```
```sh [bun]
bun run deploy
```
:::
就是这样!
## 将 Hono 与其他事件处理程序一起使用
您可以在 _Module Worker 模式_ 中将 Hono 与其他事件处理程序(例如 `scheduled`)集成。
为此,将 `app.fetch` 导出为模块的 `fetch` 处理程序,然后根据需要实现其他处理程序:
```ts
const app = new Hono()
export default {
fetch: app.fetch,
scheduled: async (batch, env) => {},
}
```
## 提供静态文件
如果您想提供静态文件,可以使用 Cloudflare Workers 的 [静态资产功能](https://developers.cloudflare.com/workers/static-assets/)。在 `wrangler.toml` 中指定文件目录:
```toml
assets = { directory = "public" }
```
然后创建 `public` 目录并将文件放在那里。例如,`./public/static/hello.txt` 将作为 `/static/hello.txt` 提供。
```
.
├── package.json
├── public
│ ├── favicon.ico
│ └── static
│ └── hello.txt
├── src
│ └── index.ts
└── wrangler.toml
```
## 类型
如果您想要拥有 workers 类型,必须安装 `@cloudflare/workers-types`。
::: code-group
```sh [npm]
npm i --save-dev @cloudflare/workers-types
```
```sh [yarn]
yarn add -D @cloudflare/workers-types
```
```sh [pnpm]
pnpm add -D @cloudflare/workers-types
```
```sh [bun]
bun add --dev @cloudflare/workers-types
```
:::
## 测试
对于测试,我们推荐使用 `@cloudflare/vitest-pool-workers`。
参考 [示例](https://github.com/honojs/examples) 进行设置。
如果有以下应用程序。
```ts
import { Hono } from 'hono'
const app = new Hono()
app.get('/', (c) => c.text('Please test me!'))
```
我们可以用这段代码测试它是否返回 "_200 OK_" 响应。
```ts
describe('Test the application', () => {
it('Should return 200 response', async () => {
const res = await app.request('http://localhost/')
expect(res.status).toBe(200)
})
})
```
## 绑定
在 Cloudflare Workers 中,我们可以绑定环境变量、KV 命名空间、R2 存储桶或 Durable Object。您可以在 `c.env` 中访问它们。如果您将绑定的 "_类型定义_" 作为泛型传递给 `Hono`,它将拥有类型。
```ts
type Bindings = {
MY_BUCKET: R2Bucket
USERNAME: string
PASSWORD: string
}
const app = new Hono<{ Bindings: Bindings }>()
// 访问环境变量
app.put('/upload/:key', async (c, next) => {
const key = c.req.param('key')
await c.env.MY_BUCKET.put(key, c.req.body)
return c.text(`Put ${key} successfully!`)
})
```
## 在中间件中使用变量
这仅适用于 Module Worker 模式。
如果您想在中间件中使用变量或秘密变量,例如基本认证中间件中的 "username" 或 "password",您需要如下编写。
```ts
import { basicAuth } from 'hono/basic-auth'
type Bindings = {
USERNAME: string
PASSWORD: string
}
const app = new Hono<{ Bindings: Bindings }>()
//...
app.use('/auth/*', async (c, next) => {
const auth = basicAuth({
username: c.env.USERNAME,
password: c.env.PASSWORD,
})
return auth(c, next)
})
```
同样适用于 Bearer 认证中间件、JWT 认证或其他。
## 从 GitHub Actions 部署
在通过 CI 将代码部署到 Cloudflare 之前,您需要一个 Cloudflare 令牌。您可以从 [用户 API 令牌](https://dash.cloudflare.com/profile/api-tokens) 管理它。
如果是新创建的令牌,选择 **编辑 Cloudflare Workers** 模板。如果您已经有另一个令牌,请确保该令牌具有相应的权限。(注意:令牌权限在 Cloudflare Pages 和 Cloudflare Workers 之间不共享)。
然后转到您的 GitHub 仓库设置仪表板:`Settings->Secrets and variables->Actions->Repository secrets`,并添加一个名为 `CLOUDFLARE_API_TOKEN` 的新秘密。
然后在您的 Hono 项目根文件夹中创建 `.github/workflows/deploy.yml`,粘贴以下代码:
```yml
name: Deploy
on:
push:
branches:
- main
jobs:
deploy:
runs-on: ubuntu-latest
name: Deploy
steps:
- uses: actions/checkout@v4
- name: Deploy
uses: cloudflare/wrangler-action@v3
with:
apiToken: ${{ secrets.CLOUDFLARE_API_TOKEN }}
```
然后编辑 `wrangler.toml`,并在 `compatibility_date` 行后添加此代码。
```toml
main = "src/index.ts"
minify = true
```
一切都准备好了!现在推送代码并享受它。
## 本地开发时加载环境变量
要为本地开发配置环境变量,在项目根目录创建 `.dev.vars` 文件或 `.env` 文件。
这些文件应使用 [dotenv](https://hexdocs.pm/dotenvy/dotenv-file-format.html) 语法格式化。例如:
```
SECRET_KEY=value
API_TOKEN=eyJhbGciOiJIUzI1NiIsInR5cCI6IkpXVCJ9
```
> 关于此部分的更多信息,您可以在 Cloudflare 文档中找到:
> https://developers.cloudflare.com/workers/wrangler/configuration/#secrets
然后我们在代码中使用 `c.env.*` 来获取环境变量。
::: info
默认情况下,`process.env` 在 Cloudflare Workers 中不可用,因此建议从 `c.env` 获取环境变量。如果您想使用它,需要启用 [`nodejs_compat_populate_process_env`](https://developers.cloudflare.com/workers/configuration/compatibility-flags/#enable-auto-populating-processenv) 标志。您也可以从 `cloudflare:workers` 导入 `env`。详细信息请参阅 [Cloudflare 文档上如何访问 `env`](https://developers.cloudflare.com/workers/runtime-apis/bindings/#how-to-access-env)
:::
```ts
type Bindings = {
SECRET_KEY: string
}
const app = new Hono<{ Bindings: Bindings }>()
app.get('/env', (c) => {
const SECRET_KEY = c.env.SECRET_KEY
return c.text(SECRET_KEY)
})
```
在将项目部署到 Cloudflare 之前,请记住在 Cloudflare Workers 项目的配置中设置环境变量/秘密。
> 关于此部分的更多信息,您可以在 Cloudflare 文档中找到:
> https://developers.cloudflare.com/workers/configuration/environment-variables/#add-environment-variables-via-the-dashboard
# Deno
[Deno](https://deno.com/) 是一个基于 V8 构建的 JavaScript 运行时。它不是 Node.js。
Hono 也可以在 Deno 上运行。
你可以使用 Hono,用 TypeScript 编写代码,使用 `deno` 命令运行应用程序,并将其部署到 "Deno Deploy"。
## 1. 安装 Deno
首先,安装 `deno` 命令。
请参考 [官方文档](https://docs.deno.com/runtime/getting_started/installation/)。
## 2. 设置
Deno 有一个入门模板可用。
使用 [`deno init`](https://docs.deno.com/runtime/reference/cli/init/) 命令开始你的项目。
```sh
deno init --npm hono --template=deno my-app
```
进入 `my-app`。对于 Deno,你不需要显式安装 Hono。
```sh
cd my-app
```
## 3. 你好世界
编辑 `main.ts`:
```ts [main.ts]
import { Hono } from 'hono'
const app = new Hono()
app.get('/', (c) => c.text('Hello Deno!'))
Deno.serve(app.fetch)
```
## 4. 运行
在本地运行开发服务器。然后,在 Web 浏览器中访问 `http://localhost:8000`。
```sh
deno task start
```
## 更改端口号
你可以通过更新 `main.ts` 中 `Deno.serve` 的参数来指定端口号:
```ts
Deno.serve(app.fetch) // [!code --]
Deno.serve({ port: 8787 }, app.fetch) // [!code ++]
```
## 提供静态文件
要提供静态文件,请使用从 `hono/deno` 导入的 `serveStatic`。
```ts
import { Hono } from 'hono'
import { serveStatic } from 'hono/deno'
const app = new Hono()
app.use('/static/*', serveStatic({ root: './' }))
app.use('/favicon.ico', serveStatic({ path: './favicon.ico' }))
app.get('/', (c) => c.text('You can access: /static/hello.txt'))
app.get('*', serveStatic({ path: './static/fallback.txt' }))
Deno.serve(app.fetch)
```
对于上述代码,配合以下目录结构可以正常工作。
```
./
├── favicon.ico
├── index.ts
└── static
├── demo
│ └── index.html
├── fallback.txt
├── hello.txt
└── images
└── dinotocat.png
```
### `rewriteRequestPath`
如果你想将 `http://localhost:8000/static/*` 映射到 `./statics`,可以使用 `rewriteRequestPath` 选项:
```ts
app.get(
'/static/*',
serveStatic({
root: './',
rewriteRequestPath: (path) =>
path.replace(/^\/static/, '/statics'),
})
)
```
### `mimes`
你可以使用 `mimes` 添加 MIME 类型:
```ts
app.get(
'/static/*',
serveStatic({
mimes: {
m3u8: 'application/vnd.apple.mpegurl',
ts: 'video/mp2t',
},
})
)
```
### `onFound`
你可以使用 `onFound` 指定当请求的文件被找到时的处理:
```ts
app.get(
'/static/*',
serveStatic({
// ...
onFound: (_path, c) => {
c.header('Cache-Control', `public, immutable, max-age=31536000`)
},
})
)
```
### `onNotFound`
你可以使用 `onNotFound` 指定当请求的文件未找到时的处理:
```ts
app.get(
'/static/*',
serveStatic({
onNotFound: (path, c) => {
console.log(`${path} is not found, you access ${c.req.path}`)
},
})
)
```
### `precompressed`
`precompressed` 选项检查是否存在扩展名为 `.br` 或 `.gz` 的文件,并根据 `Accept-Encoding` 头提供它们。它优先使用 Brotli,然后是 Zstd 和 Gzip。如果都不可用,则提供原始文件。
```ts
app.get(
'/static/*',
serveStatic({
precompressed: true,
})
)
```
## Deno Deploy
Deno Deploy 是一个用于在云端运行 JavaScript 和 TypeScript 应用程序的无服务器平台。
它提供了一个管理平面,支持通过 GitHub 部署等集成来部署和运行应用程序。
Hono 也可以在 Deno Deploy 上运行。请参考 [官方文档](https://docs.deno.com/deploy/manual/)。
## 测试
在 Deno 上测试应用程序很简单。
你可以使用 `Deno.test` 编写测试,并使用 [@std/assert](https://jsr.io/@std/assert) 中的 `assert` 或 `assertEquals`。
```sh
deno add jsr:@std/assert
```
```ts [hello.ts]
import { Hono } from 'hono'
import { assertEquals } from '@std/assert'
Deno.test('Hello World', async () => {
const app = new Hono()
app.get('/', (c) => c.text('Please test me'))
const res = await app.request('http://localhost/')
assertEquals(res.status, 200)
})
```
然后运行命令:
```sh
deno test hello.ts
```
## npm 和 JSR
Hono 在 [npm](https://www.npmjs.com/package/hono) 和 [JSR](https://jsr.io/@hono/hono)(JavaScript Registry)上均可用。你可以在 `deno.json` 中使用 `npm:hono` 或 `jsr:@hono/hono`:
```json
{
"imports": {
"hono": "jsr:@hono/hono" // [!code --]
"hono": "npm:hono" // [!code ++]
}
}
```
要使用中间件,你需要在导入中使用 [Deno 目录](https://docs.deno.com/runtime/fundamentals/configuration/#custom-path-mappings) 语法。
```json
{
"imports": {
"hono/": "npm:/hono/"
}
}
```
使用第三方中间件时,为了正确的 TypeScript 类型推断,你可能需要使用与中间件相同注册表的 Hono。例如,如果使用来自 npm 的中间件,你也应该使用来自 npm 的 Hono:
```json
{
"imports": {
"hono": "npm:hono",
"zod": "npm:zod",
"@hono/zod-validator": "npm:@hono/zod-validator"
}
}
```
我们在 [JSR](https://jsr.io/@hono) 上也提供了许多第三方中间件包。当使用 JSR 上的中间件时,请使用来自 JSR 的 Hono:
```json
{
"imports": {
"hono": "jsr:@hono/hono",
"zod": "npm:zod",
"@hono/zod-validator": "jsr:@hono/zod-validator"
}
}
```
# Fastly Compute
[Fastly Compute](https://www.fastly.com/products/edge-compute) 是一个先进的边缘计算系统,它可以在 Fastly 的全球边缘网络上以您喜欢的语言运行您的代码。Hono 也可以在 Fastly Compute 上运行。
您可以使用 [Fastly CLI](https://www.fastly.com/documentation/reference/tools/cli/) 在本地开发应用程序并通过几条命令发布它,该 CLI 作为模板的一部分会自动安装在本地。
## 1. 设置
Fastly Compute 的入门模板可用。
使用 "create-hono" 命令开始您的项目。
为本示例选择 `fastly` 模板。
::: code-group
```sh [npm]
npm create hono@latest my-app
```
```sh [yarn]
yarn create hono my-app
```
```sh [pnpm]
pnpm create hono my-app
```
```sh [bun]
bun create hono@latest my-app
```
```sh [deno]
deno init --npm hono my-app
```
:::
进入 `my-app` 并安装依赖项。
::: code-group
```sh [npm]
cd my-app
npm i
```
```sh [yarn]
cd my-app
yarn
```
```sh [pnpm]
cd my-app
pnpm i
```
```sh [bun]
cd my-app
bun i
```
:::
## 2. 你好世界
编辑 `src/index.ts`:
```ts
// src/index.ts
import { Hono } from 'hono'
import { fire } from '@fastly/hono-fastly-compute'
const app = new Hono()
app.get('/', (c) => c.text('Hello Fastly!'))
fire(app)
```
> [!NOTE]
> 当在应用程序的顶层使用来自 `@fastly/hono-fastly-compute'` 的 `fire`(或 `buildFire()`)时,适合使用来自 `'hono'` 的 `Hono` 而不是 `'hono/quick'`,因为 `fire` 会导致其路由器在应用程序初始化阶段构建其内部数据。
## 3. 运行
在本地运行开发服务器。然后,在您的 Web 浏览器中访问 `http://localhost:7676`。
::: code-group
```sh [npm]
npm run start
```
```sh [yarn]
yarn start
```
```sh [pnpm]
pnpm run start
```
```sh [bun]
bun run start
```
:::
## 4. 部署
要构建并将应用程序部署到您的 Fastly 账户,请输入以下命令。首次部署应用程序时,系统会提示您在账户中创建新服务。
如果您还没有账户,必须 [创建您的 Fastly 账户](https://www.fastly.com/signup/)。
::: code-group
```sh [npm]
npm run deploy
```
```sh [yarn]
yarn deploy
```
```sh [pnpm]
pnpm run deploy
```
```sh [bun]
bun run deploy
```
:::
## 绑定
在 Fastly Compute 中,您可以绑定 Fastly 平台资源,例如 KV Stores、Config Stores、Secret Stores、Backends、Access Control Lists、Named Log Streams 和环境变量。您可以通过 `c.env` 访问它们,并将拥有它们各自的 SDK 类型。
要使用这些绑定,请从 `@fastly/hono-fastly-compute` 导入 `buildFire` 而不是 `fire`。定义您的 [绑定](https://github.com/fastly/compute-js-context?tab=readme-ov-file#typed-bindings-with-buildcontextproxy) 并将它们传递给 [`buildFire()`](https://github.com/fastly/hono-fastly-compute?tab=readme-ov-file#basic-example) 以获取 `fire`。然后在构建 `Hono` 时使用 `fire.Bindings` 来定义您的 `Env` 类型。
```ts
// src/index.ts
import { buildFire } from '@fastly/hono-fastly-compute'
const fire = buildFire({
siteData: 'KVStore:site-data', // 我有一个名为 "site-data" 的 KV Store
})
const app = new Hono<{ Bindings: typeof fire.Bindings }>()
app.put('/upload/:key', async (c, next) => {
// 例如,访问 KV Store
const key = c.req.param('key')
await c.env.siteData.put(key, c.req.body)
return c.text(`Put ${key} successfully!`)
})
fire(app)
```
# Google Cloud Run
[Google Cloud Run](https://cloud.google.com/run) 是由 Google Cloud 构建的无服务器平台。您可以响应事件运行代码,Google 会自动为您管理底层计算资源。
Google Cloud Run 使用容器来运行您的服务。这意味着您可以通过提供 Dockerfile 来使用任何您喜欢的运行时(例如,Deno 或 Bun)。如果未提供 Dockerfile,Google Cloud Run 将使用默认的 Node.js 构建包。
本指南假设您已经拥有 Google Cloud 账户和结算账户。
## 1. 安装 CLI
在使用 Google Cloud Platform 时,使用 [gcloud CLI](https://cloud.google.com/sdk/docs/install) 是最简单的。
例如,在 MacOS 上使用 Homebrew:
```sh
brew install --cask gcloud-cli
```
使用 CLI 进行身份验证。
```sh
gcloud auth login
```
## 2. 项目设置
创建一个项目。在提示符处接受自动生成的项目 ID。
```sh
gcloud projects create --set-as-default --name="my app"
```
为您的项目 ID 和项目编号创建环境变量以便于重用。项目通过 `gcloud projects list` 命令成功返回可能需要 ~30 秒。
```sh
PROJECT_ID=$(gcloud projects list \
--format='value(projectId)' \
--filter='name="my app"')
PROJECT_NUMBER=$(gcloud projects list \
--format='value(projectNumber)' \
--filter='name="my app"')
echo $PROJECT_ID $PROJECT_NUMBER
```
查找您的结算账户 ID。
```sh
gcloud billing accounts list
```
将上一条命令中的结算账户添加到项目。
```sh
gcloud billing projects link $PROJECT_ID \
--billing-account=[billing_account_id]
```
启用所需的 API。
```sh
gcloud services enable run.googleapis.com \
cloudbuild.googleapis.com
```
更新服务账户权限以访问 Cloud Build。
```sh
gcloud projects add-iam-policy-binding $PROJECT_ID \
--member=serviceAccount:$PROJECT_NUMBER-compute@developer.gserviceaccount.com \
--role=roles/run.builder
```
## 3. Hello World
使用 "create-hono" 命令启动您的项目。选择 `nodejs`。
```sh
npm create hono@latest my-app
```
进入 `my-app` 并安装依赖项。
```sh
cd my-app
npm i
```
将 `src/index.ts` 中的端口更新为 `8080`。
```ts
import { serve } from '@hono/node-server'
import { Hono } from 'hono'
const app = new Hono()
app.get('/', (c) => {
return c.text('Hello Hono!')
})
serve({
fetch: app.fetch,
port: 3000 // [!code --]
port: 8080 // [!code ++]
}, (info) => {
console.log(`Server is running on http://localhost:${info.port}`)
})
```
在本地运行开发服务器。然后,在您的 Web 浏览器中访问 http://localhost:8080。
```sh
npm run dev
```
## 4. 部署
开始部署并按照交互式提示操作(例如,选择一个区域)。
```sh
gcloud run deploy my-app --source . --allow-unauthenticated
```
## 更改运行时
如果您想使用 Deno 或 Bun 运行时(或自定义的 Nodejs 容器)进行部署,请添加一个包含所需环境的 `Dockerfile`(以及可选的 `.dockerignore`)。
有关容器化的信息,请参阅:
- [Node.js](/docs/getting-started/nodejs#building-deployment)
- [Bun](https://bun.com/guides/ecosystem/docker)
- [Deno](https://docs.deno.com/examples/google_cloud_run_tutorial)
# Lambda@Edge
[Lambda@Edge](https://aws.amazon.com/lambda/edge/) 是 Amazon Web Services 的一个无服务器平台。它允许你在 Amazon CloudFront 的边缘位置运行 Lambda 函数,使你能够自定义 HTTP 请求/响应的行为。
Hono 支持在 Node.js 18+ 环境下使用 Lambda@Edge。
## 1. 设置
在 Lambda@Edge 上创建应用程序时,
[CDK](https://docs.aws.amazon.com/serverless-application-model/latest/developerguide/serverless-cdk.html)
对于设置 CloudFront、IAM 角色、API Gateway 等函数非常有用。
使用 `cdk` CLI 初始化你的项目。
::: code-group
```sh [npm]
mkdir my-app
cd my-app
cdk init app -l typescript
npm i hono
mkdir lambda
```
```sh [yarn]
mkdir my-app
cd my-app
cdk init app -l typescript
yarn add hono
mkdir lambda
```
```sh [pnpm]
mkdir my-app
cd my-app
cdk init app -l typescript
pnpm add hono
mkdir lambda
```
```sh [bun]
mkdir my-app
cd my-app
cdk init app -l typescript
bun add hono
mkdir lambda
```
:::
## 2. Hello World
编辑 `lambda/index_edge.ts`。
```ts
import { Hono } from 'hono'
import { handle } from 'hono/lambda-edge'
const app = new Hono()
app.get('/', (c) => c.text('Hello Hono on Lambda@Edge!'))
export const handler = handle(app)
```
## 3. 部署
编辑 `bin/my-app.ts`。
```ts
#!/usr/bin/env node
import 'source-map-support/register'
import * as cdk from 'aws-cdk-lib'
import { MyAppStack } from '../lib/my-app-stack'
const app = new cdk.App()
new MyAppStack(app, 'MyAppStack', {
env: {
account: process.env.CDK_DEFAULT_ACCOUNT,
region: 'us-east-1',
},
})
```
编辑 `lambda/cdk-stack.ts`。
```ts
import { Construct } from 'constructs'
import * as cdk from 'aws-cdk-lib'
import * as cloudfront from 'aws-cdk-lib/aws-cloudfront'
import * as origins from 'aws-cdk-lib/aws-cloudfront-origins'
import * as lambda from 'aws-cdk-lib/aws-lambda'
import { NodejsFunction } from 'aws-cdk-lib/aws-lambda-nodejs'
import * as s3 from 'aws-cdk-lib/aws-s3'
export class MyAppStack extends cdk.Stack {
public readonly edgeFn: lambda.Function
constructor(scope: Construct, id: string, props?: cdk.StackProps) {
super(scope, id, props)
const edgeFn = new NodejsFunction(this, 'edgeViewer', {
entry: 'lambda/index_edge.ts',
handler: 'handler',
runtime: lambda.Runtime.NODEJS_20_X,
})
// 上传任意 html
const originBucket = new s3.Bucket(this, 'originBucket')
new cloudfront.Distribution(this, 'Cdn', {
defaultBehavior: {
origin: new origins.S3Origin(originBucket),
edgeLambdas: [
{
functionVersion: edgeFn.currentVersion,
eventType: cloudfront.LambdaEdgeEventType.VIEWER_REQUEST,
},
],
},
})
}
}
```
最后,运行以下命令进行部署:
```sh
cdk deploy
```
## 回调
如果你想添加基本认证并在验证后继续处理请求,可以使用 `c.env.callback()`
```ts
import { Hono } from 'hono'
import { basicAuth } from 'hono/basic-auth'
import type { Callback, CloudFrontRequest } from 'hono/lambda-edge'
import { handle } from 'hono/lambda-edge'
type Bindings = {
callback: Callback
request: CloudFrontRequest
}
const app = new Hono<{ Bindings: Bindings }>()
app.get(
'*',
basicAuth({
username: 'hono',
password: 'acoolproject',
})
)
app.get('/', async (c, next) => {
await next()
c.env.callback(null, c.env.request)
})
export const handler = handle(app)
```
# Netlify
Netlify 提供静态网站托管和无服务器后端服务。[边缘函数](https://docs.netlify.com/edge-functions/overview/) 使我们能够使网页动态化。
边缘函数支持使用 Deno 和 TypeScript 编写,并且通过 [Netlify CLI](https://docs.netlify.com/cli/get-started/) 使部署变得简单。使用 Hono,你可以为 Netlify 边缘函数创建应用程序。
## 1. 设置
Netlify 的入门模板可用。
使用 "create-hono" 命令启动你的项目。
为本示例选择 `netlify` 模板。
::: code-group
```sh [npm]
npm create hono@latest my-app
```
```sh [yarn]
yarn create hono my-app
```
```sh [pnpm]
pnpm create hono my-app
```
```sh [bun]
bun create hono@latest my-app
```
```sh [deno]
deno init --npm hono my-app
```
:::
进入 `my-app`。
## 2. Hello World
编辑 `netlify/edge-functions/index.ts`:
```ts
import { Hono } from 'jsr:@hono/hono'
import { handle } from 'jsr:@hono/hono/netlify'
const app = new Hono()
app.get('/', (c) => {
return c.text('Hello Hono!')
})
export default handle(app)
```
## 3. 运行
使用 Netlify CLI 运行开发服务器。然后,在你的 Web 浏览器中访问 `http://localhost:8888`。
```sh
netlify dev
```
## 4. 部署
你可以使用 `netlify deploy` 命令进行部署。
```sh
netlify deploy --prod
```
## `上下文`
你可以通过 `c.env` 访问 Netlify 的 `上下文`:
```ts
import { Hono } from 'jsr:@hono/hono'
import { handle } from 'jsr:@hono/hono/netlify'
// 导入类型定义
import type { Context } from 'https://edge.netlify.com/'
export type Env = {
Bindings: {
context: Context
}
}
const app = new Hono()
app.get('/country', (c) =>
c.json({
'You are in': c.env.context.geo.country?.name,
})
)
export default handle(app)
```
# Next.js
Next.js 是一个灵活的 React 框架,为您提供构建快速 Web 应用程序的基石。
在使用 Node.js 运行时时,您可以在 Next.js 上运行 Hono。\
在 Vercel 上,通过使用 Vercel Functions,可以轻松部署带有 Hono 的 Next.js 应用。
## 1. 设置
提供了一个 Next.js 入门模板。
使用 "create-hono" 命令启动您的项目。
本示例请选择 `nextjs` 模板。
::: code-group
```sh [npm]
npm create hono@latest my-app
```
```sh [yarn]
yarn create hono my-app
```
```sh [pnpm]
pnpm create hono my-app
```
```sh [bun]
bun create hono@latest my-app
```
```sh [deno]
deno init --npm hono my-app
```
:::
进入 `my-app` 目录并安装依赖。
::: code-group
```sh [npm]
cd my-app
npm i
```
```sh [yarn]
cd my-app
yarn
```
```sh [pnpm]
cd my-app
pnpm i
```
```sh [bun]
cd my-app
bun i
```
:::
## 2. 你好世界
如果您使用 App Router,请编辑 `app/api/[[...route]]/route.ts`。更多选项请参考 [支持的 HTTP 方法](https://nextjs.org/docs/app/building-your-application/routing/route-handlers#supported-http-methods) 部分。
```ts
import { Hono } from 'hono'
import { handle } from 'hono/vercel'
const app = new Hono().basePath('/api')
app.get('/hello', (c) => {
return c.json({
message: 'Hello Next.js!',
})
})
export const GET = handle(app)
export const POST = handle(app)
```
## 3. 运行
在本地运行开发服务器。然后,在浏览器中访问 `http://localhost:3000`。
::: code-group
```sh [npm]
npm run dev
```
```sh [yarn]
yarn dev
```
```sh [pnpm]
pnpm dev
```
```sh [bun]
bun run dev
```
:::
现在,`/api/hello` 仅返回 JSON,但如果您构建 React UI,则可以使用 Hono 创建全栈应用程序。
## 4. 部署
如果您拥有 Vercel 账户,可以通过关联 Git 仓库进行部署。
## Pages Router
如果您使用 Pages Router,首先需要安装 Node.js 适配器。
::: code-group
```sh [npm]
npm i @hono/node-server
```
```sh [yarn]
yarn add @hono/node-server
```
```sh [pnpm]
pnpm add @hono/node-server
```
```sh [bun]
bun add @hono/node-server
```
:::
然后,您可以在 `pages/api/[[...route]].ts` 中使用从 `@hono/node-server/vercel` 导入的 `handle` 函数。
```ts
import { Hono } from 'hono'
import { handle } from '@hono/node-server/vercel'
import type { PageConfig } from 'next'
export const config: PageConfig = {
api: {
bodyParser: false,
},
}
const app = new Hono().basePath('/api')
app.get('/hello', (c) => {
return c.json({
message: 'Hello Next.js!',
})
})
export default handle(app)
```
为了使其与 Pages Router 配合工作,重要的是通过在项目仪表板或 `.env` 文件中设置环境变量来禁用 Vercel Node.js 助手。
```text
NODEJS_HELPERS=0
```
# Node.js
[Node.js](https://nodejs.org/) 是一个开源、跨平台的 JavaScript 运行时环境。
Hono 最初并非为 Node.js 设计,但通过 [Node.js Adapter](https://github.com/honojs/node-server),它也可以在 Node.js 上运行。
::: info
它适用于大于 18.x 的 Node.js 版本。具体所需的 Node.js 版本如下:
- 18.x => 18.14.1+
- 19.x => 19.7.0+
- 20.x => 20.0.0+
基本上,你可以简单地使用每个主要版本的最新版本。
:::
## 1. 设置
提供了适用于 Node.js 的启动器。
使用 "create-hono" 命令启动你的项目。
本示例请选择 `nodejs` 模板。
::: code-group
```sh [npm]
npm create hono@latest my-app
```
```sh [yarn]
yarn create hono my-app
```
```sh [pnpm]
pnpm create hono my-app
```
```sh [bun]
bun create hono@latest my-app
```
```sh [deno]
deno init --npm hono my-app
```
:::
进入 `my-app` 并安装依赖。
::: code-group
```sh [npm]
cd my-app
npm i
```
```sh [yarn]
cd my-app
yarn
```
```sh [pnpm]
cd my-app
pnpm i
```
```sh [bun]
cd my-app
bun i
```
:::
## 2. 你好世界
编辑 `src/index.ts`:
```ts
import { serve } from '@hono/node-server'
import { Hono } from 'hono'
const app = new Hono()
app.get('/', (c) => c.text('Hello Node.js!'))
serve(app)
```
如果你想优雅地关闭服务器,可以这样写:
```ts
const server = serve(app)
// 优雅关闭
process.on('SIGINT', () => {
server.close()
process.exit(0)
})
process.on('SIGTERM', () => {
server.close((err) => {
if (err) {
console.error(err)
process.exit(1)
}
process.exit(0)
})
})
```
## 3. 运行
在本地运行开发服务器。然后,在 Web 浏览器中访问 `http://localhost:3000`。
::: code-group
```sh [npm]
npm run dev
```
```sh [yarn]
yarn dev
```
```sh [pnpm]
pnpm dev
```
:::
## 更改端口号
你可以使用 `port` 选项指定端口号。
```ts
serve({
fetch: app.fetch,
port: 8787,
})
```
## 访问原生 Node.js API
你可以通过 `c.env.incoming` 和 `c.env.outgoing` 访问 Node.js API。
```ts
import { Hono } from 'hono'
import { serve, type HttpBindings } from '@hono/node-server'
// 如果你使用 HTTP2,则使用 `Http2Bindings`
type Bindings = HttpBindings & {
/* ... */
}
const app = new Hono<{ Bindings: Bindings }>()
app.get('/', (c) => {
return c.json({
remoteAddress: c.env.incoming.socket.remoteAddress,
})
})
serve(app)
```
## 提供静态文件
你可以使用 `serveStatic` 从本地文件系统提供静态文件。例如,假设目录结构如下:
```sh
./
├── favicon.ico
├── index.ts
└── static
├── hello.txt
└── image.png
```
如果有请求访问路径 `/static/*` 并且你想返回 `./static` 下的文件,你可以这样写:
```ts
import { serveStatic } from '@hono/node-server/serve-static'
app.use('/static/*', serveStatic({ root: './' }))
```
::: warning
`root` 选项相对于当前工作目录(`process.cwd()`)解析路径。这意味着行为取决于**你从何处运行 Node.js 进程**,而不是源文件的位置。如果你从不同的目录启动服务器,文件解析可能会失败。
为了可靠的路径解析,始终指向与源文件相同的目录,请使用 `import.meta.url`:
```ts
import { fileURLToPath } from 'node:url'
import { serveStatic } from '@hono/node-server/serve-static'
app.use(
'/static/*',
serveStatic({ root: fileURLToPath(new URL('./', import.meta.url)) })
)
```
:::
使用 `path` 选项提供目录根目录下的 `favicon.ico`:
```ts
app.use('/favicon.ico', serveStatic({ path: './favicon.ico' }))
```
如果有请求访问路径 `/hello.txt` 或 `/image.png` 并且你想返回名为 `./static/hello.txt` 或 `./static/image.png` 的文件,你可以使用以下内容:
```ts
app.use('*', serveStatic({ root: './static' }))
```
### `rewriteRequestPath`
如果你想将 `http://localhost:3000/static/*` 映射到 `./statics`,你可以使用 `rewriteRequestPath` 选项:
```ts
app.get(
'/static/*',
serveStatic({
root: './',
rewriteRequestPath: (path) =>
path.replace(/^\/static/, '/statics'),
})
)
```
## http2
你可以在 [Node.js http2 Server](https://nodejs.org/api/http2.html) 上运行 hono。
### 未加密的 http2
```ts
import { createServer } from 'node:http2'
const server = serve({
fetch: app.fetch,
createServer,
})
```
### 加密的 http2
```ts
import { createSecureServer } from 'node:http2'
import { readFileSync } from 'node:fs'
const server = serve({
fetch: app.fetch,
createServer: createSecureServer,
serverOptions: {
key: readFileSync('localhost-privkey.pem'),
cert: readFileSync('localhost-cert.pem'),
},
})
```
## 构建与部署
::: code-group
```sh [npm]
npm run build
```
```sh [yarn]
yarn run build
```
```sh [pnpm]
pnpm run build
```
```sh [bun]
bun run build
```
::: info
带有前端框架的应用可能需要使用 [Hono 的 Vite 插件](https://github.com/honojs/vite-plugins)。
:::
### Dockerfile
这是一个 Node.js Dockerfile 示例。
```Dockerfile
FROM node:22-alpine AS base
FROM base AS builder
RUN apk add --no-cache gcompat
WORKDIR /app
COPY package*json tsconfig.json src ./
RUN npm ci && \
npm run build && \
npm prune --production
FROM base AS runner
WORKDIR /app
RUN addgroup --system --gid 1001 nodejs
RUN adduser --system --uid 1001 hono
COPY --from=builder --chown=hono:nodejs /app/node_modules /app/node_modules
COPY --from=builder --chown=hono:nodejs /app/dist /app/dist
COPY --from=builder --chown=hono:nodejs /app/package.json /app/package.json
USER hono
EXPOSE 3000
CMD ["node", "/app/dist/index.js"]
```
# Service Worker
[Service Worker](https://developer.mozilla.org/en-US/docs/Web/API/Service_Worker_API) 是一个在浏览器后台运行的脚本,用于处理缓存和推送通知等任务。使用 Service Worker 适配器,你可以在浏览器内将用 Hono 制作的应用作为 [FetchEvent](https://developer.mozilla.org/en-US/docs/Web/API/FetchEvent) 处理器运行。
本页展示了使用 [Vite](https://vitejs.dev/) 创建项目的示例。
## 1. 设置
首先,创建并进入你的项目目录:
```sh
mkdir my-app
cd my-app
```
创建项目所需的文件。创建一个包含以下内容的 `package.json` 文件:
```json
{
"name": "my-app",
"private": true,
"scripts": {
"dev": "vite dev"
},
"type": "module"
}
```
同样,创建一个包含以下内容的 `tsconfig.json` 文件:
```json
{
"compilerOptions": {
"target": "ES2020",
"module": "ESNext",
"lib": ["ES2020", "DOM", "WebWorker"],
"moduleResolution": "bundler"
},
"include": ["./"],
"exclude": ["node_modules"]
}
```
接下来,安装必要的模块。
::: code-group
```sh [npm]
npm i hono
npm i -D vite
```
```sh [yarn]
yarn add hono
yarn add -D vite
```
```sh [pnpm]
pnpm add hono
pnpm add -D vite
```
```sh [bun]
bun add hono
bun add -D vite
```
:::
## 2. Hello World
编辑 `index.html`:
```html
Service Worker 的 Hello World
```
`main.ts` 是一个用于注册 Service Worker 的脚本:
```ts
function register() {
navigator.serviceWorker
.register('/sw.ts', { scope: '/sw', type: 'module' })
.then(
function (_registration) {
console.log('Register Service Worker: Success')
},
function (_error) {
console.log('Register Service Worker: Error')
}
)
}
function start() {
navigator.serviceWorker
.getRegistrations()
.then(function (registrations) {
for (const registration of registrations) {
console.log('Unregister Service Worker')
registration.unregister()
}
register()
})
}
start()
```
在 `sw.ts` 中,使用 Hono 创建一个应用,并通过 Service Worker 适配器的 `handle` 函数将其注册到 `fetch` 事件。这使得 Hono 应用能够拦截对 `/sw` 的访问。
```ts
// 为了支持类型
// https://github.com/microsoft/TypeScript/issues/14877
declare const self: ServiceWorkerGlobalScope
import { Hono } from 'hono'
import { handle } from 'hono/service-worker'
const app = new Hono().basePath('/sw')
app.get('/', (c) => c.text('Hello World'))
self.addEventListener('fetch', handle(app))
```
### 使用 `fire()`
`fire()` 函数会自动为你调用 `addEventListener('fetch', handle(app))`,使代码更简洁。
```ts
import { Hono } from 'hono'
import { fire } from 'hono/service-worker'
const app = new Hono().basePath('/sw')
app.get('/', (c) => c.text('Hello World'))
fire(app)
```
## 3. 运行
启动开发服务器。
::: code-group
```sh [npm]
npm run dev
```
```sh [yarn]
yarn dev
```
```sh [pnpm]
pnpm run dev
```
```sh [bun]
bun run dev
```
:::
默认情况下,开发服务器将在端口 `5173` 上运行。在浏览器中访问 `http://localhost:5173/` 以完成 Service Worker 注册。然后,访问 `/sw` 查看来自 Hono 应用的响应。
# Supabase 边缘函数
[Supabase](https://supabase.com/) 是 Firebase 的开源替代品,提供了一套类似于 Firebase 功能的工具套件,包括数据库、身份验证、存储,以及现在的无服务器函数。
Supabase 边缘函数是服务器端 TypeScript 函数,它们在全球范围内分布,运行在离用户更近的地方以提高性能。这些函数使用 [Deno](https://deno.com/) 开发,带来了多种好处,包括提高安全性和现代化的 JavaScript/TypeScript 运行时。
以下是开始使用 Supabase 边缘函数的方法:
## 1. 设置
### 前提条件
开始之前,请确保已安装 Supabase CLI。如果尚未安装,请按照 [官方文档](https://supabase.com/docs/guides/cli/getting-started) 中的说明进行操作。
### 创建新项目
1. 打开终端或命令提示符。
2. 通过在本地机器上的目录中运行以下命令创建一个新的 Supabase 项目:
```bash
supabase init
```
此命令在当前目录中初始化一个新的 Supabase 项目。
### 添加边缘函数
3. 在 Supabase 项目中,创建一个名为 `hello-world` 的新边缘函数:
```bash
supabase functions new hello-world
```
此命令在项目中创建一个指定名称的新边缘函数。
## 2. 你好世界
通过修改文件 `supabase/functions/hello-world/index.ts` 来编辑 `hello-world` 函数:
```ts
import { Hono } from 'jsr:@hono/hono'
// 将此更改为你的函数名
const functionName = 'hello-world'
const app = new Hono().basePath(`/${functionName}`)
app.get('/hello', (c) => c.text('Hello from hono-server!'))
Deno.serve(app.fetch)
```
## 3. 运行
要在本地运行函数,请使用以下命令:
1. 使用以下命令来服务函数:
```bash
supabase start # 启动 supabase 栈
supabase functions serve --no-verify-jwt # 启动 Functions 监视器
```
`--no-verify-jwt` 标志允许你在本地开发期间绕过 JWT 验证。
2. 使用 cURL 或 Postman 向 `http://127.0.0.1:54321/functions/v1/hello-world/hello` 发送 GET 请求:
```bash
curl --location 'http://127.0.0.1:54321/functions/v1/hello-world/hello'
```
此请求应返回文本 "Hello from hono-server!"。
## 4. 部署
你可以使用一条命令部署 Supabase 中的所有边缘函数:
```bash
supabase functions deploy
```
或者,你可以通过在部署命令中指定函数名称来部署单个边缘函数:
```bash
supabase functions deploy hello-world
```
有关更多部署方法,请访问 Supabase 文档关于 [部署到生产环境](https://supabase.com/docs/guides/functions/deploy) 的部分。
# Vercel
Vercel 是 AI 云,提供开发者工具和云基础设施,以构建、扩展和保护更快、更个性化的 Web。
Hono 可以零配置部署到 Vercel。
## 1. 设置
提供了一个 Vercel 的 starter 模板。
使用 "create-hono" 命令开始你的项目。
为本示例选择 `vercel` 模板。
::: code-group
```sh [npm]
npm create hono@latest my-app
```
```sh [yarn]
yarn create hono my-app
```
```sh [pnpm]
pnpm create hono my-app
```
```sh [bun]
bun create hono@latest my-app
```
```sh [deno]
deno init --npm hono my-app
```
:::
进入 `my-app` 并安装依赖。
::: code-group
```sh [npm]
cd my-app
npm i
```
```sh [yarn]
cd my-app
yarn
```
```sh [pnpm]
cd my-app
pnpm i
```
```sh [bun]
cd my-app
bun i
```
:::
下一步我们将使用 Vercel CLI 在本地开发应用。如果尚未安装,请按照 [Vercel CLI 文档](https://vercel.com/docs/cli) 全局安装它。
## 2. 你好世界
在项目的 `index.ts` 或 `src/index.ts` 中,将 Hono 应用作为默认导出。
```ts
import { Hono } from 'hono'
const app = new Hono()
const welcomeStrings = [
'Hello Hono!',
'To learn more about Hono on Vercel, visit https://vercel.com/docs/frameworks/backend/hono',
]
app.get('/', (c) => {
return c.text(welcomeStrings.join('\n\n'))
})
export default app
```
如果你使用 `vercel` 模板开始项目,这已经为你设置好了。
## 3. 运行
要在本地运行开发服务器:
```sh
vercel dev
```
访问 `localhost:3000` 将返回文本响应。
## 4. 部署
使用 `vc deploy` 部署到 Vercel。
```sh
vercel deploy
```
## 进一步阅读
[在 Vercel 文档中了解更多关于 Hono 的信息](https://vercel.com/docs/frameworks/backend/hono)。
# WebAssembly (w/ WASI)
[WebAssembly][wasm-core] 是一个安全、沙箱化、可移植的运行时,可在网页浏览器内部和外部运行。
在实践中:
- 语言(如 JavaScript)_编译为_ WebAssembly(`.wasm` 文件)
- WebAssembly 运行时(如 [`wasmtime`][wasmtime] 或 [`jco`][jco])支持_运行_ WebAssembly 二进制文件
虽然核心 WebAssembly _无法_ 访问本地文件系统或套接字等内容,但 [WebAssembly 系统接口][wasi]
介入以支持在 WebAssembly 工作负载下定义平台。
这意味着_借助_ WASI,WebAssembly 可以操作文件、套接字以及更多内容。
::: info
想亲自看看 WASI 接口吗?查看 [`wasi:http`][wasi-http]
:::
JS 中对 WebAssembly w/ WASI 的支持由 [StarlingMonkey][sm] 驱动,得益于
StarlingMonkey 和 Hono 都对 Web 标准的关注,**Hono 可以*\*开箱即用\*地支持启用 WASI 的 WebAssembly 生态系统。**
[sm]: https://github.com/bytecodealliance/StarlingMonkey
[wasm-core]: https://webassembly.org/
[wasi]: https://wasi.dev/
[bca]: https://bytecodealliance.org/
[wasi-http]: https://github.com/WebAssembly/wasi-http
## 1. 设置
WebAssembly JS 生态系统提供了工具,使开始构建启用 WASI 的 WebAssembly 组件变得容易:
- [StarlingMonkey][sm] 是 [SpiderMonkey][spidermonkey] 的一个分支,可编译为 WebAssembly 并启用组件
- [`componentize-js`][componentize-js] 将 JavaScript ES 模块转换为 WebAssembly 组件
- [`jco`][jco] 是一个多用途工具,可构建组件、生成类型并在 Node.js 或浏览器等环境中运行组件
::: info
WebAssembly 拥有一个开放的生态系统且是开源的,核心项目主要由 [Bytecode Alliance][bca] 及其成员管理。
新功能、问题、拉取请求和其他类型的贡献总是受欢迎的。
:::
虽然 Hono 在 WebAssembly 上的 starter 尚不可用,但你可以像其他任何项目一样启动一个 WebAssembly Hono 项目:
::: code-group
```sh [npm]
mkdir my-app
cd my-app
npm init
npm i hono
npm i -D @bytecodealliance/jco @bytecodealliance/componentize-js @bytecodealliance/jco-std
npm i -D rolldown
```
````sh [yarn]
mkdir my-app
cd my-app
npm init
yarn add hono
yarn add -D @bytecodealliance/jco @bytecodealliance/componentize-js @bytecodealliance/jco-std
yarn add -D rolldown
````
```sh [pnpm]
mkdir my-app
cd my-app
pnpm init --init-type module
pnpm add hono
pnpm add -D @bytecodealliance/jco @bytecodealliance/componentize-js @bytecodealliance/jco-std
pnpm add -D rolldown
````
```sh [bun]
mkdir my-app
cd my-app
npm init
bun add hono
bun add -D @bytecodealliance/jco @bytecodealliance/componentize-js @bytecodealliance/jco-std
```
:::
::: info
为确保你的项目使用 ES 模块,请确保 `package.json` 中的 `type` 设置为 `"module"`
:::
进入 `my-app` 文件夹后,安装依赖项并初始化 TypeScript:
::: code-group
```sh [npm]
npm i
npx tsc --init
```
```sh [yarn]
yarn
yarn tsc --init
```
```sh [pnpm]
pnpm i
pnpm exec --init
```
```sh [bun]
bun i
```
:::
一旦你有了基本的 TypeScript 配置文件(`tsconfig.json`),请确保它具有以下配置:
- `compilerOptions.module` 设置为 `"nodenext"`
由于 `componentize-js`(以及重用它的 `jco`)仅支持单个 JS 文件,
因此需要进行捆绑,所以可以使用 [`rolldown`][rolldown] 来创建单个文件捆绑包。
可以使用如下所示的 Rolldown 配置(`rolldown.config.mjs`):
```js
import { defineConfig } from 'rolldown'
export default defineConfig({
input: 'src/component.ts',
external: /wasi:.*/,
output: {
file: 'dist/component.js',
format: 'esm',
},
})
```
::: info
随意使用任何其他你更熟悉的捆绑器(`rolldown`、`esbuild`、`rollup` 等)
:::
[jco]: https://github.com/bytecodealliance/jco
[componentize-js]: https://github.com/bytecodealliance/componentize-js
[rolldown]: https://rolldown.rs
[spidermonkey]: https://spidermonkey.dev/
## 2. 设置 WIT 接口和依赖
[WebAssembly 接口类型 (WIT)][wit] 是一种接口定义语言("IDL"),它管理 WebAssembly 组件使用的功能("imports")以及它提供的功能("exports")。
在标准化的 WIT 接口中,[`wasi:http`][wasi-http] 用于处理 HTTP 请求(无论是接收还是发送),由于我们打算制作一个 Web 服务器,我们的组件必须在其 [WIT 世界][wit-world] 中声明使用 `wasi:http/incoming-handler`:
首先,让我们在名为 `wit/component.wit` 的文件中设置组件的 WIT 世界:
```txt
package example:hono;
world component {
export wasi:http/incoming-handler@0.2.6;
}
```
简单来说,上面的 WIT 文件意味着我们的组件“提供”“接收”/“处理传入”HTTP 请求的功能。
`wasi:http/incoming-handler` 接口依赖于上游标准化的 WIT 接口(关于请求结构等的规范)。
为了拉取那些第三方(由 Bytecode Alliance 维护)的 WIT 接口,我们可以使用的一个工具是 [`wkg`][wkg]:
```sh
wkg wit fetch
```
`wkg` 运行完成后,你应该会发现你的 `wit` 文件夹中除了 `component.wit` 外,还填充了一个新的 `deps` 文件夹:
```
wit
├── component.wit
└── deps
├── wasi-cli-0.2.6
│ └── package.wit
├── wasi-clocks-0.2.6
│ └── package.wit
├── wasi-http-0.2.6
│ └── package.wit
├── wasi-io-0.2.6
│ └── package.wit
└── wasi-random-0.2.6
└── package.wit
```
[wkg]: https://github.com/bytecodealliance/wasm-pkg-tools
[wit-world]: https://github.com/WebAssembly/component-model/blob/main/design/mvp/WIT.md#wit-worlds
[wit]: https://github.com/WebAssembly/component-model/blob/main/design/mvp/WIT.md
## 3. Hello Wasm
为了在 WebAssembly 中构建 HTTP 服务器,我们可以利用 [`jco-std`][jco-std] 项目,其中包含的辅助工具使体验与标准 Hono 体验非常相似。
让我们在名为 `src/component.ts` 的文件中用一个基本的 Hono 应用程序作为 WebAssembly 组件来实现我们的 `component` 世界:
```ts
import { Hono } from 'hono'
import { fire } from '@bytecodealliance/jco-std/wasi/0.2.6/http/adapters/hono/server'
const app = new Hono()
app.get('/hello', (c) => {
return c.json({ message: 'Hello from WebAssembly!' })
})
fire(app)
// 虽然我们在上面配置了 wasi HTTP 并调用了 `fire()`,
// 我们仍然需要实际导出 `wasi:http/incoming-handler` 接口对象,
// 因为 jco 和 componentize-js 将寻找匹配 WASI 接口的 ES 模块导出。
export { incomingHandler } from '@bytecodealliance/jco-std/wasi/0.2.6/http/adapters/hono/server'
```
## 4. 构建
由于我们使用的是 Rolldown(并且已配置为处理 TypeScript 编译),我们可以使用它来构建和捆绑:
::: code-group
```sh [npm]
npx rolldown -c
```
```sh [yarn]
yarn rolldown -c
```
```sh [pnpm]
pnpm exec rolldown -c
```
```sh [bun]
bun build --target=bun --outfile=dist/component.js ./src/component.ts
```
:::
::: info
捆绑步骤是必要的,因为 WebAssembly JS 生态系统工具目前仅支持单个 JS 文件,而我们希望包含 Hono 以及相关库。
对于需求更简单的组件,捆绑器不是必须的。
:::
要构建你的 WebAssembly 组件,请使用 `jco`(并间接使用 `componentize-js`):
::: code-group
```sh [npm]
npx jco componentize -w wit -o dist/component.wasm dist/component.js
```
```sh [yarn]
yarn jco componentize -w wit -o dist/component.wasm dist/component.js
```
```sh [pnpm]
pnpm exec jco componentize -w wit -o dist/component.wasm dist/component.js
```
```sh [bun]
bun run jco componentize -w wit -o dist/component.wasm dist/component.js
```
:::
## 3. 运行
要运行你的 Hono WebAssembly HTTP 服务器,你可以使用任何启用 WASI 的 WebAssembly 运行时:
- [`wasmtime`][wasmtime]
- `jco`(在 Node.js 中运行)
在本指南中,我们将使用 `jco serve`,因为它已经安装好了。
::: warning
`jco serve` 旨在用于开发,不建议用于生产环境。
:::
[wasmtime]: https://wasmtime.dev
::: code-group
```sh [npm]
npx jco serve dist/component.wasm
```
```sh [yarn]
yarn jco serve dist/component.wasm
```
```sh [pnpm]
pnpm exec jco serve dist/component.wasm
```
```sh [bun]
bun run jco serve dist/component.wasm
```
:::
你应该看到如下输出:
```
$ npx jco serve dist/component.wasm
Server listening @ localhost:8000...
```
向 `localhost:8000/hello` 发送请求将产生你在 Hono 应用程序中指定的 JSON 输出。
你应该看到如下输出:
```json
{ "message": "Hello from WebAssembly!" }
```
::: info
`jco serve` 的工作原理是将 WebAssembly 组件转换为基本的 WebAssembly 核心模块,以便它可以在 Node.js 和浏览器等运行时中运行。
此过程通常通过 `jco transpile` 运行,这也是我们可以使用 JS 引擎(如 Node.js 和浏览器(可能使用 V8 或其他 Javascript 引擎))作为 WebAssembly 组件运行时的方式。
`jco transpile` 的工作原理不在本指南范围内,你可以在 [Jco book][jco-book] 中阅读更多相关内容
:::
## 更多信息
要了解有关 WASI、WebAssembly 组件等的更多信息,请参阅以下资源:
- [BytecodeAlliance Component Model book][cm-book]
- [`jco` 代码库][jco]
- [`jco` 示例组件][jco-example-components](特别是 [Hono 示例][jco-example-component-hono])
- [Jco book][jco-book]
- [`componentize-js` 代码库][componentize-js]
- [StarlingMonkey 代码库][sm]
要向 WebAssembly 社区咨询问题、评论、贡献或提交问题:
- [Bytecode Alliance Zulip](https://bytecodealliance.zulipchat.com)(考虑在 [#jco 频道](https://bytecodealliance.zulipchat.com/#narrow/channel/409526-jco) 中发帖)
- [Jco 仓库](https://github.com/bytecodealliance/jco)
- [componentize-js 仓库](https://github.com/bytecodealliance/componentize-js)
[cm-book]: https://component-model.bytecodealliance.org/
[jco-book]: https://bytecodealliance.github.io/jco/
[jco-example-components]: https://github.com/bytecodealliance/jco/tree/main/examples/components
[jco-example-component-hono]: https://github.com/bytecodealliance/jco/tree/main/examples/components/http-server-hono
# 基准测试
基准测试仅仅是基准测试,但它们对我们很重要。
## 路由
我们测量了一系列 JavaScript 路由的速度。
例如,`find-my-way` 是 Fastify 内部使用的一个非常快的路由。
- @medley/router
- find-my-way
- koa-tree-router
- trek-router
- express(包括处理)
- koa-router
首先,我们在每个路由库中注册了以下路由。
这些类似于现实世界中使用的路由。
```ts twoslash
interface Route {
method: string
path: string
}
// ---cut---
export const routes: Route[] = [
{ method: 'GET', path: '/user' },
{ method: 'GET', path: '/user/comments' },
{ method: 'GET', path: '/user/avatar' },
{ method: 'GET', path: '/user/lookup/username/:username' },
{ method: 'GET', path: '/user/lookup/email/:address' },
{ method: 'GET', path: '/event/:id' },
{ method: 'GET', path: '/event/:id/comments' },
{ method: 'POST', path: '/event/:id/comment' },
{ method: 'GET', path: '/map/:location/events' },
{ method: 'GET', path: '/status' },
{ method: 'GET', path: '/very/deeply/nested/route/hello/there' },
{ method: 'GET', path: '/static/*' },
]
```
然后我们向端点发送了如下请求。
```ts twoslash
interface Route {
method: string
path: string
}
// ---cut---
const routes: (Route & { name: string })[] = [
{
name: 'short static',
method: 'GET',
path: '/user',
},
{
name: 'static with same radix',
method: 'GET',
path: '/user/comments',
},
{
name: 'dynamic route',
method: 'GET',
path: '/user/lookup/username/hey',
},
{
name: 'mixed static dynamic',
method: 'GET',
path: '/event/abcd1234/comments',
},
{
name: 'post',
method: 'POST',
path: '/event/abcd1234/comment',
},
{
name: 'long static',
method: 'GET',
path: '/very/deeply/nested/route/hello/there',
},
{
name: 'wildcard',
method: 'GET',
path: '/static/index.html',
},
]
```
让我们看看结果。
### 在 Node.js 上
以下截图显示了在 Node.js 上的结果。
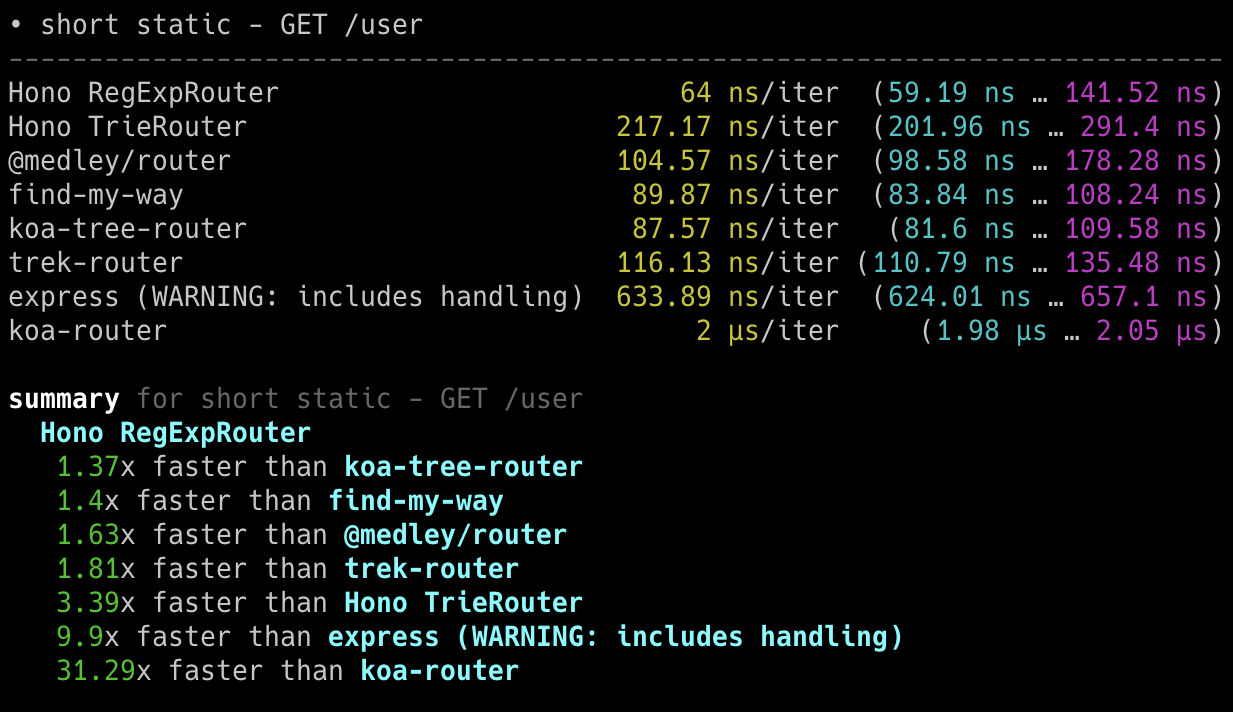
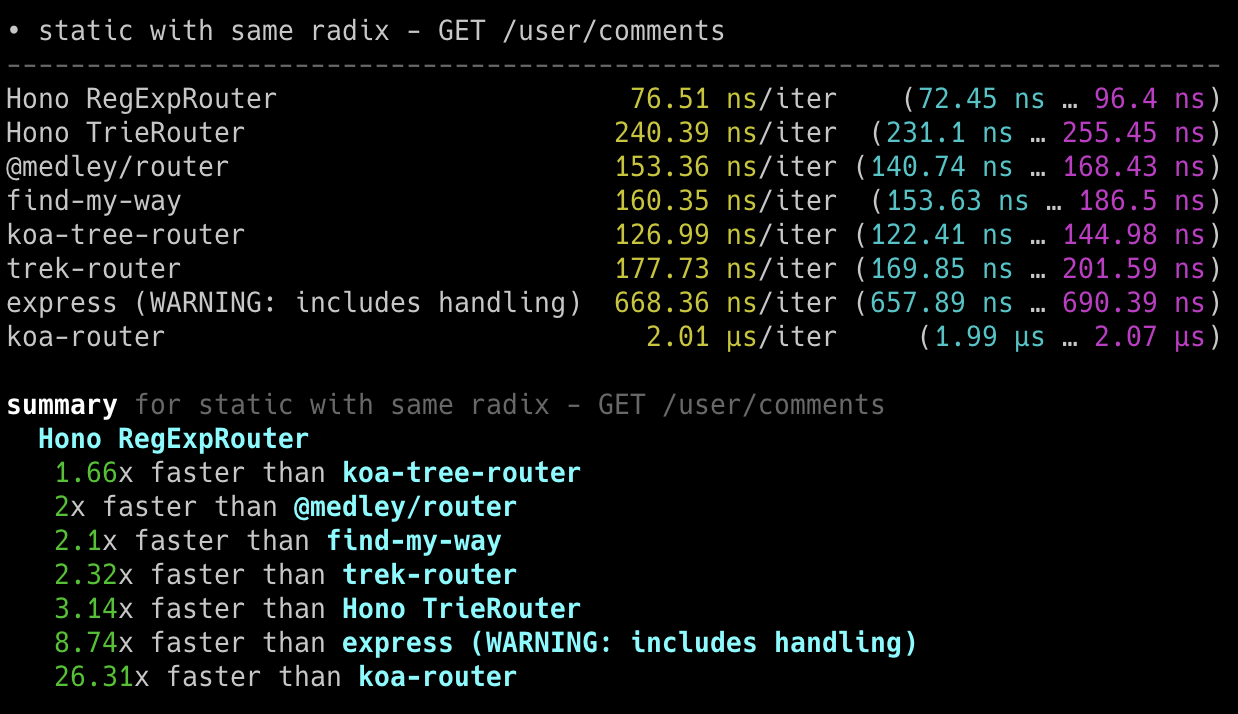
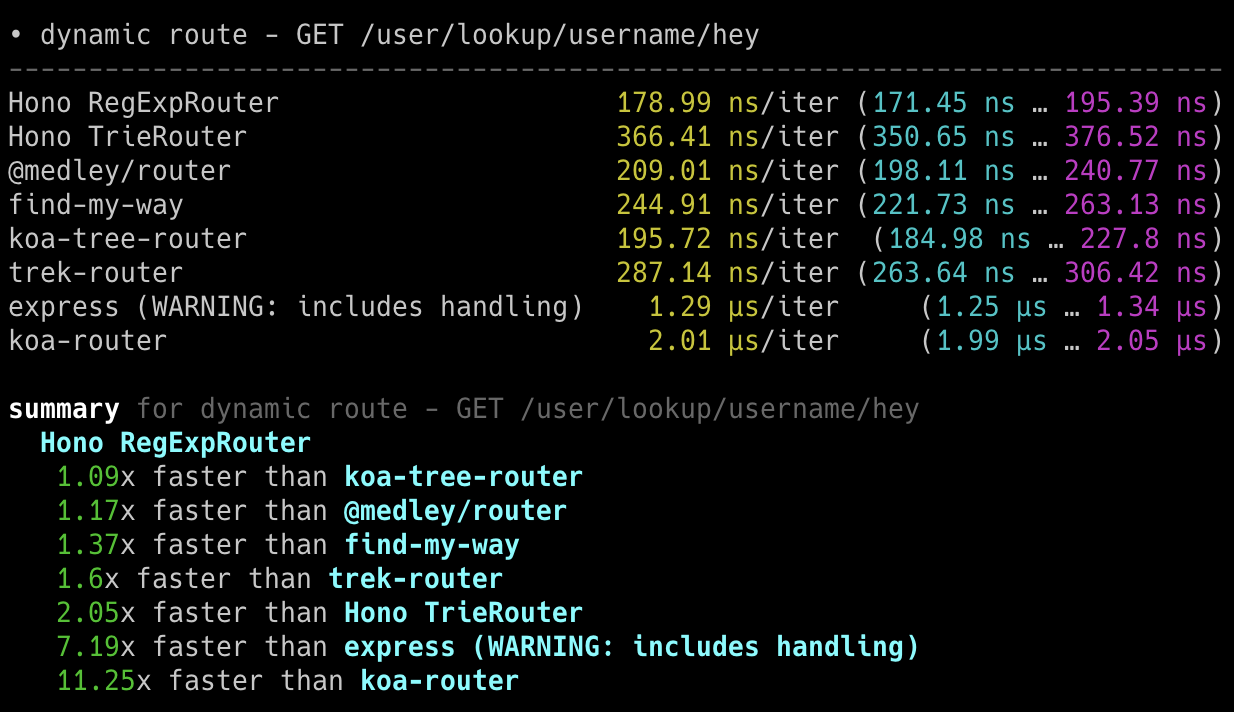
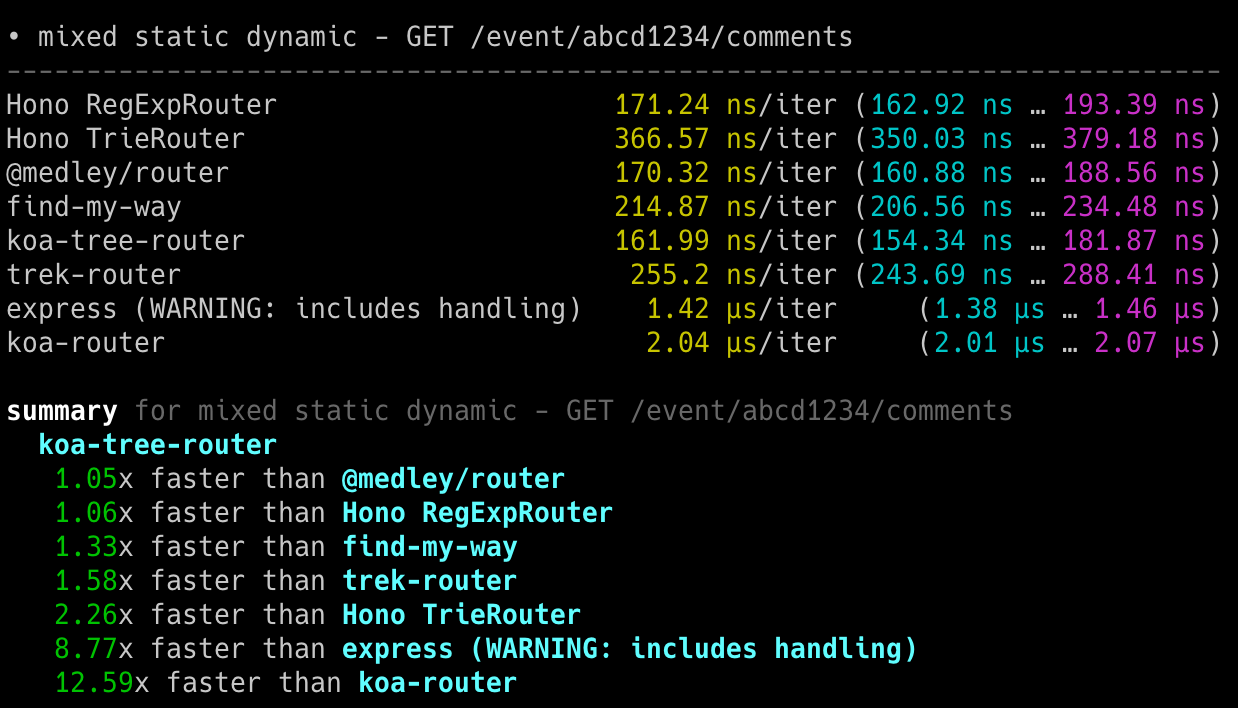
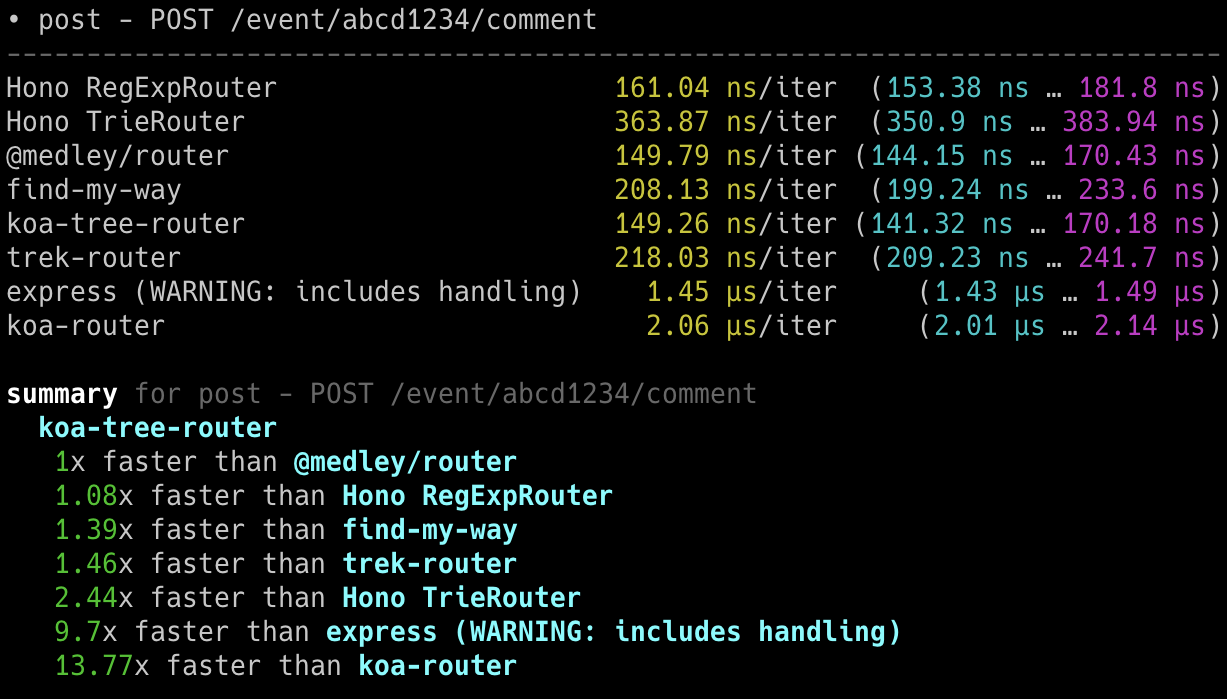
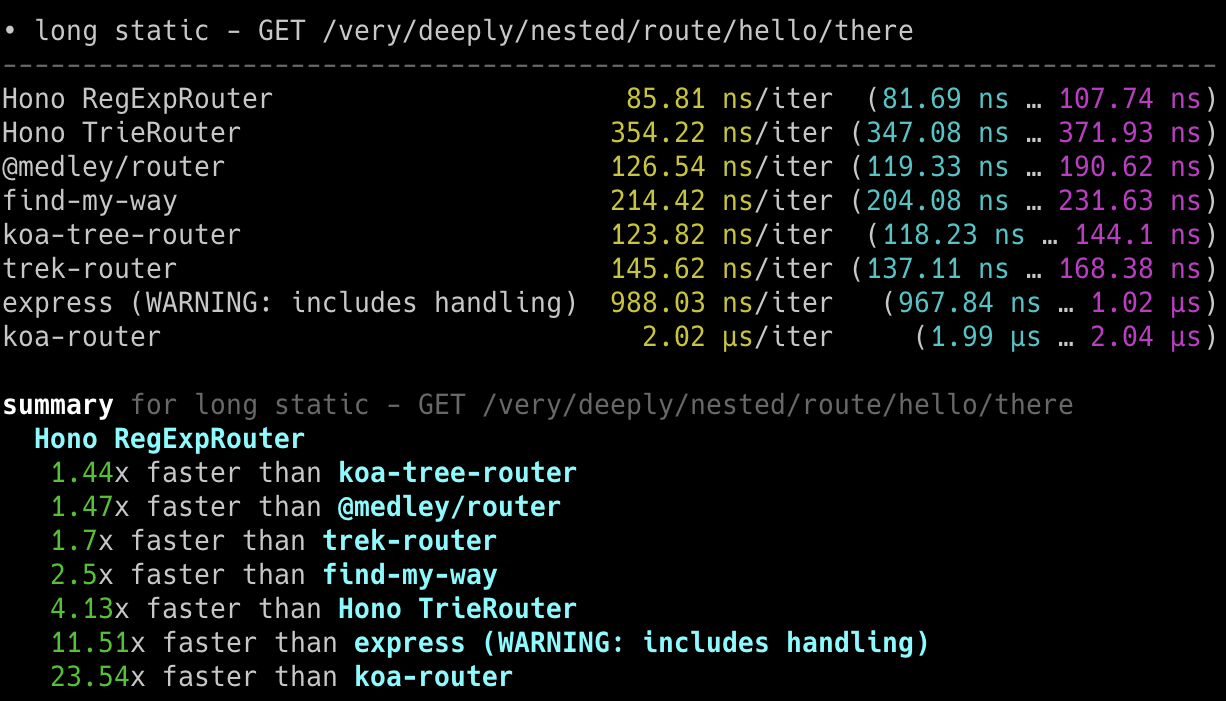
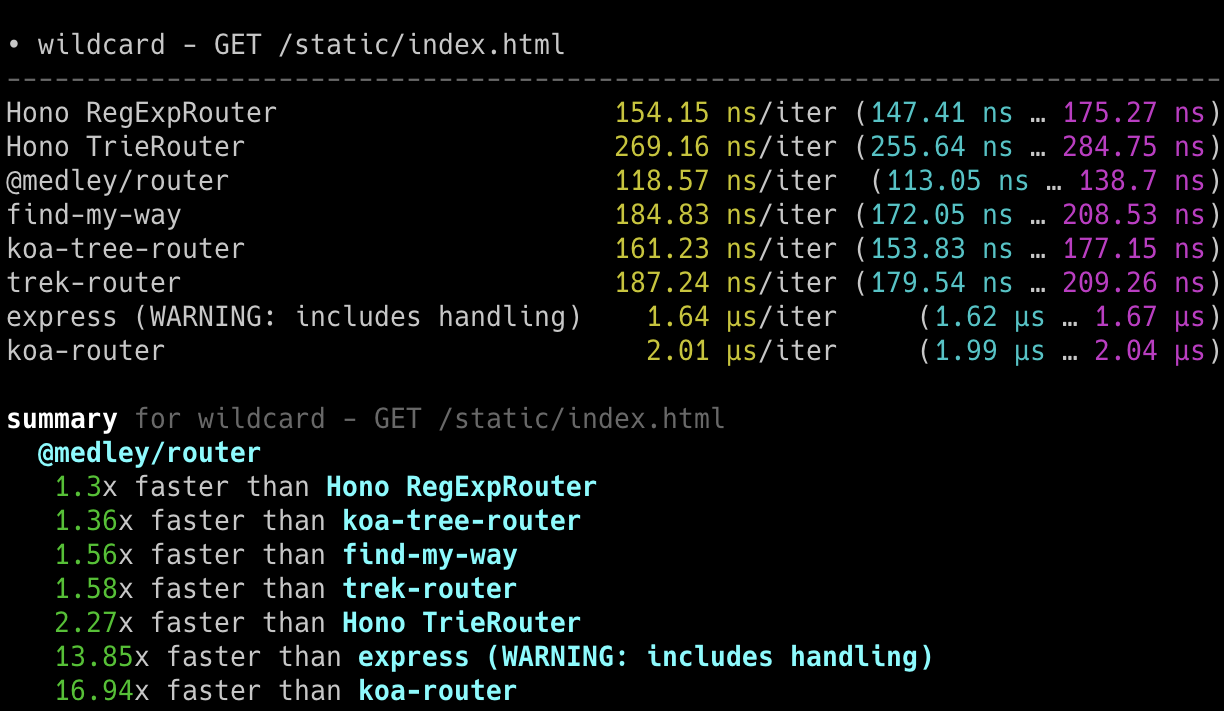
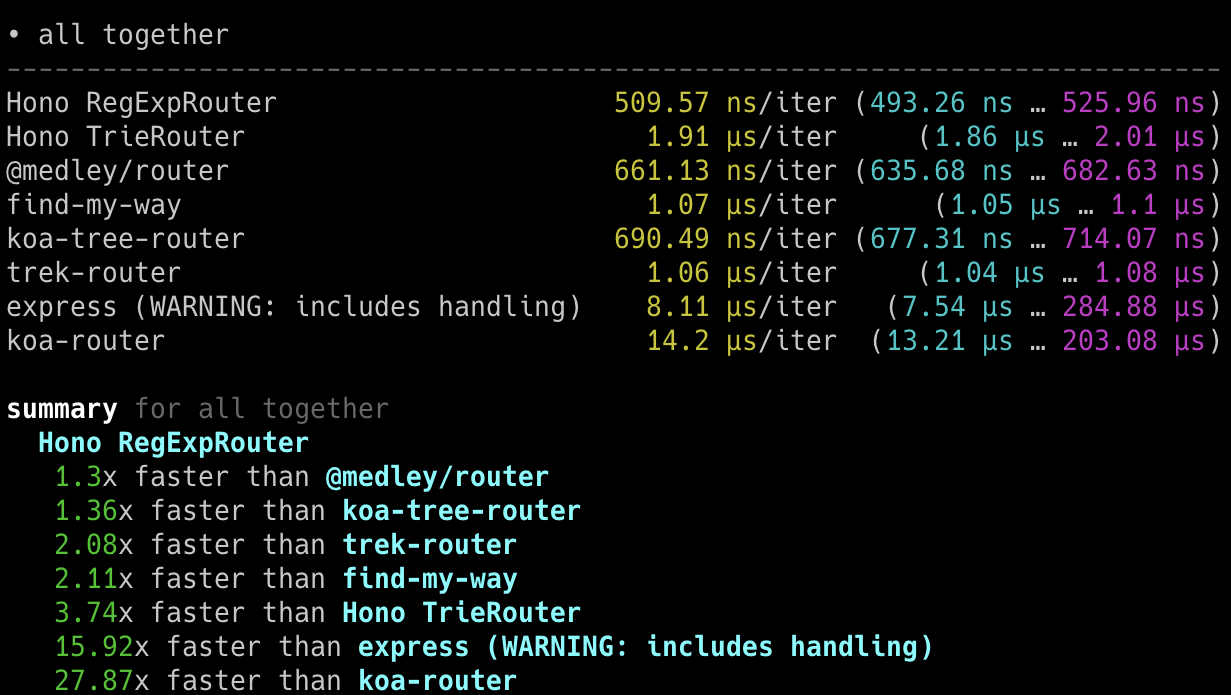
### 在 Bun 上
以下截图显示了在 Bun 上的结果。
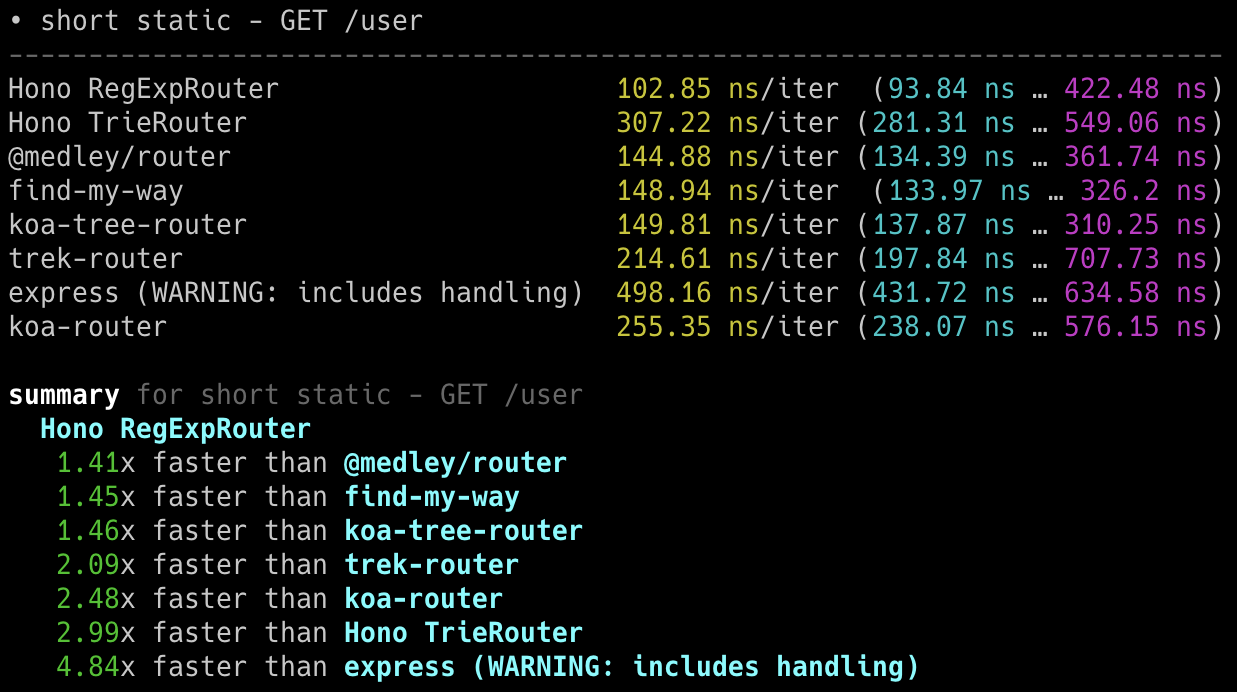

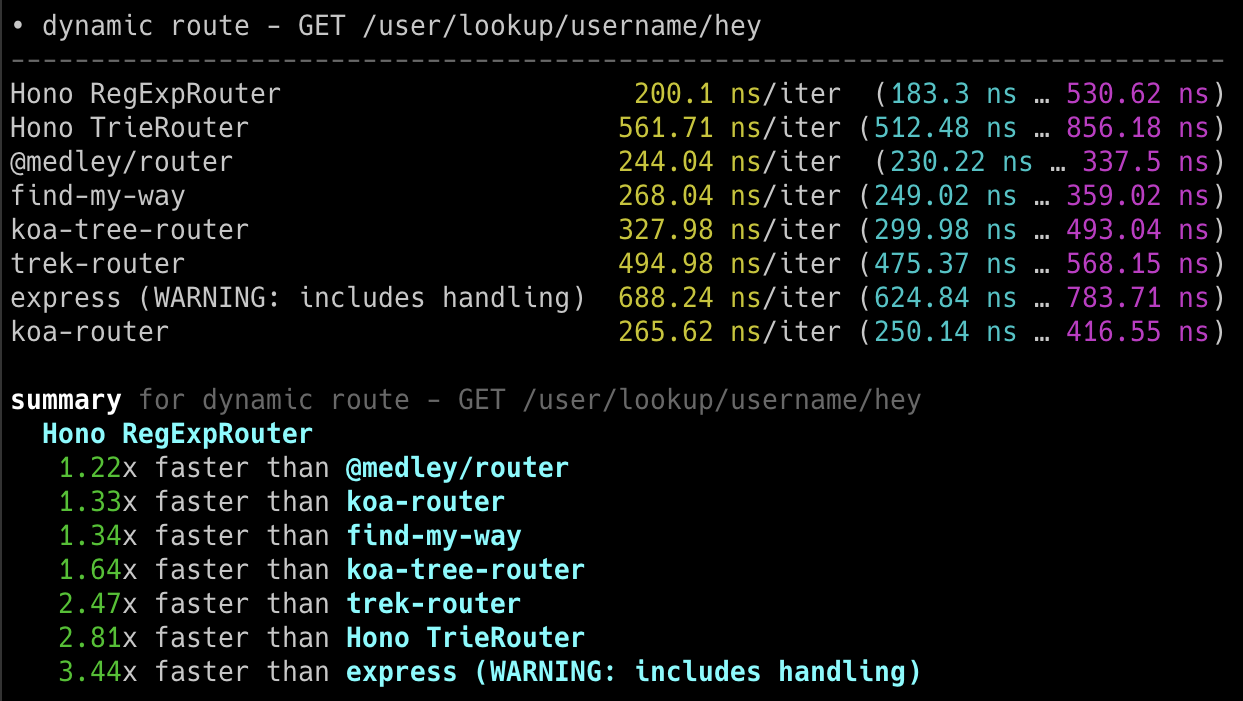
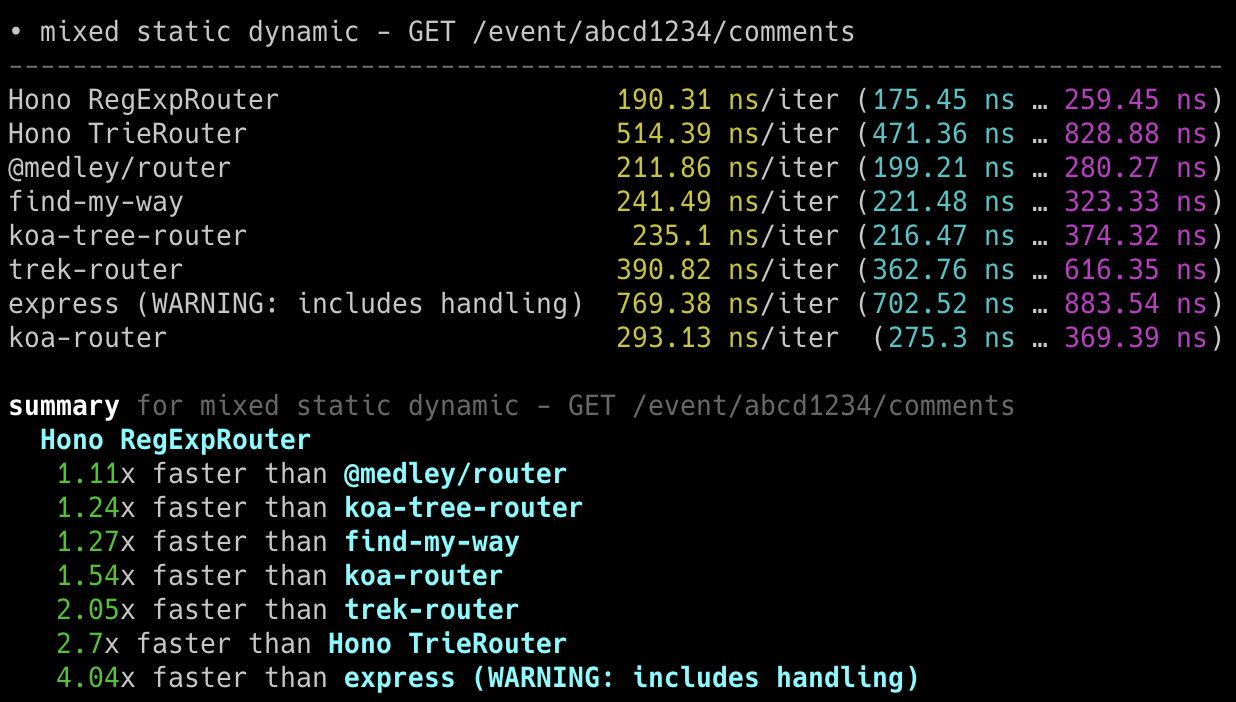
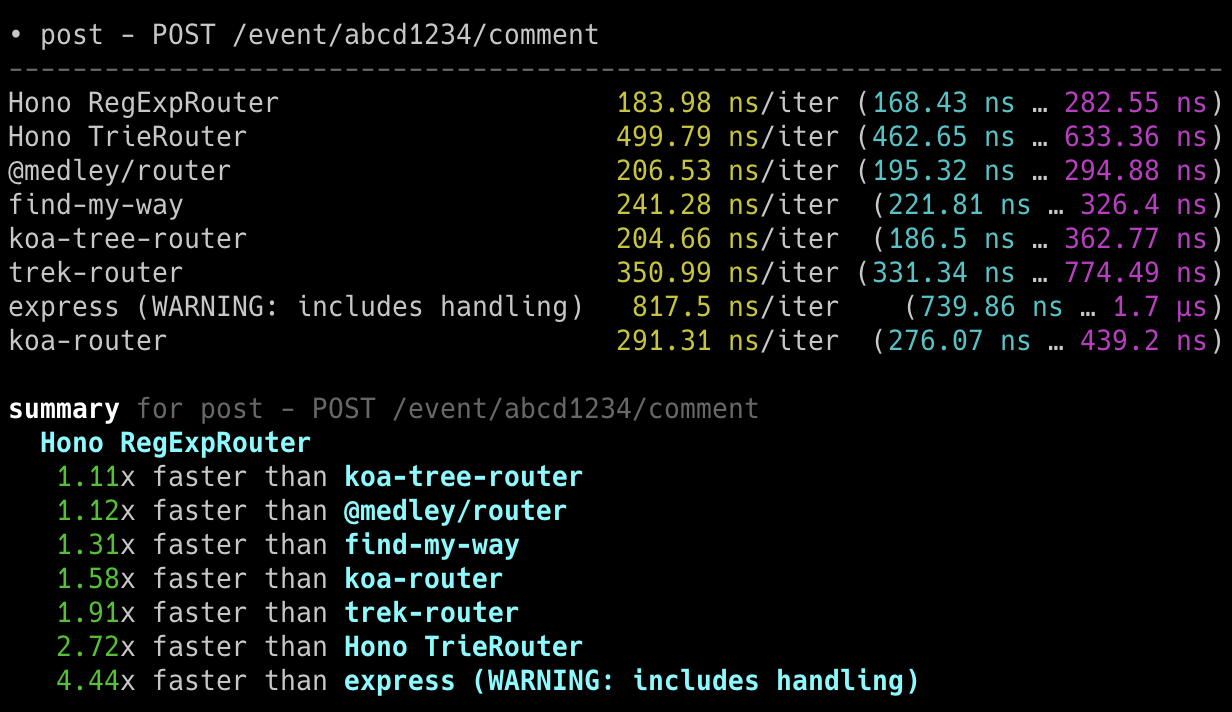
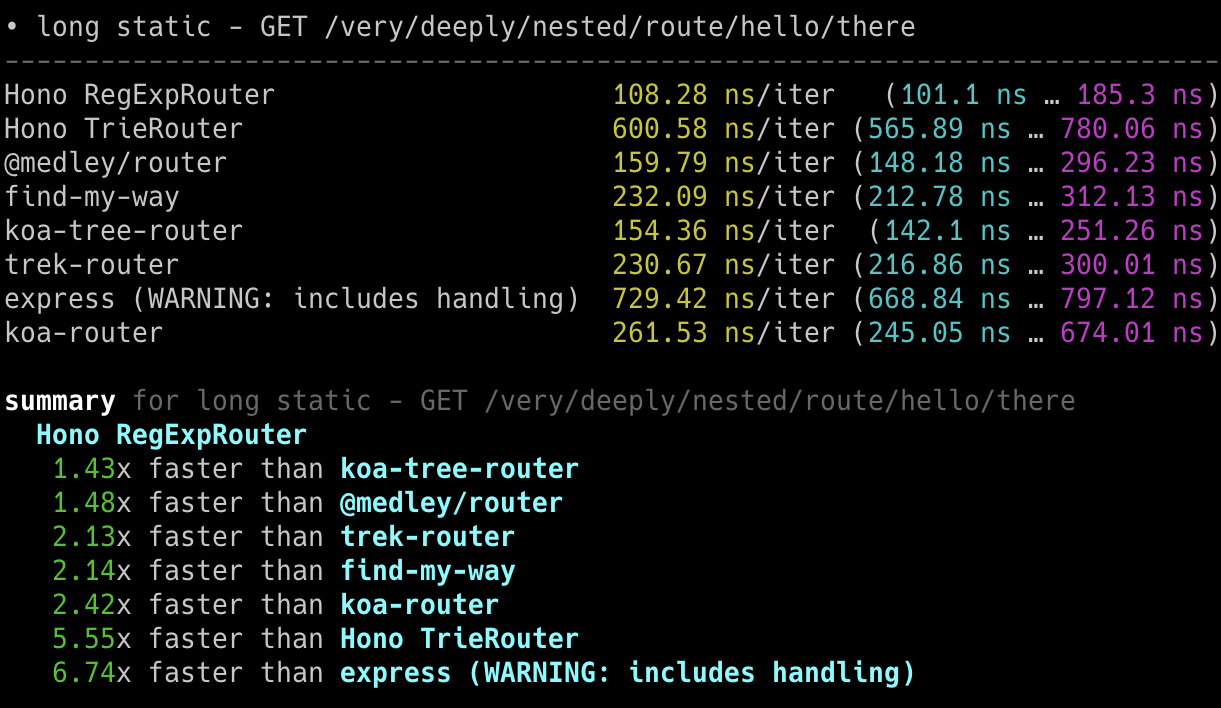
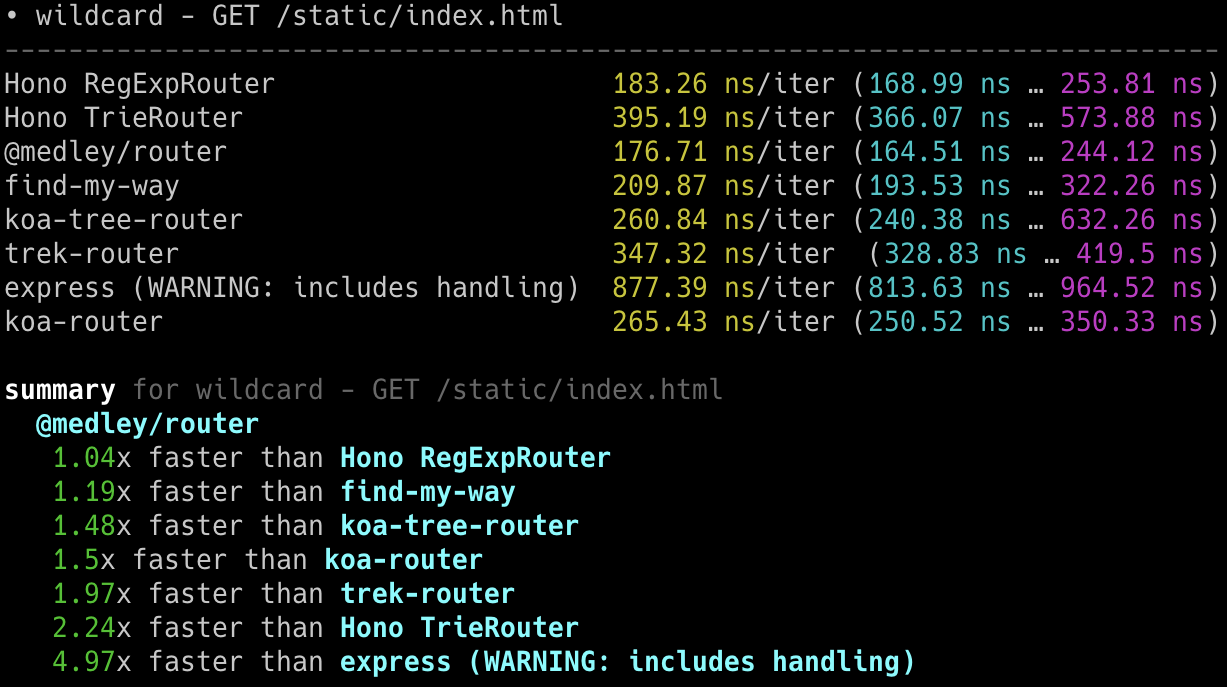
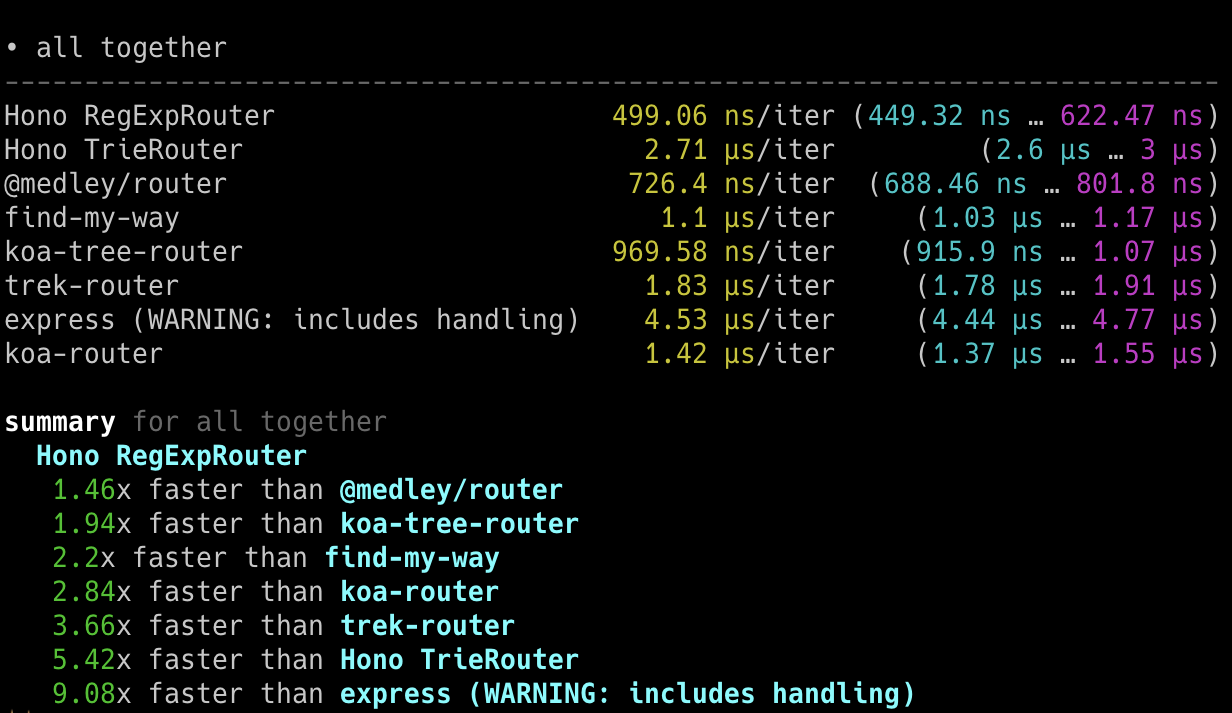
## Cloudflare Workers
**Hono 是最快的**,与其他 Cloudflare Workers 路由相比。
- 机器:Apple MacBook Pro, 32 GiB, M1 Pro
- 脚本:[benchmarks/handle-event](https://github.com/honojs/hono/tree/main/benchmarks/handle-event)
```
Hono x 402,820 ops/sec ±4.78% (80 runs sampled)
itty-router x 212,598 ops/sec ±3.11% (87 runs sampled)
sunder x 297,036 ops/sec ±4.76% (77 runs sampled)
worktop x 197,345 ops/sec ±2.40% (88 runs sampled)
Fastest is Hono
✨ Done in 28.06s.
```
## Deno
**Hono 是最快的**,与其他 Deno 框架相比。
- 机器:Apple MacBook Pro, 32 GiB, M1 Pro, Deno v1.22.0
- 脚本:[benchmarks/deno](https://github.com/honojs/hono/tree/main/benchmarks/deno)
- 方法:`bombardier --fasthttp -d 10s -c 100 'http://localhost:8000/user/lookup/username/foo'`
| 框架 | 版本 | 结果 |
| --------- | :----------: | -----------------------: |
| **Hono** | 3.0.0 | **请求/秒:136112** |
| Fast | 4.0.0-beta.1 | 请求/秒:103214 |
| Megalo | 0.3.0 | 请求/秒:64597 |
| Faster | 5.7 | 请求/秒:54801 |
| oak | 10.5.1 | 请求/秒:43326 |
| opine | 2.2.0 | 请求/秒:30700 |
另一个基准测试结果:[denosaurs/bench](https://github.com/denosaurs/bench)
## Bun
Hono 是 Bun 最快的框架之一。
你可以在下面看到。
- [SaltyAom/bun-http-framework-benchmark](https://github.com/SaltyAom/bun-http-framework-benchmark)
# 开发者体验
要创建一个优秀的应用程序,我们需要出色的开发体验。
幸运的是,我们可以用 TypeScript 为 Cloudflare Workers、Deno 和 Bun 编写应用程序,而无需将其转译为 JavaScript。
Hono 是用 TypeScript 编写的,可以使应用程序具备类型安全。
# 中间件
我们将返回 `Response` 的基本单元称为 "Handler"。
"Middleware" 在 Handler 之前和之后执行,并处理 `Request` 和 `Response`。
它就像洋葱结构一样。

例如,我们可以编写如下中间件来添加 "X-Response-Time" 头。
```ts twoslash
import { Hono } from 'hono'
const app = new Hono()
// ---cut---
app.use(async (c, next) => {
const start = performance.now()
await next()
const end = performance.now()
c.res.headers.set('X-Response-Time', `${end - start}`)
})
```
通过这种简单的方法,我们可以编写自己的自定义中间件,也可以使用内置或第三方中间件。
# 理念
在本节中,我们将讨论 Hono 的概念,或者说理念。
## 动机
起初,我只是想在 Cloudflare Workers 上创建一个 Web 应用程序。
但是,并没有能在 Cloudflare Workers 上运行的好框架。
所以,我开始构建 Hono。
我认为这是一个学习如何使用 Trie 树构建路由器的好机会。
然后一位朋友带来了名为 "RegExpRouter" 的极速路由器。
我还有一位朋友创建了基本认证中间件。
仅使用 Web 标准 API,我们就可以让它在 Deno 和 Bun 上运行。当人们问“有适用于 Bun 的 Express 吗?”,我们可以回答,“没有,但有 Hono"。
(虽然 Express 现在也可以在 Bun 上运行了。)
我们还有朋友制作了 GraphQL 服务器、Firebase 认证和 Sentry 中间件。
而且,我们还有一个 Node.js 适配器。
一个生态系统已经涌现。
换句话说,Hono 超快,能实现很多东西,并且无处不在。
我们可以设想,Hono 可能会成为 **Web 标准的标准**。
# 路由
路由是 Hono 最重要的功能。
Hono 有五种路由。
## RegExpRouter
**RegExpRouter** 是 JavaScript 世界中最快的路由。
虽然它被称为 "RegExp",但它并不是像 Express 那样使用 [path-to-regexp](https://github.com/pillarjs/path-to-regexp) 的实现。
它们使用的是线性循环。
因此,将对所有路由执行正则表达式匹配,并且随着路由数量的增加,性能将会下降。
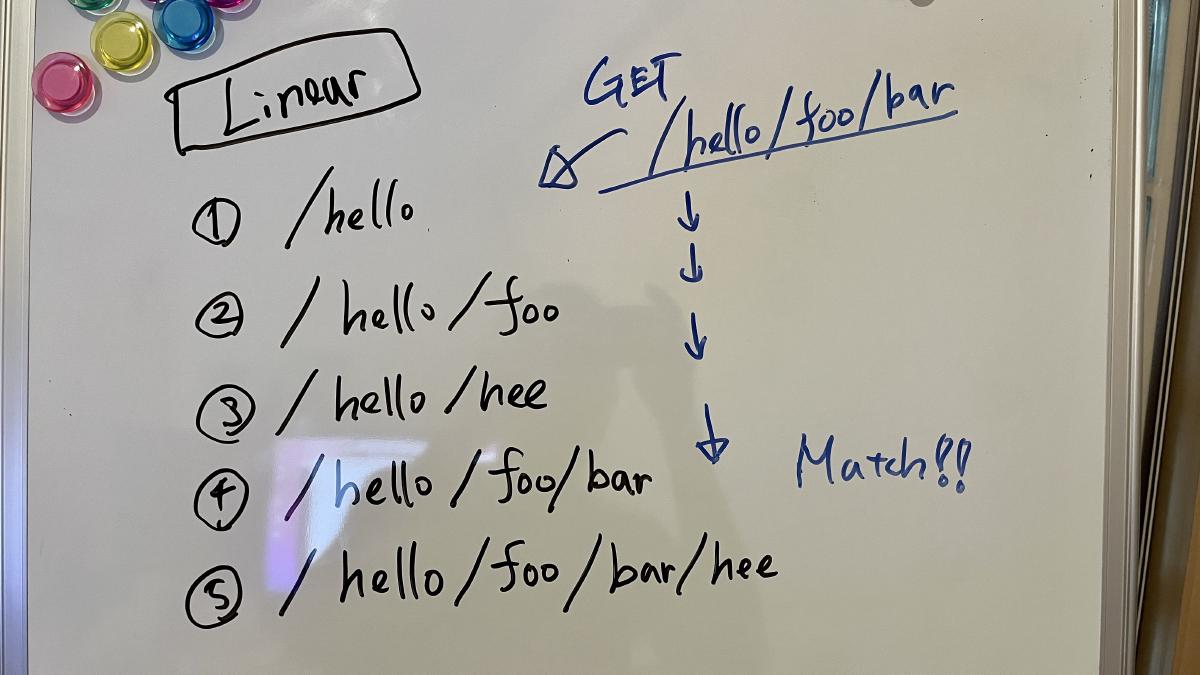
Hono 的 RegExpRouter 将路由模式转换为“一个大型正则表达式”。
然后它可以通过一次匹配获得结果。
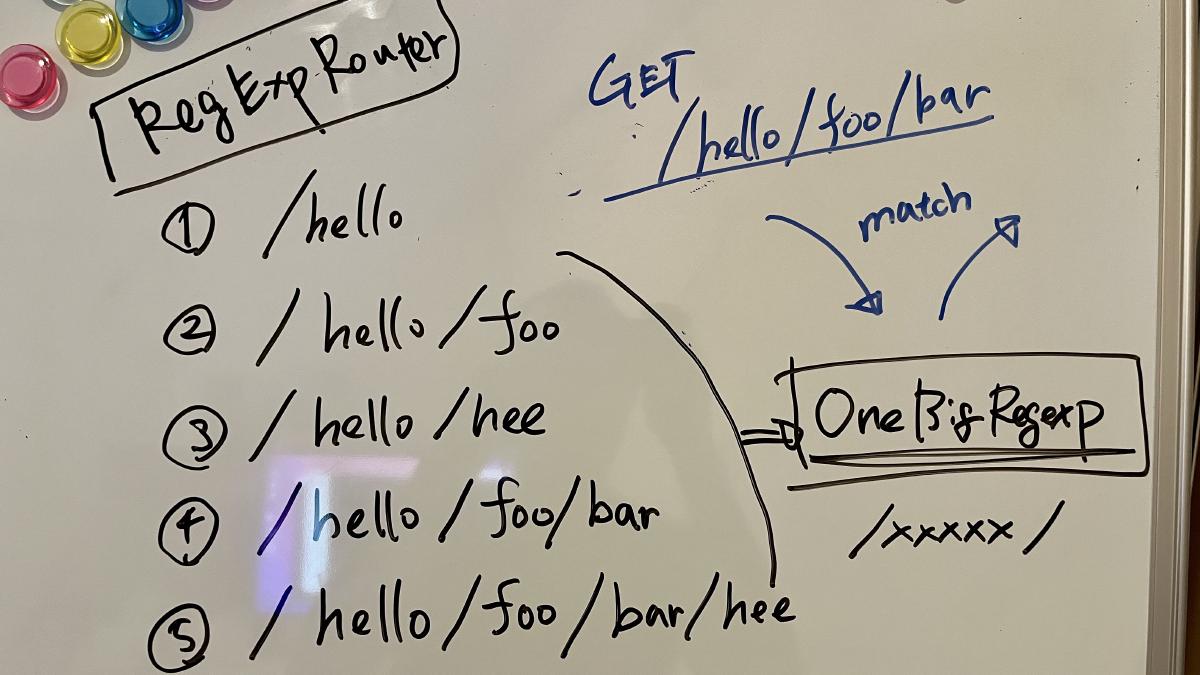
在大多数情况下,这比使用基于树的算法(如基数树)的方法更快。
但是,RegExpRouter 不支持所有路由模式,所以它通常与下面支持所有路由模式的其他路由之一结合使用。
## TrieRouter
**TrieRouter** 是使用 Trie 树算法的路由。
像 RegExpRouter 一样,它不使用线性循环。

这个路由不如 RegExpRouter 快,但比 Express 路由快得多。
TrieRouter 支持所有模式。
## SmartRouter
当你使用多个路由时,**SmartRouter** 非常有用。它通过从注册的路由中推断来选择最佳路由。
Hono 默认使用 SmartRouter、RegExpRouter 和 TrieRouter:
```ts
// 在 Hono 的核心内部。
readonly defaultRouter: Router = new SmartRouter({
routers: [new RegExpRouter(), new TrieRouter()],
})
```
当应用程序启动时,SmartRouter 会根据路由检测最快的路由并继续使用它。
## LinearRouter
RegExpRouter 很快,但路由注册阶段可能会稍慢。
因此,它不适合每次请求都初始化的环境。
**LinearRouter** 针对“一次性”情况进行了优化。
路由注册比 RegExpRouter 快得多,因为它使用线性方法添加路由而不编译字符串。
以下是基准测试结果之一,其中包括路由注册阶段。
```console
• GET /user/lookup/username/hey
----------------------------------------------------- -----------------------------
LinearRouter 1.82 µs/iter (1.7 µs … 2.04 µs) 1.84 µs 2.04 µs 2.04 µs
MedleyRouter 4.44 µs/iter (4.34 µs … 4.54 µs) 4.48 µs 4.54 µs 4.54 µs
FindMyWay 60.36 µs/iter (45.5 µs … 1.9 ms) 59.88 µs 78.13 µs 82.92 µs
KoaTreeRouter 3.81 µs/iter (3.73 µs … 3.87 µs) 3.84 µs 3.87 µs 3.87 µs
TrekRouter 5.84 µs/iter (5.75 µs … 6.04 µs) 5.86 µs 6.04 µs 6.04 µs
summary for GET /user/lookup/username/hey
LinearRouter
2.1x faster than KoaTreeRouter
2.45x faster than MedleyRouter
3.21x faster than TrekRouter
33.24x faster than FindMyWay
```
## PatternRouter
**PatternRouter** 是 Hono 路由中最小的路由。
虽然 Hono 已经非常紧凑,但如果你需要在资源有限的环境中使其更小,请使用 PatternRouter。
仅使用 PatternRouter 的应用程序大小低于 15KB。
```console
$ npx wrangler deploy --minify ./src/index.ts
⛅️ wrangler 3.20.0
-------------------
Total Upload: 14.68 KiB / gzip: 5.38 KiB
```
# Hono 技术栈
Hono 让简单的事情变得简单,让困难的事情也变得简单。
它不仅适合返回 JSON,也非常适合构建包含 REST API 服务器和客户端的全栈应用程序。
## RPC
Hono 的 RPC 功能允许你只需少量代码更改即可共享 API 规范。
由 `hc` 生成的客户端将读取规范并类型安全地访问端点。
以下库使其成为可能。
- Hono - API 服务器
- [Zod](https://zod.dev) - 验证器
- [Zod 验证器中间件](https://github.com/honojs/middleware/tree/main/packages/zod-validator)
- `hc` - HTTP 客户端
我们可以将这套组件称为 **Hono 技术栈**。
现在让我们用它创建一个 API 服务器和一个客户端。
## 编写 API
首先,编写一个接收 GET 请求并返回 JSON 的端点。
```ts twoslash
import { Hono } from 'hono'
const app = new Hono()
app.get('/hello', (c) => {
return c.json({
message: `Hello!`,
})
})
```
## 使用 Zod 进行验证
使用 Zod 验证以接收查询参数的值。
```ts
import { zValidator } from '@hono/zod-validator'
import * as z from 'zod'
app.get(
'/hello',
zValidator(
'query',
z.object({
name: z.string(),
})
),
(c) => {
const { name } = c.req.valid('query')
return c.json({
message: `Hello! ${name}`,
})
}
)
```
## 共享类型
要发出端点规范,请导出其类型。
::: warning
为了使 RPC 正确推断路由,所有包含的方法必须链式调用,并且端点或应用类型必须从声明的变量中推断。更多信息,请参阅 [RPC 最佳实践](https://hono.dev/docs/guides/best-practices#if-you-want-to-use-rpc-features)。
:::
```ts{1,17}
const route = app.get(
'/hello',
zValidator(
'query',
z.object({
name: z.string(),
})
),
(c) => {
const { name } = c.req.valid('query')
return c.json({
message: `Hello! ${name}`,
})
}
)
export type AppType = typeof route
```
## 客户端
接下来是客户端实现。
通过将 `AppType` 类型作为泛型传递给 `hc` 来创建客户端对象。
然后,神奇地,自动补全生效了,端点路径和请求类型会被建议。
```ts
import { AppType } from './server'
import { hc } from 'hono/client'
const client = hc('/api')
const res = await client.hello.$get({
query: {
name: 'Hono',
},
})
```
`Response` 与 fetch API 兼容,但可以通过 `json()` 检索的数据具有类型。
```ts
const data = await res.json()
console.log(`${data.message}`)
```
共享 API 规范意味着你可以察觉到服务器端的更改。
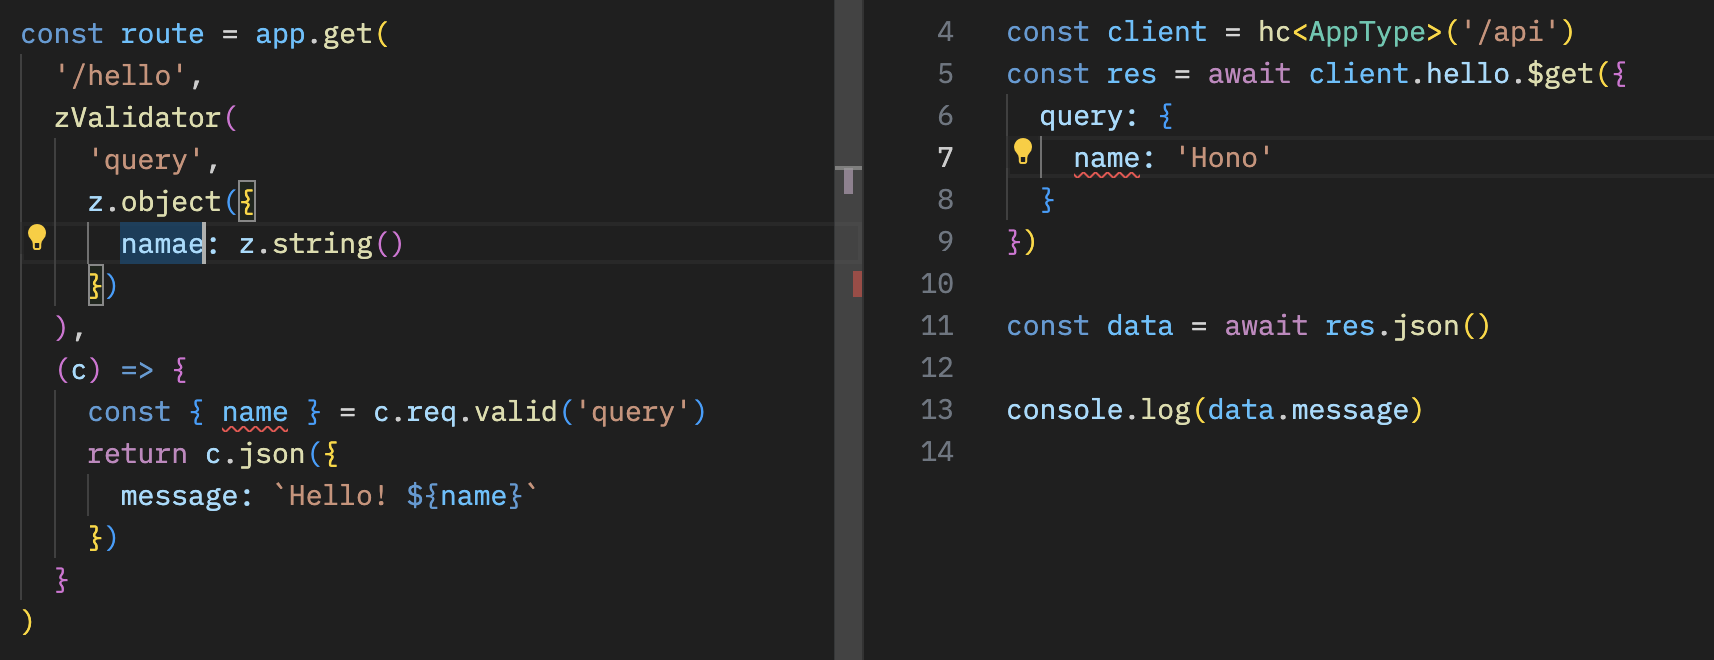
## 结合 React
你可以使用 React 在 Cloudflare Pages 上创建应用程序。
API 服务器。
```ts
// functions/api/[[route]].ts
import { Hono } from 'hono'
import { handle } from 'hono/cloudflare-pages'
import * as z from 'zod'
import { zValidator } from '@hono/zod-validator'
const app = new Hono()
const schema = z.object({
id: z.string(),
title: z.string(),
})
type Todo = z.infer
const todos: Todo[] = []
const route = app
.post('/todo', zValidator('form', schema), (c) => {
const todo = c.req.valid('form')
todos.push(todo)
return c.json({
message: 'created!',
})
})
.get((c) => {
return c.json({
todos,
})
})
export type AppType = typeof route
export const onRequest = handle(app, '/api')
```
使用 React 和 React Query 的客户端。
```tsx
// src/App.tsx
import {
useQuery,
useMutation,
QueryClient,
QueryClientProvider,
} from '@tanstack/react-query'
import { AppType } from '../functions/api/[[route]]'
import { hc, InferResponseType, InferRequestType } from 'hono/client'
const queryClient = new QueryClient()
const client = hc('/api')
export default function App() {
return (
)
}
const Todos = () => {
const query = useQuery({
queryKey: ['todos'],
queryFn: async () => {
const res = await client.todo.$get()
return await res.json()
},
})
const $post = client.todo.$post
const mutation = useMutation<
InferResponseType,
Error,
InferRequestType['form']
>({
mutationFn: async (todo) => {
const res = await $post({
form: todo,
})
return await res.json()
},
onSuccess: async () => {
queryClient.invalidateQueries({ queryKey: ['todos'] })
},
onError: (error) => {
console.log(error)
},
})
return (
{query.data?.todos.map((todo) => (
- {todo.title}
))}
)
}
```
# Web 标准
Hono 仅使用像 Fetch 这样的 **Web 标准**。
它们最初用于 `fetch` 函数,由处理 HTTP 请求和响应的基本对象组成。
除了 `Requests` 和 `Responses` 之外,还有 `URL`、`URLSearchParam`、`Headers` 等。
Cloudflare Workers、Deno 和 Bun 也是基于 Web 标准构建的。
例如,一个返回 "Hello World" 的服务器可以写成下面这样。这可以在 Cloudflare Workers 和 Bun 上运行。
```ts twoslash
export default {
async fetch() {
return new Response('Hello World')
},
}
```
Hono 仅使用 Web 标准,这意味着 Hono 可以在任何支持它们的运行时上运行。
此外,我们有一个 Node.js 适配器。Hono 可以在这些运行时上运行:
- Cloudflare Workers (`workerd`)
- Deno
- Bun
- Fastly Compute
- AWS Lambda
- Node.js
- Vercel (edge-light)
- WebAssembly(通过 [`wasi:http`][wasi-http] 使用 [WebAssembly 系统接口 (WASI)][wasi])
它也适用于 Netlify 和其他平台。
相同的代码可以在所有平台上运行。
Cloudflare Workers、Deno、Shopify 等发起了 [WinterCG](https://wintercg.org),以讨论使用 Web 标准实现"Web 互操作性"的可能性。
Hono 将追随他们的脚步,致力于 **Web 标准的标准**。
[wasi]: https://github.com/WebAssembly/wasi
[wasi-http]: https://github.com/WebAssembly/wasi-http
# 上下文
`Context` 对象为每个请求实例化,并保留直到响应返回。你可以将值放入其中,设置要返回的标头和状态码,并访问 HonoRequest 和 Response 对象。
## req
`req` 是 HonoRequest 的实例。更多详情,请参阅 [HonoRequest](/docs/api/request)。
```ts twoslash
import { Hono } from 'hono'
const app = new Hono()
// ---cut---
app.get('/hello', (c) => {
const userAgent = c.req.header('User-Agent')
// ...
// ---cut-start---
return c.text(`Hello, ${userAgent}`)
// ---cut-end---
})
```
## status()
你可以使用 `c.status()` 设置 HTTP 状态码。默认值为 `200`。如果代码是 `200`,则不必使用 `c.status()`。
```ts twoslash
import { Hono } from 'hono'
const app = new Hono()
// ---cut---
app.post('/posts', (c) => {
// 设置 HTTP 状态码
c.status(201)
return c.text('Your post is created!')
})
```
## header()
你可以为响应设置 HTTP 标头。
```ts twoslash
import { Hono } from 'hono'
const app = new Hono()
// ---cut---
app.get('/', (c) => {
// 设置标头
c.header('X-Message', 'My custom message')
return c.text('Hello!')
})
```
## body()
返回 HTTP 响应。
::: info
**注意**:当返回文本或 HTML 时,建议使用 `c.text()` 或 `c.html()`。
:::
```ts twoslash
import { Hono } from 'hono'
const app = new Hono()
// ---cut---
app.get('/welcome', (c) => {
c.header('Content-Type', 'text/plain')
// 返回响应体
return c.body('Thank you for coming')
})
```
你也可以这样写。
```ts twoslash
import { Hono } from 'hono'
const app = new Hono()
// ---cut---
app.get('/welcome', (c) => {
return c.body('Thank you for coming', 201, {
'X-Message': 'Hello!',
'Content-Type': 'text/plain',
})
})
```
响应与下面的 `Response` 对象相同。
```ts twoslash
new Response('Thank you for coming', {
status: 201,
headers: {
'X-Message': 'Hello!',
'Content-Type': 'text/plain',
},
})
```
## text()
将文本渲染为 `Content-Type: text/plain`。
```ts twoslash
import { Hono } from 'hono'
const app = new Hono()
// ---cut---
app.get('/say', (c) => {
return c.text('Hello!')
})
```
## json()
将 JSON 渲染为 `Content-Type: application/json`。
```ts twoslash
import { Hono } from 'hono'
const app = new Hono()
// ---cut---
app.get('/api', (c) => {
return c.json({ message: 'Hello!' })
})
```
## html()
将 HTML 渲染为 `Content-Type: text/html`。
```ts twoslash
import { Hono } from 'hono'
const app = new Hono()
// ---cut---
app.get('/', (c) => {
return c.html('Hello! Hono!
')
})
```
## notFound()
返回 `Not Found` 响应。你可以使用 [`app.notFound()`](/docs/api/hono#not-found) 自定义它。
```ts twoslash
import { Hono } from 'hono'
const app = new Hono()
// ---cut---
app.get('/notfound', (c) => {
return c.notFound()
})
```
## redirect()
重定向,默认状态码为 `302`。
```ts twoslash
import { Hono } from 'hono'
const app = new Hono()
// ---cut---
app.get('/redirect', (c) => {
return c.redirect('/')
})
app.get('/redirect-permanently', (c) => {
return c.redirect('/', 301)
})
```
## res
你可以访问将返回的 [Response] 对象。
```ts twoslash
import { Hono } from 'hono'
const app = new Hono()
// ---cut---
// Response 对象
app.use('/', async (c, next) => {
await next()
c.res.headers.append('X-Debug', 'Debug message')
})
```
[Response]: https://developer.mozilla.org/en-US/docs/Web/API/Response
## set() / get()
获取和设置任意键值对,生命周期为当前请求。这允许在中间件之间或从中间件到路由处理器传递特定值。
```ts twoslash
import { Hono } from 'hono'
const app = new Hono<{ Variables: { message: string } }>()
// ---cut---
app.use(async (c, next) => {
c.set('message', 'Hono is cool!!')
await next()
})
app.get('/', (c) => {
const message = c.get('message')
return c.text(`The message is "${message}"`)
})
```
将 `Variables` 作为泛型传递给 `Hono` 的构造函数以使其类型安全。
```ts twoslash
import { Hono } from 'hono'
// ---cut---
type Variables = {
message: string
}
const app = new Hono<{ Variables: Variables }>()
```
`c.set` / `c.get` 的值仅在同一请求内保留。它们不能在不同请求之间共享或持久化。
## var
你也可以使用 `c.var` 访问变量的值。
```ts twoslash
import type { Context } from 'hono'
declare const c: Context
// ---cut---
const result = c.var.client.oneMethod()
```
如果你想创建一个提供自定义方法的中间件,
请如下编写:
```ts twoslash
import { Hono } from 'hono'
import { createMiddleware } from 'hono/factory'
// ---cut---
type Env = {
Variables: {
echo: (str: string) => string
}
}
const app = new Hono()
const echoMiddleware = createMiddleware(async (c, next) => {
c.set('echo', (str) => str)
await next()
})
app.get('/echo', echoMiddleware, (c) => {
return c.text(c.var.echo('Hello!'))
})
```
如果你想在多个处理器中使用该中间件,可以使用 `app.use()`。
然后,你必须将 `Env` 作为泛型传递给 `Hono` 的构造函数以使其类型安全。
```ts twoslash
import { Hono } from 'hono'
import type { MiddlewareHandler } from 'hono/types'
declare const echoMiddleware: MiddlewareHandler
type Env = {
Variables: {
echo: (str: string) => string
}
}
// ---cut---
const app = new Hono()
app.use(echoMiddleware)
app.get('/echo', (c) => {
return c.text(c.var.echo('Hello!'))
})
```
## render() / setRenderer()
你可以在自定义中间件中使用 `c.setRenderer()` 设置布局。
```tsx twoslash
/** @jsx jsx */
/** @jsxImportSource hono/jsx */
import { Hono } from 'hono'
const app = new Hono()
// ---cut---
app.use(async (c, next) => {
c.setRenderer((content) => {
return c.html(
{content}
)
})
await next()
})
```
然后,你可以利用 `c.render()` 在此布局内创建响应。
```ts twoslash
import { Hono } from 'hono'
const app = new Hono()
// ---cut---
app.get('/', (c) => {
return c.render('Hello!')
})
```
输出将为:
```html
Hello!
```
此外,此功能提供了自定义参数的灵活性。
为了确保类型安全,类型可以定义为:
```ts
declare module 'hono' {
interface ContextRenderer {
(
content: string | Promise,
head: { title: string }
): Response | Promise
}
}
```
以下是如何使用此功能的示例:
```ts
app.use('/pages/*', async (c, next) => {
c.setRenderer((content, head) => {
return c.html(
{head.title}
{content}
)
})
await next()
})
app.get('/pages/my-favorite', (c) => {
return c.render(Ramen and Sushi
, {
title: 'My favorite',
})
})
app.get('/pages/my-hobbies', (c) => {
return c.render(Watching baseball
, {
title: 'My hobbies',
})
})
```
## executionCtx
你可以访问 Cloudflare Workers 特定的 [ExecutionContext](https://developers.cloudflare.com/workers/runtime-apis/context/)。
```ts twoslash
import { Hono } from 'hono'
const app = new Hono<{
Bindings: {
KV: any
}
}>()
declare const key: string
declare const data: string
// ---cut---
// ExecutionContext 对象
app.get('/foo', async (c) => {
c.executionCtx.waitUntil(c.env.KV.put(key, data))
// ...
})
```
`ExecutionContext` 还有一个 [`exports`](https://developers.cloudflare.com/workers/runtime-apis/context/#exports) 字段。要使用 Wrangler 生成的类型获得自动补全,你可以使用模块 augmentation:
```ts
import 'hono'
declare module 'hono' {
interface ExecutionContext {
readonly exports: Cloudflare.Exports
}
}
```
## event
你可以访问 Cloudflare Workers 特定的 `FetchEvent`。这在 "Service Worker" 语法中使用过。但现在不推荐使用。
```ts twoslash
import { Hono } from 'hono'
declare const key: string
declare const data: string
type KVNamespace = any
// ---cut---
// 用于类型推断的类型定义
type Bindings = {
MY_KV: KVNamespace
}
const app = new Hono<{ Bindings: Bindings }>()
// FetchEvent 对象(仅在使用 Service Worker 语法时设置)
app.get('/foo', async (c) => {
c.event.waitUntil(c.env.MY_KV.put(key, data))
// ...
})
```
## env
在 Cloudflare Workers 环境变量中,绑定到 worker 的 secrets、KV 命名空间、D1 数据库、R2 存储桶等被称为 bindings。
无论类型如何,bindings 始终可作为全局变量使用,并可通过上下文 `c.env.BINDING_KEY` 访问。
```ts twoslash
import { Hono } from 'hono'
type KVNamespace = any
// ---cut---
// 用于类型推断的类型定义
type Bindings = {
MY_KV: KVNamespace
}
const app = new Hono<{ Bindings: Bindings }>()
// Cloudflare Workers 的环境对象
app.get('/', async (c) => {
c.env.MY_KV.get('my-key')
// ...
})
```
## error
如果 Handler 抛出错误,错误对象将放置在 `c.error` 中。
你可以在中间件中访问它。
```ts twoslash
import { Hono } from 'hono'
const app = new Hono()
// ---cut---
app.use(async (c, next) => {
await next()
if (c.error) {
// 做一些事情...
}
})
```
## ContextVariableMap
例如,如果你希望在特定中间件使用时为变量添加类型定义,你可以扩展 `ContextVariableMap`。例如:
```ts
declare module 'hono' {
interface ContextVariableMap {
result: string
}
}
```
然后你可以在中间件中使用它:
```ts twoslash
import { createMiddleware } from 'hono/factory'
// ---cut---
const mw = createMiddleware(async (c, next) => {
c.set('result', 'some values') // result 是一个字符串
await next()
})
```
在处理器中,变量被推断为正确的类型:
```ts twoslash
import { Hono } from 'hono'
const app = new Hono<{ Variables: { result: string } }>()
// ---cut---
app.get('/', (c) => {
const val = c.get('result') // val 是一个字符串
// ...
return c.json({ result: val })
})
```
# HTTPException
当发生致命错误时,Hono(以及许多生态系统中间件)可能会抛出 `HTTPException`。这是一个自定义的 Hono `Error`,简化了 [返回错误响应](#handling-httpexceptions) 的过程。
## 抛出 HTTPExceptions
你可以通过指定状态码,以及消息或自定义响应来抛出你自己的 HTTPExceptions。
### 自定义消息
对于基本的 `text` 响应,只需设置错误 `message`。
```ts twoslash
import { HTTPException } from 'hono/http-exception'
throw new HTTPException(401, { message: 'Unauthorized' })
```
### 自定义响应
对于其他响应类型,或者要设置响应头,请使用 `res` 选项。_注意,传递给构造函数的状态码是用于创建响应的状态码。_
```ts twoslash
import { HTTPException } from 'hono/http-exception'
const errorResponse = new Response('Unauthorized', {
status: 401, // 这将被忽略
headers: {
Authenticate: 'error="invalid_token"',
},
})
throw new HTTPException(401, { res: errorResponse })
```
### 原因
在任何一种情况下,你都可以使用 [`cause`](https://developer.mozilla.org/en-US/docs/Web/JavaScript/Reference/Global_Objects/Error/cause) 选项向 HTTPException 添加任意数据。
```ts twoslash
import { Hono, Context } from 'hono'
import { HTTPException } from 'hono/http-exception'
const app = new Hono()
declare const message: string
declare const authorize: (c: Context) => Promise
// ---cut---
app.post('/login', async (c) => {
try {
await authorize(c)
} catch (cause) {
throw new HTTPException(401, { message, cause })
}
return c.redirect('/')
})
```
## 处理 HTTPExceptions
你可以使用 [`app.onError`](/docs/api/hono#error-handling) 处理未捕获的 HTTPExceptions。它们包含一个 `getResponse` 方法,该方法返回一个新的 `Response`,该响应是根据错误 `status` 创建的,并使用错误 `message` 或抛出错误时设置的 [自定义响应](#custom-response)。
```ts twoslash
import { Hono } from 'hono'
const app = new Hono()
// ---cut---
import { HTTPException } from 'hono/http-exception'
// ...
app.onError((err, c) => {
if (err instanceof HTTPException) {
// 返回 HTTPException 生成的错误响应
return err.getResponse()
}
// 对于任何其他意外错误,记录日志并返回通用的 500 响应
console.error(err)
return c.text('Internal Server Error', 500)
})
```
::: warning
**`HTTPException.getResponse` 不知道 `Context`**。要包含已在 `Context` 中设置的头,你必须将它们应用到一个新的 `Response` 上。
:::
# 应用 - Hono
`Hono` 是主要对象。
它将首先被导入并一直使用到最后。
```ts twoslash
import { Hono } from 'hono'
const app = new Hono()
//...
export default app // 用于 Cloudflare Workers 或 Bun
```
## 方法
`Hono` 的实例拥有以下方法。
- app.**HTTP_METHOD**(\[path,\]handler|middleware...)
- app.**all**(\[path,\]handler|middleware...)
- app.**on**(method|method[], path|path[], handler|middleware...)
- app.**use**(\[path,\]middleware)
- app.**route**(path, \[app\])
- app.**basePath**(path)
- app.**notFound**(handler)
- app.**onError**(err, handler)
- app.**mount**(path, anotherApp)
- app.**fire**()
- app.**fetch**(request, env, event)
- app.**request**(path, options)
其中第一部分用于路由,请参阅 [路由部分](/docs/api/routing)。
## 未找到
`app.notFound` 允许你自定义未找到响应。
```ts twoslash
import { Hono } from 'hono'
const app = new Hono()
// ---cut---
app.notFound((c) => {
return c.text('Custom 404 Message', 404)
})
```
:::warning
`notFound` 方法仅从顶层应用调用。更多信息,请参阅此 [issue](https://github.com/honojs/hono/issues/3465#issuecomment-2381210165)。
:::
## 错误处理
`app.onError` 允许你处理未捕获的错误并返回自定义响应。
```ts twoslash
import { Hono } from 'hono'
const app = new Hono()
// ---cut---
app.onError((err, c) => {
console.error(`${err}`)
return c.text('Custom Error Message', 500)
})
```
::: info
如果父应用及其路由都有 `onError` 处理程序,则路由级处理程序优先。
:::
## fire()
::: warning
**`app.fire()` 已弃用**。请改用 `hono/service-worker` 中的 `fire()`。详见 [Service Worker 文档](/docs/getting-started/service-worker)。
:::
`app.fire()` 自动添加一个全局 `fetch` 事件监听器。
这对于遵循 [Service Worker API](https://developer.mozilla.org/en-US/docs/Web/API/Service_Worker_API) 的环境很有用,例如 [非 ES 模块 Cloudflare Workers](https://developers.cloudflare.com/workers/reference/migrate-to-module-workers/)。
`app.fire()` 为你执行以下操作:
```ts
addEventListener('fetch', (event: FetchEventLike): void => {
event.respondWith(this.dispatch(...))
})
```
## fetch()
`app.fetch` 将成为你的应用程序入口点。
对于 Cloudflare Workers,你可以使用以下内容:
```ts twoslash
import { Hono } from 'hono'
const app = new Hono()
type Env = any
type ExecutionContext = any
// ---cut---
export default {
fetch(request: Request, env: Env, ctx: ExecutionContext) {
return app.fetch(request, env, ctx)
},
}
```
或者直接这样做:
```ts twoslash
import { Hono } from 'hono'
const app = new Hono()
// ---cut---
export default app
```
Bun:
```ts
export default app // [!code --]
export default { // [!code ++]
port: 3000, // [!code ++]
fetch: app.fetch, // [!code ++]
} // [!code ++]
```
## request()
`request` 是一个用于测试的有用方法。
你可以传递 URL 或路径名来发送 GET 请求。
`app` 将返回一个 `Response` 对象。
```ts twoslash
import { Hono } from 'hono'
const app = new Hono()
declare const test: (name: string, fn: () => void) => void
declare const expect: (value: any) => any
// ---cut---
test('GET /hello is ok', async () => {
const res = await app.request('/hello')
expect(res.status).toBe(200)
})
```
你也可以传递一个 `Request` 对象:
```ts twoslash
import { Hono } from 'hono'
const app = new Hono()
declare const test: (name: string, fn: () => void) => void
declare const expect: (value: any) => any
// ---cut---
test('POST /message is ok', async () => {
const req = new Request('Hello!', {
method: 'POST',
})
const res = await app.request(req)
expect(res.status).toBe(201)
})
```
## mount()
`mount()` 允许你将使用其他框架构建的应用挂载到你的 Hono 应用中。
```ts
import { Router as IttyRouter } from 'itty-router'
import { Hono } from 'hono'
// 创建 itty-router 应用
const ittyRouter = IttyRouter()
// 处理 `GET /itty-router/hello`
ittyRouter.get('/hello', () => new Response('Hello from itty-router'))
// Hono 应用
const app = new Hono()
// 挂载!
app.mount('/itty-router', ittyRouter.handle)
```
## 严格模式
严格模式默认为 `true` 并区分以下路由。
- `/hello`
- `/hello/`
`app.get('/hello')` 不会匹配 `GET /hello/`。
通过将严格模式设置为 `false`,两条路径将被同等对待。
```ts twoslash
import { Hono } from 'hono'
// ---cut---
const app = new Hono({ strict: false })
```
## router 选项
`router` 选项指定使用哪个路由器。默认路由器是 `SmartRouter`。如果你想使用 `RegExpRouter`,将其传递给新的 `Hono` 实例:
```ts twoslash
import { Hono } from 'hono'
// ---cut---
import { RegExpRouter } from 'hono/router/reg-exp-router'
const app = new Hono({ router: new RegExpRouter() })
```
## 泛型
你可以传递泛型来指定 `c.set`/`c.get` 中使用的 Cloudflare Workers Bindings 和变量的类型。
```ts twoslash
import { Hono } from 'hono'
type User = any
declare const user: User
// ---cut---
type Bindings = {
TOKEN: string
}
type Variables = {
user: User
}
const app = new Hono<{
Bindings: Bindings
Variables: Variables
}>()
app.use('/auth/*', async (c, next) => {
const token = c.env.TOKEN // token 是 `string`
// ...
c.set('user', user) // user 应该是 `User`
await next()
})
```
# API
Hono 的 API 很简单。
仅由基于 Web 标准扩展的对象组成。
因此,你可以很快上手。
在本节中,我们将介绍 Hono 的 API,如下所示。
- Hono 对象
- 关于路由
- 上下文对象
- 关于中间件
# 预设
Hono 拥有多个路由器,每个路由器都为特定目的而设计。
您可以在 Hono 的构造函数中指定想要使用的路由器。
**预设** 是为常见用例提供的,因此您不必每次都指定路由器。
从所有预设中导入的 `Hono` 类是相同的,唯一区别在于路由器。
因此,您可以互换使用它们。
## `hono`
用法:
```ts twoslash
import { Hono } from 'hono'
```
路由器:
```ts
this.router = new SmartRouter({
routers: [new RegExpRouter(), new TrieRouter()],
})
```
## `hono/quick`
用法:
```ts twoslash
import { Hono } from 'hono/quick'
```
路由器:
```ts
this.router = new SmartRouter({
routers: [new LinearRouter(), new TrieRouter()],
})
```
## `hono/tiny`
用法:
```ts twoslash
import { Hono } from 'hono/tiny'
```
路由器:
```ts
this.router = new PatternRouter()
```
## 我应该使用哪个预设?
| 预设 | 适合的平台 |
| ------------ | ------------------------------------------------------------------------------------------------------------------------------------------------------------------------------------------------------------------------------------------------------------------------------------------------------------------------------------------------------------------------------------------------------------------------------------------------------------------------------------------------------------------------------------------ |
| `hono` | 这是大多数用例的强烈推荐选项。虽然注册阶段可能比 `hono/quick` 慢,但一旦启动,它表现出高性能。它非常适合使用 **Deno**、**Bun** 或 **Node.js** 构建的长生命周期服务器。它也适用于 **Fastly Compute**,因为在该平台上路由注册发生在应用构建阶段。对于利用 v8 isolates 的环境,如 **Cloudflare Workers**、**Deno Deploy**,此预设也适用。因为隔离在启动后会持续一定时间。 |
| `hono/quick` | 此预设专为每个请求都初始化应用程序的环境而设计。 |
| `hono/tiny` | 这是最小的路由器包,适用于资源有限的环境。 |
# HonoRequest
`HonoRequest` 是一个对象,可以从 `c.req` 获取,它包装了一个 [Request](https://developer.mozilla.org/en-US/docs/Web/API/Request) 对象。
## param()
获取路径参数的值。
```ts twoslash
import { Hono } from 'hono'
const app = new Hono()
// ---cut---
// 捕获的参数
app.get('/entry/:id', async (c) => {
const id = c.req.param('id')
// ^?
// ...
})
// 一次性获取所有参数
app.get('/entry/:id/comment/:commentId', async (c) => {
const { id, commentId } = c.req.param()
// ^?
})
```
## query()
获取查询字符串参数。
```ts twoslash
import { Hono } from 'hono'
const app = new Hono()
// ---cut---
// 查询参数
app.get('/search', async (c) => {
const query = c.req.query('q')
// ^?
})
// 一次性获取所有参数
app.get('/search', async (c) => {
const { q, limit, offset } = c.req.query()
// ^?
})
```
## queries()
获取多个查询字符串参数值,例如 `/search?tags=A&tags=B`
```ts twoslash
import { Hono } from 'hono'
const app = new Hono()
// ---cut---
app.get('/search', async (c) => {
// tags 将是 string[]
const tags = c.req.queries('tags')
// ^?
// ...
})
```
## header()
获取请求头值。
```ts twoslash
import { Hono } from 'hono'
const app = new Hono()
// ---cut---
app.get('/', (c) => {
const userAgent = c.req.header('User-Agent')
// ^?
return c.text(`Your user agent is ${userAgent}`)
})
```
::: warning
当不带参数调用 `c.req.header()` 时,返回记录中的所有键都是 **小写** 的。
如果你想获取大写名称的请求头的值,
请使用 `c.req.header("X-Foo")`。
```ts
// ❌ 不起作用
const headerRecord = c.req.header()
const foo = headerRecord['X-Foo']
// ✅ 起作用
const foo = c.req.header('X-Foo')
```
:::
## parseBody()
解析类型为 `multipart/form-data` 或 `application/x-www-form-urlencoded` 的请求体
```ts twoslash
import { Hono } from 'hono'
const app = new Hono()
// ---cut---
app.post('/entry', async (c) => {
const body = await c.req.parseBody()
// ...
})
```
`parseBody()` 支持以下行为。
**单个文件**
```ts twoslash
import { Context } from 'hono'
declare const c: Context
// ---cut---
const body = await c.req.parseBody()
const data = body['foo']
// ^?
```
`body['foo']` 是 `(string | File)`。
如果上传了多个文件,将使用最后一个。
### 多个文件
```ts twoslash
import { Context } from 'hono'
declare const c: Context
// ---cut---
const body = await c.req.parseBody()
body['foo[]']
```
`body['foo[]']` 始终是 `(string | File)[]`。
`[]` 后缀是必需的。
### 多个文件或同名字段
如果你有一个允许多个 `` 的输入字段,或者多个具有相同名称的复选框 ``。
```ts twoslash
import { Context } from 'hono'
declare const c: Context
// ---cut---
const body = await c.req.parseBody({ all: true })
body['foo']
```
`all` 选项默认是禁用的。
- 如果 `body['foo']` 是多个文件,它将被解析为 `(string | File)[]`。
- 如果 `body['foo']` 是单个文件,它将被解析为 `(string | File)`。
### 点表示法
如果你将 `dot` 选项设置为 `true`,返回值将基于点表示法进行结构化。
想象接收以下数据:
```ts twoslash
const data = new FormData()
data.append('obj.key1', 'value1')
data.append('obj.key2', 'value2')
```
你可以通过将 `dot` 选项设置为 `true` 来获取结构化值:
```ts twoslash
import { Context } from 'hono'
declare const c: Context
// ---cut---
const body = await c.req.parseBody({ dot: true })
// body 是 `{ obj: { key1: 'value1', key2: 'value2' } }`
```
## json()
解析类型为 `application/json` 的请求体
```ts twoslash
import { Hono } from 'hono'
const app = new Hono()
// ---cut---
app.post('/entry', async (c) => {
const body = await c.req.json()
// ...
})
```
## text()
解析类型为 `text/plain` 的请求体
```ts twoslash
import { Hono } from 'hono'
const app = new Hono()
// ---cut---
app.post('/entry', async (c) => {
const body = await c.req.text()
// ...
})
```
## arrayBuffer()
将请求体解析为 `ArrayBuffer`
```ts twoslash
import { Hono } from 'hono'
const app = new Hono()
// ---cut---
app.post('/entry', async (c) => {
const body = await c.req.arrayBuffer()
// ...
})
```
## blob()
将请求体解析为 `Blob`。
```ts twoslash
import { Hono } from 'hono'
const app = new Hono()
// ---cut---
app.post('/entry', async (c) => {
const body = await c.req.blob()
// ...
})
```
## formData()
将请求体解析为 `FormData`。
```ts twoslash
import { Hono } from 'hono'
const app = new Hono()
// ---cut---
app.post('/entry', async (c) => {
const body = await c.req.formData()
// ...
})
```
## valid()
获取验证后的数据。
```
app.post('/posts', async (c) => {
const { title, body } = c.req.valid('form')
// ...
})
```
可用的目标如下。
- `form`
- `json`
- `query`
- `header`
- `cookie`
- `param`
参见 [验证部分](/docs/guides/validation) 了解使用示例。
## routePath
::: warning
**已在 v4.8.0 中弃用**:此属性已弃用。请改用 [路由助手](/docs/helpers/route) 中的 `routePath()`。
:::
你可以像在这样在处理程序中检索注册的路径:
```ts twoslash
import { Hono } from 'hono'
const app = new Hono()
// ---cut---
app.get('/posts/:id', (c) => {
return c.json({ path: c.req.routePath })
})
```
如果你访问 `/posts/123`,它将返回 `/posts/:id`:
```json
{ "path": "/posts/:id" }
```
## matchedRoutes
::: warning
**已在 v4.8.0 中弃用**:此属性已弃用。请改用 [路由助手](/docs/helpers/route) 中的 `matchedRoutes()`。
:::
它返回处理程序中匹配的路由,这对于调试很有用。
```ts twoslash
import { Hono } from 'hono'
const app = new Hono()
// ---cut---
app.use(async function logger(c, next) {
await next()
c.req.matchedRoutes.forEach(({ handler, method, path }, i) => {
const name =
handler.name ||
(handler.length < 2 ? '[handler]' : '[middleware]')
console.log(
method,
' ',
path,
' '.repeat(Math.max(10 - path.length, 0)),
name,
i === c.req.routeIndex ? '<- respond from here' : ''
)
})
})
```
## path
请求路径名。
```ts twoslash
import { Hono } from 'hono'
const app = new Hono()
// ---cut---
app.get('/about/me', async (c) => {
const pathname = c.req.path // `/about/me`
// ...
})
```
## url
请求 URL 字符串。
```ts twoslash
import { Hono } from 'hono'
const app = new Hono()
// ---cut---
app.get('/about/me', async (c) => {
const url = c.req.url // `http://localhost:8787/about/me`
// ...
})
```
## method
请求的方法名。
```ts twoslash
import { Hono } from 'hono'
const app = new Hono()
// ---cut---
app.get('/about/me', async (c) => {
const method = c.req.method // `GET`
// ...
})
```
## raw
原始 [`Request`](https://developer.mozilla.org/en-US/docs/Web/API/Request) 对象。
```ts
// 对于 Cloudflare Workers
app.post('/', async (c) => {
const metadata = c.req.raw.cf?.hostMetadata?
// ...
})
```
## cloneRawRequest()
从 HonoRequest 克隆原始 Request 对象。即使在请求体已被验证器或 HonoRequest 方法消耗后也能工作。
```ts twoslash
import { Hono } from 'hono'
const app = new Hono()
import { cloneRawRequest } from 'hono/request'
import { validator } from 'hono/validator'
app.post(
'/forward',
validator('json', (data) => data),
async (c) => {
// 验证后克隆
const clonedReq = await cloneRawRequest(c.req)
// 不会抛出错误
await clonedReq.json()
// ...
}
)
```
# 路由
Hono 的路由灵活且直观。
让我们来看看。
## 基础
```ts twoslash
import { Hono } from 'hono'
const app = new Hono()
// ---cut---
// HTTP 方法
app.get('/', (c) => c.text('GET /'))
app.post('/', (c) => c.text('POST /'))
app.put('/', (c) => c.text('PUT /'))
app.delete('/', (c) => c.text('DELETE /'))
// 通配符
app.get('/wild/*/card', (c) => {
return c.text('GET /wild/*/card')
})
// 任意 HTTP 方法
app.all('/hello', (c) => c.text('Any Method /hello'))
// 自定义 HTTP 方法
app.on('PURGE', '/cache', (c) => c.text('PURGE Method /cache'))
// 多个方法
app.on(['PUT', 'DELETE'], '/post', (c) =>
c.text('PUT or DELETE /post')
)
// 多个路径
app.on('GET', ['/hello', '/ja/hello', '/en/hello'], (c) =>
c.text('Hello')
)
```
## 路径参数
```ts twoslash
import { Hono } from 'hono'
const app = new Hono()
// ---cut---
app.get('/user/:name', async (c) => {
const name = c.req.param('name')
// ^?
// ...
})
```
或者一次性获取所有参数:
```ts twoslash
import { Hono } from 'hono'
const app = new Hono()
// ---cut---
app.get('/posts/:id/comment/:comment_id', async (c) => {
const { id, comment_id } = c.req.param()
// ^?
// ...
})
```
## 可选参数
```ts twoslash
import { Hono } from 'hono'
const app = new Hono()
// ---cut---
// 将匹配 `/api/animal` 和 `/api/animal/:type`
app.get('/api/animal/:type?', (c) => c.text('Animal!'))
```
## 正则表达式
```ts twoslash
import { Hono } from 'hono'
const app = new Hono()
// ---cut---
app.get('/post/:date{[0-9]+}/:title{[a-z]+}', async (c) => {
const { date, title } = c.req.param()
// ^?
// ...
})
```
## 包含斜杠
```ts twoslash
import { Hono } from 'hono'
const app = new Hono()
// ---cut---
app.get('/posts/:filename{.+\\.png}', async (c) => {
//...
})
```
## 链式路由
```ts twoslash
import { Hono } from 'hono'
const app = new Hono()
// ---cut---
app
.get('/endpoint', (c) => {
return c.text('GET /endpoint')
})
.post((c) => {
return c.text('POST /endpoint')
})
.delete((c) => {
return c.text('DELETE /endpoint')
})
```
## 分组
你可以使用 Hono 实例对路由进行分组,并使用 route 方法将它们添加到主应用中。
```ts twoslash
import { Hono } from 'hono'
// ---cut---
const book = new Hono()
book.get('/', (c) => c.text('List Books')) // GET /book
book.get('/:id', (c) => {
// GET /book/:id
const id = c.req.param('id')
return c.text('Get Book: ' + id)
})
book.post('/', (c) => c.text('Create Book')) // POST /book
const app = new Hono()
app.route('/book', book)
```
## 不改变基础路径的分组
你也可以在保持基础路径的同时对多个实例进行分组。
```ts twoslash
import { Hono } from 'hono'
// ---cut---
const book = new Hono()
book.get('/book', (c) => c.text('List Books')) // GET /book
book.post('/book', (c) => c.text('Create Book')) // POST /book
const user = new Hono().basePath('/user')
user.get('/', (c) => c.text('List Users')) // GET /user
user.post('/', (c) => c.text('Create User')) // POST /user
const app = new Hono()
app.route('/', book) // 处理 /book
app.route('/', user) // 处理 /user
```
## 基础路径
你可以指定基础路径。
```ts twoslash
import { Hono } from 'hono'
// ---cut---
const api = new Hono().basePath('/api')
api.get('/book', (c) => c.text('List Books')) // GET /api/book
```
## 带主机名的路由
如果包含主机名,它也能正常工作。
```ts twoslash
import { Hono } from 'hono'
// ---cut---
const app = new Hono({
getPath: (req) => req.url.replace(/^https?:\/([^?]+).*$/, '$1'),
})
app.get('/www1.example.com/hello', (c) => c.text('hello www1'))
app.get('/www2.example.com/hello', (c) => c.text('hello www2'))
```
## 使用 `host` Header 值的路由
如果你在 Hono 构造函数中设置了 `getPath()` 函数,Hono 可以处理 `host` header 值。
```ts twoslash
import { Hono } from 'hono'
// ---cut---
const app = new Hono({
getPath: (req) =>
'/' +
req.headers.get('host') +
req.url.replace(/^https?:\/\/[^/]+(\/[^?]*).*/, '$1'),
})
app.get('/www1.example.com/hello', (c) => c.text('hello www1'))
// 以下请求将匹配该路由:
// new Request('http://www1.example.com/hello', {
// headers: { host: 'www1.example.com' },
// })
```
通过应用这一点,例如,你可以根据 `User-Agent` header 更改路由。
## 路由优先级
处理程序或中间件将按照注册顺序执行。
```ts twoslash
import { Hono } from 'hono'
const app = new Hono()
// ---cut---
app.get('/book/a', (c) => c.text('a')) // a
app.get('/book/:slug', (c) => c.text('common')) // common
```
```
GET /book/a ---> `a`
GET /book/b ---> `common`
```
当处理程序执行时,过程将停止。
```ts twoslash
import { Hono } from 'hono'
const app = new Hono()
// ---cut---
app.get('*', (c) => c.text('common')) // common
app.get('/foo', (c) => c.text('foo')) // foo
```
```
GET /foo ---> `common` // foo 不会被分发
```
如果你有想要执行的中间件,请将代码写在处理程序上方。
```ts twoslash
import { Hono } from 'hono'
import { logger } from 'hono/logger'
const app = new Hono()
// ---cut---
app.use(logger())
app.get('/foo', (c) => c.text('foo'))
```
如果你想要一个 "_fallback_"(回退)处理程序,请将代码写在其他处理程序下方。
```ts twoslash
import { Hono } from 'hono'
const app = new Hono()
// ---cut---
app.get('/bar', (c) => c.text('bar')) // bar
app.get('*', (c) => c.text('fallback')) // fallback
```
```
GET /bar ---> `bar`
GET /foo ---> `fallback`
```
## 分组顺序
请注意,路由分组的错误很难被发现。
`route()` 函数从第二个参数(例如 `three` 或 `two`)获取存储的路由,并将其添加到自身(`two` 或 `app`)的路由中。
```ts
three.get('/hi', (c) => c.text('hi'))
two.route('/three', three)
app.route('/two', two)
export default app
```
它将返回 200 响应。
```
GET /two/three/hi ---> `hi`
```
然而,如果顺序错误,它将返回 404。
```ts twoslash
import { Hono } from 'hono'
const app = new Hono()
const two = new Hono()
const three = new Hono()
// ---cut---
three.get('/hi', (c) => c.text('hi'))
app.route('/two', two) // `two` 没有路由
two.route('/three', three)
export default app
```
```
GET /two/three/hi ---> 404 Not Found
```